Organizing Kids Maker Space
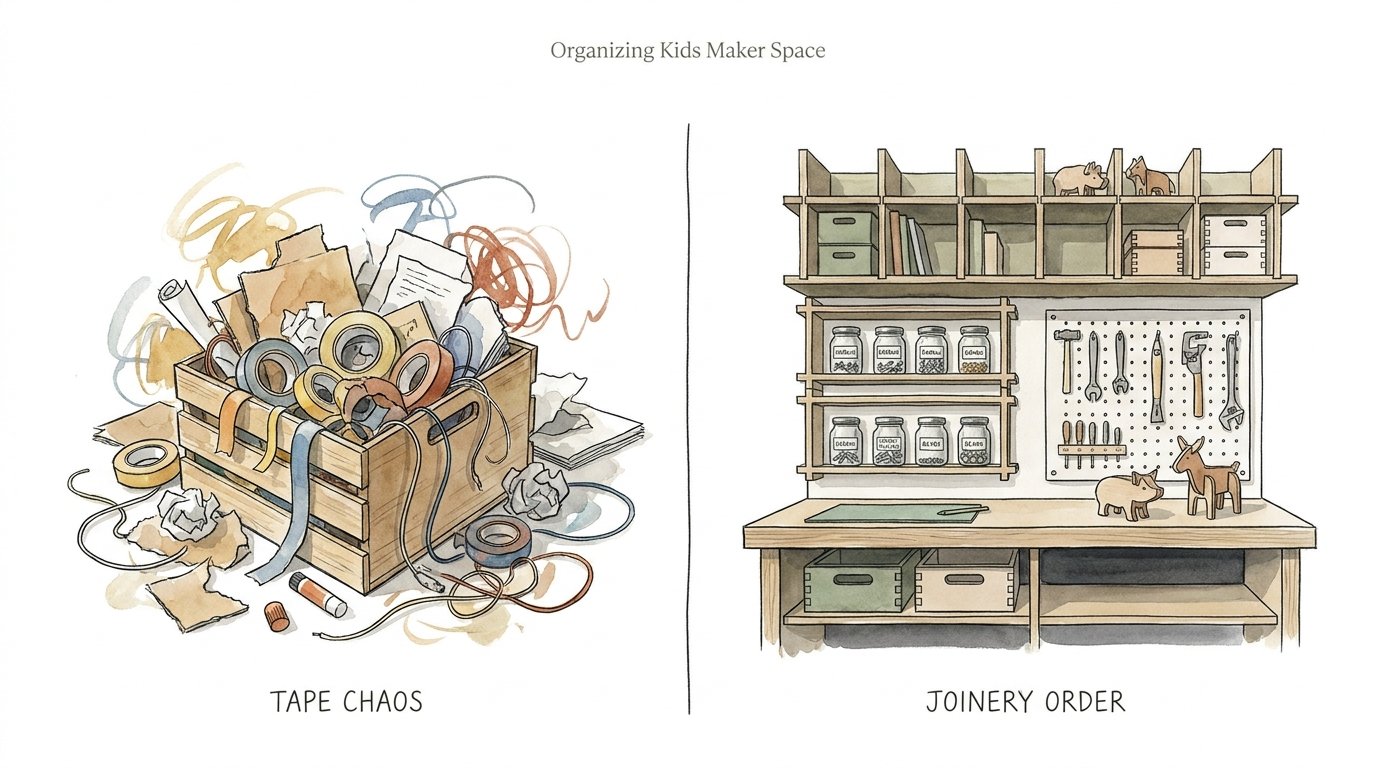
When the materials are a mess, the mind is a mess. See how ‘Joinery Order’ ignites a child’s mechanical genius. We wonder why kids lose interest in ‘making’ so quickly. It’s often because they spend 80% of their energy fighting the tape dispenser. A dedicated Joinery Station turns the ‘how do I stick this?’ frustration into a ‘which fastener is best?’ engineering decision.
Speaking directly to you, the parent or educator, this guide is about more than just cleaning up. It’s about designing a cognitive environment where a child’s spatial reasoning can flourish without the friction of a disorganized junk drawer.
Introduce your young maker to the world of structural connections. When we move from ‘Tape Chaos’ to ‘Joinery Order,’ we shift the child’s focus from merely surviving a project to mastering the mechanics of how things actually fit together.
Organizing Kids Maker Space
Organizing a kids’ maker space begins with the Joinery Station. This is the central hub where all fasteners, adhesives, and connectors live. In the real world, engineers don’t just ‘tape’ things; they choose the right joint for the right load. A Joinery Station replicates this professional environment by categorizing materials based on their mechanical function.
Imagine a space divided into clear, logical zones. One zone is for ‘Sticky’ connections like tapes and glues. Another is for ‘Mechanical’ connections like screws, nuts, and bolts. A third might be for ‘Structural’ aids like brackets or gussets. This organization helps children visualize their options before they even pick up a tool.
Think of it like a chef’s mise en place. When every spice and tool is in its place, the chef can focus on the flavor. In a maker space, when every fastener is labeled and accessible, the child can focus on the engineering. It turns a chaotic pile of scraps into a library of possibilities.
How the Joinery Station Works
The Joinery Station operates on the principle of ‘Functional Categorization.’ You aren’t just sorting items by color or size; you are sorting them by how they perform. This teaches children to think about the physical properties of their materials.
First, establish a ‘Tinker Zone’ for mechanical fasteners. Use clear bins for items like split pins (brads), zip ties, and rubber bands. Research shows that as children reach the ages of 3 to 6, they begin to move from simple physical manipulation to mental trial-and-error. Providing visible, organized fasteners supports this transition by allowing them to ‘mentally prototype’ which connection will work.
Second, create a ‘Sticky Zone’ for adhesives. This includes masking tape, painter’s tape, and hot glue. Masking tape is often superior to clear tape because it is easier to tear and manipulate for small hands. For cardboard projects, provide specialized tools like ‘Makedo’ screws, which are plastic fasteners designed specifically for thick corrugation.
Finally, include a ‘Structural Zone’ for reinforcements. Store triangular cardboard scraps (gussets), ‘L’ brackets made of folded cardstock, and wooden skewers here. These items help kids understand how to stabilize a 90-degree joint or create a pivot point.
Benefits of Joinery Order
A well-organized Joinery Station provides measurable cognitive and emotional benefits. The most significant is the development of an ‘Engineering Mindset.’ When a child has to choose between a zip tie and a bead of hot glue, they are practicing critical thinking and decision-making.
By reducing the ‘search time’ for materials, you increase the ‘flow state’ time. Makerspaces are known to improve spatial reasoning and computational thinking. When a child can find a 1-inch screw instantly, they don’t lose the mental thread of their design. They stay in the ‘zone’ longer, leading to more complex and successful projects.
Another major benefit is resilience. Engineering involves a cycle of ‘prototype, test, fail, and refine.’ In a disorganized space, failure feels like a mess. In an organized space, failure is just a prompt to go back to the Joinery Station and try a different fastener. This builds ‘grit’—the ability to sustain effort toward a long-term goal.
Challenges and Common Mistakes
One of the biggest pitfalls is ‘Adhesive Overload.’ Children often default to using massive amounts of tape or glue to solve every problem. This ‘Tape Chaos’ hides the underlying mechanical issues of their build. They might think they need more tape, when what they actually need is a structural gusset or a better-placed screw.
Another mistake is neglecting safety education. Hot glue guns are incredible tools, but they can cause burns if not handled correctly. A common error is providing high-temperature guns to very young children without proper supervision or heat-resistant surfaces.
Finally, avoid the ‘Hidden Material’ trap. If the fasteners are tucked away in opaque boxes or high cupboards, the child won’t use them. They will default to whatever is on the table, which is usually just a roll of scotch tape. Visibility is the key to mechanical variety.
Limitations of the Joinery Station
While a Joinery Station is powerful, it has realistic constraints. For very young toddlers (under 3), the small parts like nuts and bolts are a choking hazard. For this age group, the station should focus on large-scale connectors like oversized velcro or magnetic blocks.
Environmental limitations also play a role. Some adhesives, like wood glue, require long cure times that don’t align with a child’s desire for immediate results. In these cases, the Joinery Station might ‘fail’ to keep the child’s interest if they have to wait 24 hours for a birdhouse to dry.
There is also a ‘Cognitive Ceiling.’ Research suggests that children between 6 and 10 often struggle to verbally explain how a mechanism works, even if they can build it. Expecting them to justify every engineering decision can lead to frustration. The goal should be physical exploration first, verbalization second.
Comparison: Tape vs. Mechanical Fasteners
| Feature | Tape (Adhesives) | Mechanical (Screws/Ties) |
|---|---|---|
| Skill Level | Low (Easy to apply) | Medium (Requires tool use) |
| Reusability | Zero (One-time use) | High (Can be unscrewed) |
| Structural Strength | Moderate (Surface only) | High (Core connection) |
| Mess Factor | High (Sticky residue) | Low (Dry parts) |
Practical Tips for Best Results
To keep the Joinery Station running efficiently, follow these best practices:
- Use Visual Labels: Don’t just write ‘Screws.’ Include a picture of the screw. This helps younger children who are still developing literacy skills.
- Implement a ‘Back Pantry’: Don’t put out every material at once. Rotate your fasteners monthly to keep the space feeling fresh and to prevent overwhelm.
- Provide ‘Scrap Support’: Keep a bin of pre-cut cardboard shapes (circles, triangles, long strips) near the fasteners. This allows kids to test a joint quickly without having to stop and cut a new piece.
- The ‘High/Low’ Glue Strategy: Use low-temp glue guns for quick builds and high-temp guns (with supervision) for structural connections that need to seep into cardboard flutes for a stronger bond.
Advanced Considerations for Makers
For serious practitioners or older children, consider introducing pivot joints and linkages. Instead of just sticking two pieces of cardboard together, show them how to use a split pin and a washer to create a moving arm. This introduces the concept of ‘degrees of freedom.’
You can also scale the Joinery Station by adding 3D printed adapters. These can bridge the gap between different materials, such as connecting a wooden dowel to a plastic bottle. This type of ‘hybrid joinery’ is a hallmark of professional prototyping.
Consider the role of ‘External Models.’ Just as engineers use CAD software to offload cognitive strain, children can use sketches or physical ‘samples’ of different joints. Create a ‘Joint Library’—a board with examples of a lap joint, a slot joint, and a flange joint already made. This gives them a physical reference to look at when they get stuck.
Example Scenario: The Cardboard Rover
Let’s look at how Joinery Order changes a simple project like building a cardboard rover.
In a ‘Tape Chaos’ environment, a child might try to tape round plastic lids to the side of a box. The wheels won’t turn, the tape will peel off, and the child will likely get frustrated and quit.
In a ‘Joinery Order’ environment, the child looks at the Joinery Station. They see ‘Pivots.’ They find a wooden skewer (axle) and a straw (sleeve). They realize they can poke the skewer through the box and the straw, then attach the wheels to the skewer using hot glue or a rubber band stopper. By choosing a mechanical connection over a sticky one, they have successfully engineered a vehicle with moving parts.
This transition from ‘stuck on’ to ‘mechanically linked’ is where the magic happens. The child isn’t just making a craft; they are building a machine.
Final Thoughts
Transforming your maker space from a pile of supplies into a structured Joinery Station is the fastest way to level up a child’s creative output. When we remove the friction of ‘Tape Chaos,’ we clear a path for the child’s mechanical genius to emerge. It turns every project into a series of meaningful engineering choices.
Remember that the goal isn’t just a clean room. The goal is a clear mind. By providing order, labels, and functional categories, you are giving the young maker the tools they need to navigate the ‘wall’ of frustration and find the joy of true invention.
Encourage your child to experiment with new connections today. Start small—perhaps just by adding a bin of zip ties or a few ‘Makedo’ screws—and watch how their builds become more stable, more complex, and more ingenious. The journey from maker to engineer begins with the right joint.
Sources
1 instructables.com | 2 myteachingcupboard.com | 3 adafruit.com | 4 remakelearning.org | 5 rit.edu