Diy Backyard Water Play Drainage Solutions
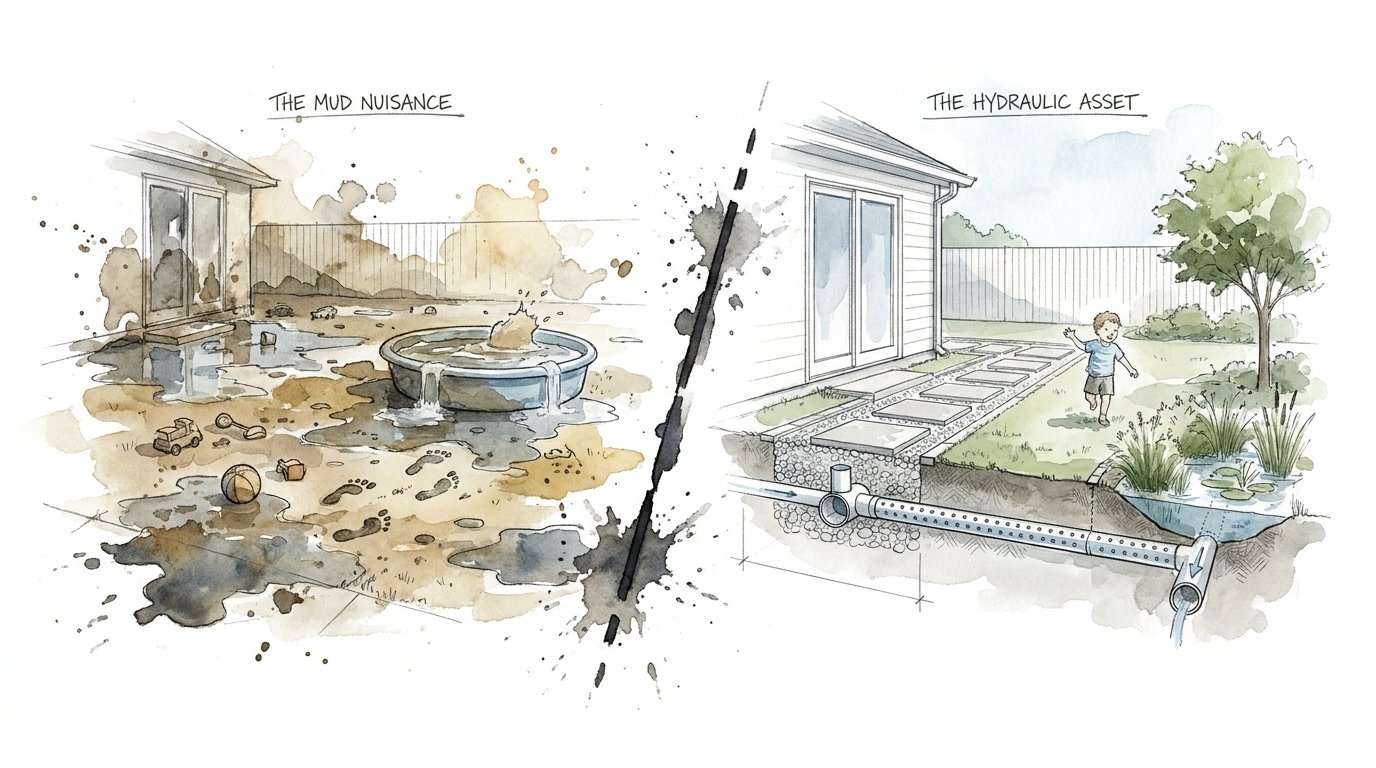
That annoying low spot in your yard isn’t a landscaping failure—it’s the foundation of a world-class physics laboratory. Most homeowners spend hundreds on fill dirt to ‘fix’ backyard drainage issues. Pro parents realize that a natural low spot is actually a gift. We transformed our standing water problem into a gravity-fed play stream that keeps the kids engaged for hours while naturally filtering runoff into the soil. Here is how we turned a nuisance into the neighborhood’s favorite asset.

Turning a swampy corner into a high-performance play space requires more than just moving dirt. It involves understanding how water moves through your specific landscape. You can replace the endless cycle of “stay out of the mud” with a system that invites interaction. This guide will walk you through the engineering, material selection, and safety protocols to build a drainage system that doubles as an outdoor classroom.
Diy Backyard Water Play Drainage Solutions
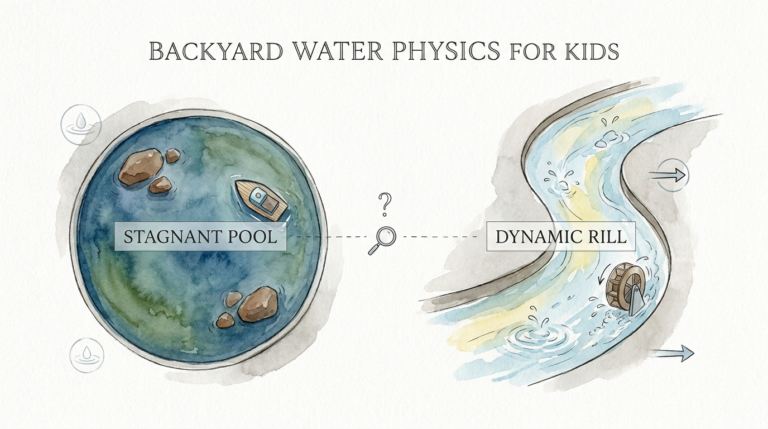
Diy Backyard Water Play Drainage Solutions are landscape features designed to manage excess rainwater by directing it through a visible, interactive channel rather than hiding it underground in pipes. Instead of a traditional French drain—which uses a perforated pipe buried in gravel—these solutions use “dry creek beds” or “ephemeral streams.” These features remain dry most of the time but spring to life during rain events or when you activate a garden hose for playtime.
In the real world, this concept is known as Green Stormwater Infrastructure. Cities use similar “bioswales” to prevent flooding and filter pollutants before they reach local rivers. In your backyard, this system acts as a natural filter. As water travels over river rocks and through the roots of native plants, sediment and lawn chemicals are trapped, allowing cleaner water to soak back into the groundwater table.
Imagine your yard as a miniature watershed. A well-designed play stream creates a controlled path for water to follow, preventing it from undercutting your driveway or flooding your foundation. It’s the difference between fighting nature and collaborating with it. You are essentially building a custom-designed escape route for water that invites kids to build dams, race leaf boats, and observe the power of gravity in real-time.

Designing the Gravity-Fed Stream
Building a functional play stream starts with a survey of your yard’s natural topography. Water always seeks the path of least resistance, and your job is to make that path both safe and beautiful. You need a minimum slope of 1 to 2 percent to keep water moving. This means for every 10 feet of stream length, the ground should drop about 2 to 3 inches.
Start by marking your path with a garden hose or landscape spray paint. Avoid straight lines; nature rarely moves in a perfect vector. Aim for gentle S-curves, which help slow the water down and prevent erosion during heavy downpours. These curves also create “eddies” and “pools,” which are the most interesting spots for kids to play.
The excavation depth is critical for both drainage and safety. Dig a trench that is approximately 8 to 12 inches deep in the center, tapering upward to the edges to create a concave shape. This profile ensures that water stays centered in the channel and doesn’t spill over the sides into your lawn. If you have heavy clay soil, consider digging a deeper “percolation pit” at the lowest point and filling it with coarse gravel to encourage faster infiltration.
Materials for Success: Liner, Rocks, and Plants
Your choice of materials determines whether your stream lasts for a season or a decade. A common mistake is using cheap plastic sheeting that tears under the weight of rocks and play. High-quality EPDM rubber pond liner is the gold standard because it is UV-resistant, flexible, and virtually indestructible. Place a layer of non-woven geotextile underlayment beneath the liner to protect it from sharp stones or roots.
Rock selection is where the “physics lab” comes to life. Use a variety of sizes to mimic a natural riparian environment:
- Large Anchor Boulders: These should be 12 to 18 inches in size. Place them at the outer bends of your curves to absorb the energy of moving water.
- River Pebbles: Use 1 to 3-inch smooth stones to line the bottom of the channel. These are easy for kids to move and rearrange into “dams.”
- Pea Gravel: This fills the gaps between larger stones, preventing the liner from being visible and providing a comfortable surface for small hands.
Avoid limestone or crushed concrete, as these can alter the pH of the water and encourage excessive algae growth. Stick to natural river rock or granite for the best long-term results.
The “Physics Lab” Component: Educational Value
A DIY play stream is more than just a drain; it is a hands-on engineering station. By including “check dams” and “weirs,” you provide children with the tools to manipulate fluid dynamics. A check dam is a small wall of rocks that creates a pool behind it. Kids can learn about potential energy as water builds up behind the stones and kinetic energy as it spills over.
You can also incorporate “stepping stones” across wider sections. This encourages balance and coordination. For older children, you can introduce more complex concepts by adding a “water wall” or a vertical pipe at the head of the stream. They can experiment with flow rates, seeing how much water it takes to move a specific sized pebble down the channel. This type of unstructured play builds a foundational understanding of civil engineering and environmental science.
Benefits of Active Drainage Over Passive Systems
Most traditional drainage solutions are “set and forget.” A French drain is effective, but it provides zero recreational value. By choosing an active play stream, you gain several measurable advantages.
First, you reduce the “heat island” effect in your backyard. Moving water and the associated vegetation can lower local temperatures by several degrees on hot summer days. Second, you create a habitat for beneficial insects and birds. Native plants along the stream edge provide food and shelter, turning your drainage problem into a biodiversity hotspot.
Finally, there is the mental health benefit. The sound of rippling water is naturally calming for both adults and children. It transforms a “nuisance area” that you used to avoid into the focal point of the garden. You aren’t just managing water; you are creating an experience.
Common Mistakes to Avoid
The most frequent error in DIY stream construction is the “Mosquito Pit” trap. If your stream doesn’t have enough slope, water will stagnate in low spots. Mosquitoes only need 24 to 48 hours of standing water to breed. Ensure your channel completely empties into a rain garden or a gravel-filled dry well within an hour of the rain stopping or the hose being turned off.
Another pitfall is ignoring the “exit strategy” for the water. If your stream ends abruptly at your property line, you may inadvertently flood your neighbor’s yard, leading to legal or social friction. Always ensure the water terminates in a designated infiltration zone on your own property, such as a rain garden filled with deep-rooted native plants like Juncus effusus (Soft Rush) or Monarda (Bee Balm).
Avoid using fine sand as a base inside the play channel. While it looks nice initially, fast-moving water will quickly wash it downstream, clogging your drainage basin and making the water murky. Stick to rounded gravel and river rock for the interior surfaces.
Limitations and Environmental Constraints
Not every yard is a candidate for a gravity-fed stream. If your yard is perfectly flat, gravity simply won’t do the work for you. In these cases, you would need to install a pump-fed system, which adds complexity and cost in the form of electrical wiring and plumbing. Furthermore, if your soil has extremely high clay content with zero percolation, a play stream might just become a long, skinny pond.
Environmental regulations are also a factor. Some municipalities have strict rules about where you can direct runoff. Before you start digging, check your local building codes. You must also call “811” or your local utility marking service to ensure you aren’t digging into gas, water, or fiber-optic lines. Safety and legality must come before any landscaping project.
Comparing Backyard Drainage Strategies
Understanding the trade-offs between different systems helps you make the right choice for your family.
| Feature | French Drain | Dry Creek Bed | Interactive Play Stream |
|---|---|---|---|
| Visibility | Hidden/Underground | Visible/Decorative | Highly Interactive |
| Maintenance | Low (can clog over time) | Moderate (weeding) | Moderate (debris removal) |
| Educational Value | None | Observational | High (STEM Learning) |
| Cost | Medium | Medium | Medium-High (Liner/Pump) |
Practical Tips for High-Energy Play
To maximize the fun and minimize the mess, incorporate a few “pro-parent” design tweaks. Place a large, flat “splash stone” at the point where the water source enters the stream. This prevents the initial surge of water from eroding your rock work. If you are using a garden hose as the primary water source, consider burying a dedicated PVC pipe to that entry point so you don’t have hoses laying across the lawn.
Install a “sediment trap” at the end of the play area. This is simply a deeper section of the stream where the water slows down significantly. Heavy sand and silt will settle here, making it easy for you to scoop out once or twice a year with a shovel. This keeps your main infiltration area or rain garden from becoming clogged with the “treasures” the kids inevitably wash downstream.
Use “waterfall foam” to secure large rocks that are meant for stepping or sitting. This specialized black foam expands to fill gaps and bonds stones together, ensuring they don’t wobble or slide when a child jumps on them. It also helps direct water over the top of rocks rather than letting it seep underneath where it can’t be seen.
Advanced Considerations: Going Beyond the Basics
For those who want to take their backyard hydraulic asset to the next level, consider integrating a rainwater harvesting system. Instead of using city water for playtime, you can use a solar-powered pump to draw water from a 500-gallon cistern that collects roof runoff. This creates a closed-loop system that is both eco-friendly and cost-effective.
You can also experiment with “biological filtration.” By creating a small “bog” area filled with gravel and specific aquatic plants like Water Iris or Pickerel Weed, you can naturally clean the water as it recirculates. This is particularly useful if you want to include a small pond at the end of the stream for frogs or local wildlife.
Another advanced technique is the use of “permeable pavers” at the entry and exit points of the stream. These allow for high-traffic play without turning the surrounding grass into a mud pit. It’s all about creating a robust system that can handle the physical energy of children as well as the hydraulic energy of a summer storm.
Example Scenario: The Suburban Slope Transformation
Consider a typical 0.25-acre suburban lot with a 3-foot drop from the back patio to the rear fence. Traditionally, this slope would wash mulch into the grass every time it rained. The homeowners excavated a 25-foot meandering channel, lined it with EPDM, and filled it with local river stone.
They added three “pools” at different elevations. In the first pool, kids use plastic gates to “hold back the flood.” In the second pool, they’ve placed several large “glacier boulders” for climbing. The stream terminates in a 10×10 foot rain garden filled with Swamp Milkweed and Switchgrass. Now, instead of a muddy slope, they have a functioning ecosystem that has completely eliminated the standing water near their patio. During dry spells, they turn on a small solar pump that recirculates water from the rain garden back to the top, providing hours of entertainment for less than $5 a month in operating costs.
Final Thoughts
Transforming your backyard drainage into a play stream is one of the most rewarding DIY projects a parent can undertake. It solves a functional problem—excess water and erosion—while providing an unparalleled environment for child-led exploration. You are moving beyond simple landscaping and into the realm of creating a living, breathing asset for your home.
Success lies in the details of the slope, the quality of the liner, and the diversity of the rock work. Start small, observe how the water moves, and don’t be afraid to adjust your design over time. The best part of a rock-based play stream is that it is infinitely reconfigurable.
Take the leap and stop fighting the rain. When you embrace the flow and build for interaction, you turn a “mud nuisance” into a world of discovery. Your yard will never be the same, and your kids will thank you for the best “physics lab” they’ve ever had.
Sources
1 naturalearning.org | 2 riverbender.com | 3 youtube.com | 4 bountifulgardens.com | 5 youtube.com | 6 thepondguy.com | 7 aggregatemarkets.com | 8 youtube.com | 9 fitzfishponds.com | 10 youtube.com | 11 exmark.com | 12 bienenstockplaygrounds.com | 13 natureplaywa.org.au | 14 ournestingspace.com | 15 pondarmor.com