Teaching Kids To Tell Time With Shadows
Is your child just watching the clock, or are they learning to read the movement of the earth itself? We’ve taught kids to read numbers on a digital screen, but we’ve lost the ancient precision of the solar day. Building a true calibrated sundial allows your child to master geometry, geography, and physics in a way a battery-powered clock never could.

Most people think a sundial is just a stick in the mud. They imagine it as a crude approximation that gets the hour “mostly right” if the sun is out. This is a massive misconception. A properly calibrated sundial is a precision instrument that reflects the celestial mechanics of our solar system. It is a bridge between the ground we stand on and the stars above.
Guiding a child through this project transforms a boring afternoon into a high-level masterclass. They stop being passive consumers of time and start becoming observers of the universe. Every shadow line they draw is a mathematical proof of Earth’s rotation. Let’s dive into how you can bring this ancient technology into your own backyard with modern scientific accuracy.
Teaching Kids To Tell Time With Shadows
A sundial is essentially a translation device. It translates the rotation of the Earth into a visual language we can understand at a glance. At its heart, it consists of two parts: the dial plate and the gnomon. The dial plate is the flat surface where we mark the hours. The gnomon is the piece that stands up and casts the shadow.
Humanity has used these tools for thousands of years. Ancient Egyptians, Babylonians, and Greeks all realized that shadows move in a predictable pattern. They used this knowledge to build massive stone obelisks and portable pocket dials. These civilizations didn’t just tell time; they tracked seasons, predicted floods, and navigated the globe using nothing but the sun and shadows.
In the real world, understanding solar time helps us grasp why we have time zones and why the sun sets later in some cities than others. It teaches kids about the “Solar Noon,” which is the exact moment the sun reaches its highest point in the sky. This isn’t always 12:00 PM on your digital watch, and discovering that gap is the first step toward scientific curiosity.
Visualizing these concepts is easy once you see the shadow move. Imagine a giant flashlight shining on a spinning basketball. If you put a toothpick on that ball, the shadow of that toothpick will travel in a curve as the ball turns. Our sundial does exactly this, but on a planetary scale. It makes the invisible motion of the Earth visible to the naked eye.
The Physics of the Solar Day
Telling time with a sundial requires us to respect the Earth’s geometry. Our planet rotates 360 degrees every 24 hours. If you divide those numbers, you find that the sun appears to move exactly 15 degrees across the sky every hour. This constant rate is the foundation of every clock ever made.
However, the Earth is tilted on its axis at about 23.5 degrees. This tilt is why we have seasons and why the sun’s path changes throughout the year. If you just stick a vertical pole in the ground, your “clock” will be wrong as the seasons change. The shadow will be longer in the winter and shorter in the summer, shifting the hour marks.
To fix this, we use a “Polar Gnomon.” This is a gnomon that points directly at the North Star (Polaris) in the Northern Hemisphere. When the gnomon is parallel to the Earth’s axis, the shadow will fall on the same hour lines regardless of whether it is June or December. This is the secret to a calibrated sundial that works year-round.
Mastering this concept introduces kids to the idea of the “Celestial Pole.” It is an imaginary point in the sky that everything else seems to rotate around. By aligning our sundial to this point, we are essentially aligning our backyard project with the rotation of the entire planet. It is a powerful realization for a young mind.
How to Build Your Calibrated Sundial
Building a precision sundial is a step-by-step process that combines craftsmanship with calculation. You can use simple materials like a paper plate and a straw, or upgrade to wood and metal for a permanent garden fixture. The key is in the setup and the angles.
First, you need to find your local latitude. This is the coordinate that tells you how far north or south of the Equator you are. You can find this easily on a map or by using a smartphone. If you live in Los Angeles, your latitude is about 34 degrees. If you are in London, it is about 51 degrees.
Second, you must create a gnomon with an angle that matches your latitude. If your latitude is 40 degrees, the angle between the gnomon’s “style” (the shadow-casting edge) and the flat dial plate must be exactly 40 degrees. You can use a protractor to cut a triangle out of cardboard to achieve this. This angle ensures the gnomon points toward the celestial pole.
Third, you need to find True North. Most people reach for a magnetic compass, but this is a mistake. Magnetic North and True North are different due to the Earth’s magnetic field. To find True North, wait for nightfall and locate Polaris (the North Star), or use the “Shadow Tip Method” during the day. Place your sundial on a flat, level surface and point the gnomon directly North.
Finally, mark your hour lines. The most accurate way to do this is to set your sundial out on a sunny day and check it every hour on the hour. Use your watch to see when it hits 10:00 AM, 11:00 AM, and so on. Draw a line where the shadow falls at those exact moments. Because your gnomon is angled to your latitude, these lines will stay accurate throughout the seasons.
The STEM Benefits for Your Child
Building a sundial offers a massive range of educational advantages. It isn’t just a craft project; it is a multi-disciplinary exercise. Your child will use math, geography, and physics in a practical, hands-on environment. This reinforces learning much better than reading a textbook ever could.
Geometry becomes a living subject when you use a protractor to set a gnomon angle. Kids see how angles in the sky translate to shadows on the ground. They begin to understand the relationship between a circle (360 degrees) and time (24 hours). This spatial reasoning is a fundamental skill for future engineers and architects.
Geography takes on new meaning when kids learn about meridians and longitudes. They discover that “Noon” is a local event. When the sun is directly above your house, it isn’t necessarily above a house 100 miles to the East. This realization helps them understand why the world is divided into time zones and how global navigation works.
Physics is the invisible force behind the project. Understanding the Earth’s rotation, the speed of light, and the nature of shadows gives children a sense of the mechanics of the universe. It fosters a scientific mindset—one that asks “why” and “how” instead of just accepting facts. This curiosity is the most valuable benefit of all.
Common Mistakes to Avoid
Many DIY sundials fail because of a few small errors. The most frequent mistake is using a vertical stick instead of an angled gnomon. While a vertical stick (a “gnomon stick”) works for a single day, it will become increasingly inaccurate as the sun’s path in the sky shifts with the seasons. Always use an angled gnomon set to your latitude.
Another pitfall is relying on a standard magnetic compass without adjusting for declination. In some parts of the world, a compass can be off by 10 or 20 degrees. If your sundial isn’t pointed at True North, the shadow will never hit the right marks. Always verify your North alignment using the North Star or solar methods.
Ignoring the “level” of the surface is a common oversight. If your dial plate is tilted even slightly, the shadow will be distorted. Use a bubble level or a bowl of water to make sure your surface is perfectly flat. Precision in the base leads to precision in the timekeeping.
Finally, don’t forget about Daylight Savings Time. Sundials track “Solar Time,” which doesn’t care about government-mandated clock shifts. If you calibrate your sundial in the summer during Daylight Savings, it will be one hour off in the winter. Decide whether you want your sundial to show “Real Time” (Solar) or “Social Time” (Watch) and mark it accordingly.
Limitations of Solar Timekeeping
It is important to understand that a sundial is not a replacement for a modern atomic clock. It has inherent limitations based on the environment. The most obvious limitation is the weather. On cloudy days or during the night, a sundial is essentially a decorative lawn ornament. It requires direct sunlight to cast a sharp, readable shadow.
Environmental obstructions can also pose a challenge. Trees, buildings, and even power lines can cast competing shadows or block the sun at certain hours of the day. Choosing a location for a sundial requires a “Solar Survey” to ensure the spot stays sunny from sunrise to sunset. This adds a layer of planning to the project.
Seasonal shifts in the “Equation of Time” mean that even a perfect sundial will vary by a few minutes throughout the year. This is because the Earth’s orbit is an ellipse, not a perfect circle, and the Earth moves faster when it is closer to the sun. This causes the “Solar Day” to fluctuate slightly in length. While minor, it means your sundial might be 15 minutes fast in November and 14 minutes slow in February.
These limitations aren’t “failures” of the device. Instead, they are lessons in reality. They teach kids that the natural world is complex and that our standardized clocks are actually “averages” designed for convenience. Learning to work within these limitations is a key part of the scientific process.
Comparing Calibration Methods
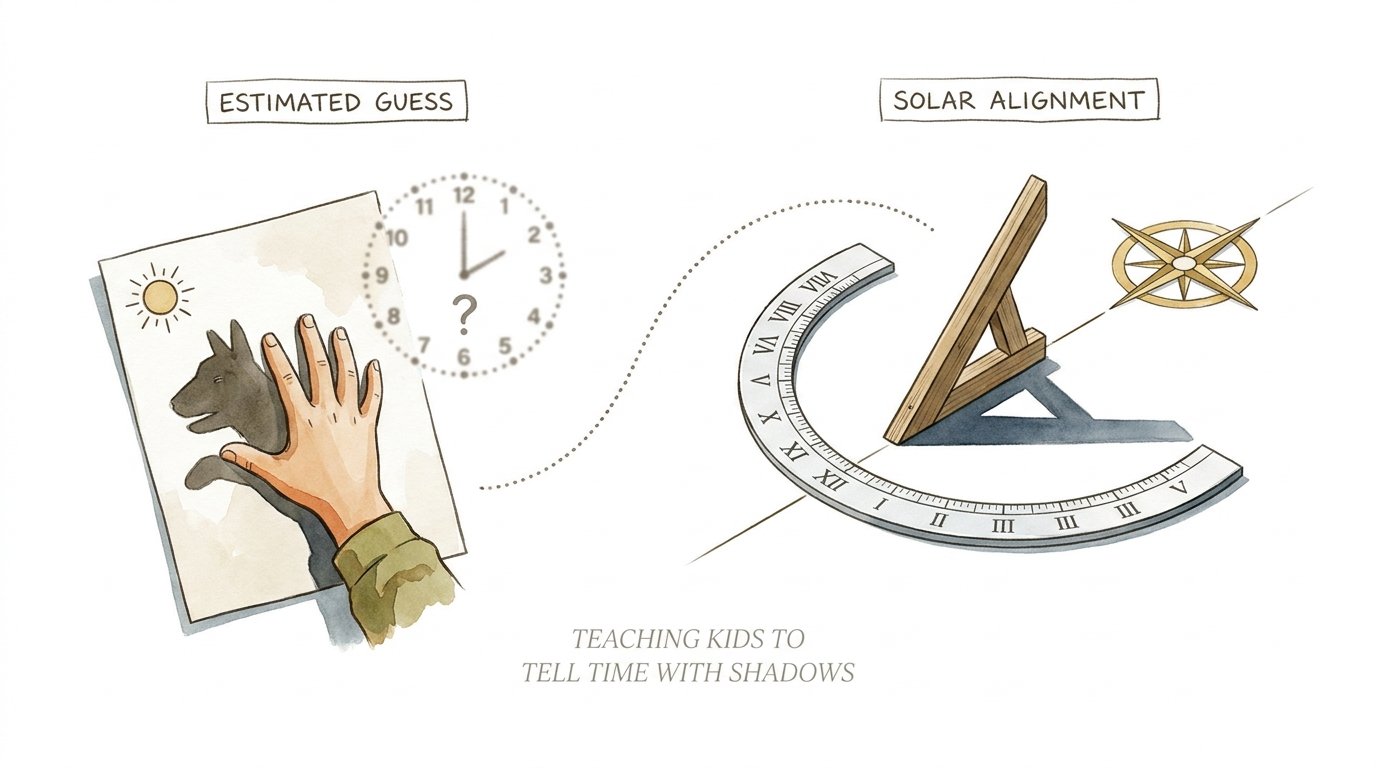
When building a sundial, you have to choose between a “Solar Alignment” approach and an “Estimated Guess” approach. While an estimated guess might work for a quick craft, a calibrated approach is necessary for anyone interested in true STEM learning.
| Factor | Estimated Guess | Solar Alignment (Calibrated) |
|---|---|---|
| Complexity | Low (Stick in a plate) | Medium (Calculated angles) |
| Accuracy | Poor (Varies by hour/season) | High (Consistent year-round) |
| Educational Value | Surface-level craft | Deep dive into physics/math |
| Longevity | Temporary | Permanent scientific tool |
Choosing the calibrated path requires more effort but yields a far more rewarding result. It turns the sundial from a toy into a legitimate instrument of measurement. For a child, seeing that their “math” actually works in the real world is an incredible boost to their confidence and interest in science.
Practical Tips for Best Results
To get the most out of your sundial project, start with a “Rough Draft.” Use cardboard and tape to build a prototype before moving to permanent materials like wood or stone. This allows you to test your angles and location without wasting expensive supplies. You can easily adjust the gnomon or move the plate if you find a shadow from a nearby tree is blocking the sun at 4:00 PM.
Use a high-contrast color for your dial plate. A white or light-colored surface makes the shadow much easier to see and read. If you are using a paper plate, a dark black marker for the hour lines provides the best visibility. Sharp, thin lines are better than thick ones for reading the exact “minute” the shadow indicates.
Consider adding an “Analemma” chart next to your sundial. An analemma is a figure-eight diagram that shows the sun’s position at the same time each day throughout the year. It explains the “Equation of Time” and helps you correct your sundial to match your watch perfectly. It is an advanced feature that adds a professional touch to any DIY setup.
Place your sundial on a pedestal if possible. Getting it off the ground makes it easier to read and keeps it away from grass or weeds that might grow and block the face. A simple wooden post or a flat-topped garden rock works perfectly. Just ensure it is securely anchored so the wind doesn’t shift its alignment.
Advanced Considerations for Serious Learners
Once the basics are mastered, you can explore different types of sundials. A “Horizontal Sundial” is the most common, but an “Equatorial Sundial” is actually easier to understand mathematically. In an equatorial dial, the plate is tilted to match the celestial equator, and the hour marks are spaced perfectly every 15 degrees. It looks like a miniature version of the Earth itself.
Another advanced concept is “Longitude Correction.” Every time zone is 15 degrees wide. If you live on the edge of a time zone, your local solar noon will be significantly different from the “Official Noon” of your clock. You can calculate this by finding the distance between your house and the central meridian of your time zone. Every degree of difference equals four minutes of time. Adding this correction to your sundial makes it an elite-level timekeeper.
Vertical sundials are another fascinating challenge. These are mounted on walls. If the wall doesn’t face exactly South, the math becomes much more complex. This involves “Declining Dials,” where the hour lines are asymmetrical. Calculating these requires a strong grasp of trigonometry, making it a perfect project for high school students.
Exploring these variations keeps the learning going for years. A child who starts with a paper plate may eventually build a brass armillary sphere or a massive stone dial in the garden. Each step forward is a step deeper into the mechanics of the cosmos.
Example Scenario: The Backyard Observatory
Imagine a family in Chicago (Latitude 41.8° N) building a sundial. They start by cutting a cardboard triangle with a 42-degree angle (rounding for simplicity). They find a sunny spot on their back patio and use a level to ensure the ground is flat. At night, the father and daughter go outside and use a laser pointer to align the gnomon with the North Star.
The next day, they set an alarm for every hour. At 10:00 AM, they mark the shadow. At 11:00 AM, they mark it again. By the end of the day, they have a custom-made clock. They notice that at “Noon” on their watches, the shadow isn’t quite on the 12 line. They research and discover that because they are West of the time zone’s center, their solar noon happens a few minutes later.
They decide to paint the design onto a large flat stone for the garden. They use weather-resistant paint and a metal rod for the gnomon. Years later, that stone remains a permanent part of their home. Every time they look at it, they remember the night they aligned it with the stars and the day they mapped the sun. This is the power of a calibrated project.
Final Thoughts
Building a calibrated sundial is one of the few projects that combines history, art, and high-level science into a single activity. It moves children away from the flickering distractions of digital screens and forces them to engage with the physical world. They learn that time isn’t just a number on a phone; it is a measurement of our planet’s journey through space.
The lessons learned during this process—precision, patience, and observation—stay with a child long after the sun goes down. They begin to see patterns in nature that others miss. They understand the “why” behind the “what.” This project isn’t just about building a clock; it is about building a better, more inquisitive mind.
Encourage your child to take the lead. Let them make the mistakes, do the calculations, and find the North Star. The goal isn’t a perfect sundial on the first try; the goal is the journey of discovery. By the time they finish, they won’t just be able to tell the time—they will be able to explain how the universe keeps it.
Sources
1 navy.mil | 2 jerryoltion.com | 3 pacificsciencecenter.org | 4 eaae-astronomy.org | 5 stoneworld.co.nz | 6 mrarch.com | 7 littlelaurie.com | 8 youtube.com | 9 diy.org | 10 sparklestories.com | 11 wordpress.com | 12 youtube.com | 13 explorable.com | 14 youtube.com | 15 reddit.com | 16 kiddle.co | 17 pbs.org | 18 dtonline.org | 19 wikihow.com