Precision Art Tools For Kids
The difference between ‘killing time’ and ‘honing a craft’ is the quality of the tool in their hand. We often give children ‘dumbed down’ versions of tools and wonder why they lose interest in 5 minutes. Precision tools demand focus, respect, and mastery. When you give a child a tool that actually works, they stop looking for the ‘next’ thing and start looking at the details.

Precision Art Tools For Kids
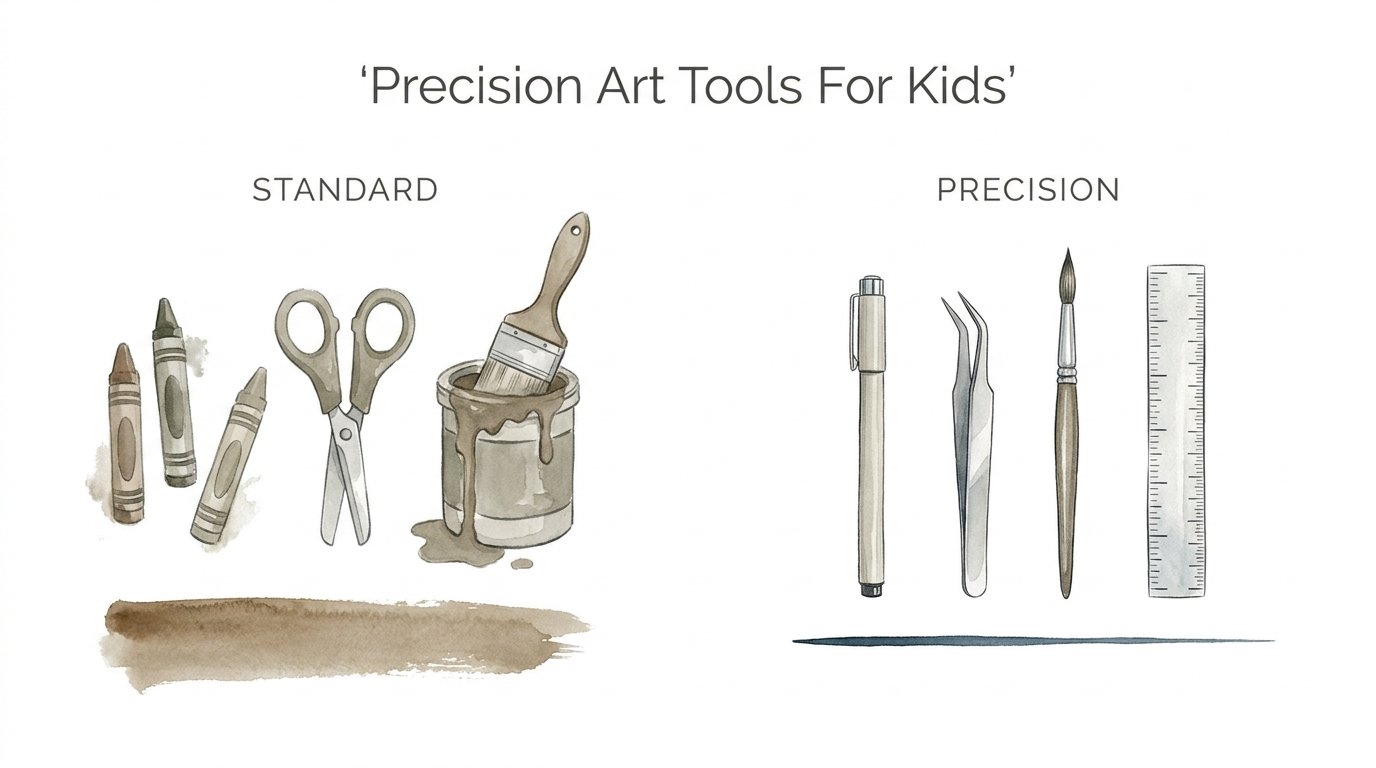
Precision art tools for kids are not your standard grocery-store markers or wax crayons. These are professional-grade instruments designed for high performance, accuracy, and durability. While standard supplies focus on safety and “washability,” precision tools focus on the artist’s intent. They allow for a level of detail that budget tools simply cannot achieve.
Think of it as the difference between a plastic toy hammer and a balanced steel one. One is for play; the other is for building. Precision tools for young artists include items like pigment-based fineliners, artist-grade colored pencils with high pigment loads, and heavyweight archival paper. They are used in environments where the goal is skill acquisition, such as art academies, home studios, and serious hobbyist circles.
These tools exist because children often outgrow their equipment before they outgrow their creativity. When a child tries to draw a fine line with a blunt, felt-tip marker, they fail because of the tool, not a lack of talent. Precision tools bridge that gap. They provide consistent results, allowing the young artist to see exactly how their hand movements translate to the page.
How to Transition to Precision Tools
Transitioning from “play” supplies to precision tools is a process of upgrading both the equipment and the mindset. You don’t have to replace everything at once. Start by identifying the child’s most frequent creative outlet and upgrade that specific category first.
Step 1: The One-Tool Introduction
Don’t overwhelm a beginner with a 150-piece professional set. Start with a single high-quality tool, like a Sakura Pigma Micron fineliner or a few Faber-Castell Polychromos pencils in their favorite colors. Let them feel the difference in the “laydown”—the way the material meets the paper.
Step 2: Matching the Surface to the Tool
Precision tools often perform poorly on cheap, thin printer paper. To see the benefits of a professional pencil, you need paper with “tooth” or texture. Introduce a Strathmore 400 Series drawing pad. The heavier weight and specific surface allow the pigments to bond properly, preventing the frustration of smearing or tearing.
Step 3: Teaching Tool Anatomy
Explain why the tool is different. Show them the delicate nib of a technical pen or the soft core of a Prismacolor Premier pencil. Understanding that the lead can break if dropped or the nib can bend if pressed too hard fosters a sense of respect for the equipment. This respect is the first step toward mastery.
Step 4: Layering and Technique
Precision tools allow for techniques that standard tools don’t support. Teach the child about layering colors rather than pressing harder to get a darker shade. High-quality colored pencils contain more pigment and less wax filler, meaning they can be layered five or six times to create new hues and deep shadows.
Benefits of Precision Equipment
Using high-grade tools offers measurable advantages for a child’s development. It isn’t just about making “prettier” art; it’s about the psychological and physical growth that occurs during the process.
Enhanced Fine Motor Skills
Standard markers require very little pressure control. Precision tools, however, respond to the subtlest changes in hand position and pressure. Using a technical pen requires a steady hand and a specific angle. This constant micro-adjustment builds hand strength and dexterity that translates to better handwriting and overall coordination.
Increased Focus and Duration
When a tool works exactly as intended, the “frustration barrier” disappears. Children often quit projects because the colors won’t blend or the paper pills up. Precision tools remove these technical hurdles. When the child can see their vision coming to life with clarity, they are more likely to enter a “flow state” and stay engaged for hours rather than minutes.
Development of Aesthetic Standards
Quality tools provide better results. A child using artist-grade watercolors will see vibrant, transparent layers rather than the muddy, chalky finish of a budget set. Experiencing these high-quality results early on helps children develop a “critic’s eye.” They begin to understand the difference between high-quality craftsmanship and mediocre output.
Challenges and Common Mistakes
The jump to precision tools isn’t without its hurdles. Many parents and educators make common errors that can actually discourage the young artist if not handled correctly.
The “Perfectionist” Trap
Because the tools are expensive and “professional,” some children become afraid to make mistakes. They might stare at a blank page, paralyzed by the fear of wasting “the good paper.” To avoid this, always keep a stash of “practice” paper nearby. Remind them that the tools are meant to be used, not displayed.
Pressing Too Hard
Children used to budget colored pencils often develop the habit of “burnishing” or pressing as hard as possible to get vibrant color. When they switch to a soft-core professional pencil like a Prismacolor, this habit causes the lead to snap instantly. It takes time to unlearn the “pressure equals color” mindset and replace it with a “layers equal color” approach.
Neglecting Maintenance
Precision tools require upkeep. A fineliner left uncapped for ten minutes is ruined. A professional brush smashed into the bottom of a water jar will lose its point forever. The biggest mistake is handing over these tools without a dedicated storage and cleaning system in place.
Limitations: When Precision Isn’t the Answer
Despite their benefits, precision tools are not universal solutions. There are specific scenarios where staying with “Standard” supplies is actually the smarter choice.
The “Messy Play” Phase
If the goal of the afternoon is sensory exploration or “process art”—where the child is simply enjoying the feeling of paint on their hands—do not use precision tools. Professional supplies are wasted in high-volume, low-focus activities. Use tempera paint and butcher paper for these sessions.
Age and Physical Maturity
Most precision tools are designed for ages 8 and up. Younger children may lack the impulse control to keep caps on or avoid “stabbing” the paper. Furthermore, some professional-grade oil paints or solvents contain heavy metals or toxic chemicals that are not safe for toddlers. Always check for the AP (Approved Product) seal from the ACMI for younger artists.
Travel and On-the-Go Art
Precision tools are often delicate. Taking a set of $200 pencils on a bumpy car ride or to a crowded park is a recipe for broken leads and lost items. For travel, stick to robust, “scholastic” grade supplies that can survive a few drops and tumbles.
Comparison: Standard vs. Precision Tools
Understanding the technical differences helps justify the investment in better equipment. Here is how the two categories typically stack up across key metrics.
| Feature | Standard (Scholastic) | Precision (Artist Grade) |
|---|---|---|
| Pigment Load | Low (filled with wax or clay) | High (pure concentrated pigment) |
| Lightfastness | Poor (fades in sunlight) | Excellent (archival quality) |
| Durability | Robust but blunt | Delicate but maintains a sharp point |
| Blending | Often impossible or muddy | Seamless layering and glazing |
| Cost | Low (disposable) | Medium to High (investment) |
Practical Tips for Maintaining a Precision Kit
If you are going to invest in precision art tools for kids, you must also invest in a maintenance routine. This protects your wallet and teaches the child the value of their equipment.
- Use a Helical Sharpener: Standard handheld sharpeners use a single blade that “shaves” the wood, often causing soft artist leads to snap. A helical (crank) sharpener gently carves the wood away without putting stress on the core.
- The “Cap Click” Rule: Teach children to listen for the “click” when capping fineliners or markers. If they don’t hear the click, it’s not sealed.
- Vertical Brush Storage: Never leave brushes soaking in water. This rots the wood and ruins the glue (ferrule). Wash them immediately and dry them flat or hanging bristles-down.
- Kneaded Erasers Only: Standard pink erasers are abrasive and can ruin the surface of high-quality paper. Switch to a kneaded rubber eraser, which “lifts” pigment without tearing the paper fibers.
Advanced Considerations for Serious Practitioners
For the child who has mastered the basics, there are deeper technical aspects of precision tools to explore. These concepts move the artist from “making a drawing” to “creating a piece of art.”
Understanding Lightfastness
Lightfastness refers to how long a pigment can resist fading when exposed to light. Most kids’ markers fade within weeks if hung on a sunny fridge. Professional tools carry a Blue Wool Scale or ASTM rating. Teaching a child about the longevity of their work adds a layer of professionalism and pride to their process.
Paper Grain and Tooth
The surface is just as important as the tool. “Hot Pressed” paper is smooth and ideal for fine pen work, while “Cold Pressed” has a noticeable texture that “grabs” colored pencil and watercolor. Matching the paper grain to the specific tool is an advanced skill that significantly alters the final outcome.
Binder Types: Wax vs. Oil
In the world of precision colored pencils, there is a major split between wax-based and oil-based cores. Prismacolor (wax) is soft and easy to blend but can develop “wax bloom” (a white foggy layer). Faber-Castell Polychromos (oil) are harder, hold a point longer, and never bloom. Helping a child choose their preferred “feel” is a great way to encourage their artistic identity.
Example Scenario: The “Detail Challenge”
Imagine two children drawing a feather.
Child A uses standard school colored pencils on thin copy paper. They try to draw the fine barbs of the feather, but the pencil tip is blunt and the colors are faint. They press harder, the paper tears, and the result is a jagged, frustrated scribble. They conclude that they “can’t draw feathers.”
Child B uses a Faber-Castell Black Edition pencil on a sheet of Bristol Board. The pencil is sharpened to a needle point, which it holds because of its high-quality binder. The pigment is rich, so Child B only needs a light touch to see a vibrant line. They can layer a dark blue over a light grey to show depth. Because the tool did exactly what they wanted, Child B spent 45 minutes observing the feather’s structure and produced a detailed study.
The only difference between the two was the tool. Precision tools didn’t “do the work” for Child B; they simply got out of the way so Child B’s focus could stay on the subject.
Final Thoughts
The transition to precision art tools for kids marks a shift in how a child views their own potential. It signals to them that their work is valuable enough to deserve quality equipment. By removing the technical frustrations of budget supplies, you allow their natural curiosity and drive for mastery to take center stage.
Remember that you don’t need a professional studio to get started. A single high-quality pen and a pad of decent paper can change a child’s entire creative trajectory. These tools demand respect, but in return, they offer a level of clarity and satisfaction that standard “toys” never can.
Encourage your young artist to experiment, to care for their gear, and to look closely at the details. When the tools are no longer a limitation, the only remaining boundary is their imagination. Expand their kit slowly, focus on quality over quantity, and watch as their “killing time” transforms into a lifelong passion for craft.
Sources
1 mamasmanyloves.com | 2 youtube.com | 3 youtube.com | 4 theartofeducation.edu | 5 reddit.com | 6 youtube.com | 7 ecokidsart.com | 8 ctfassets.net | 9 youtube.com | 10 nymag.com | 11 elephango.com | 12 artshedbrisbane.com.au | 13 youtube.com