Montessori Art Station Setup For Kids
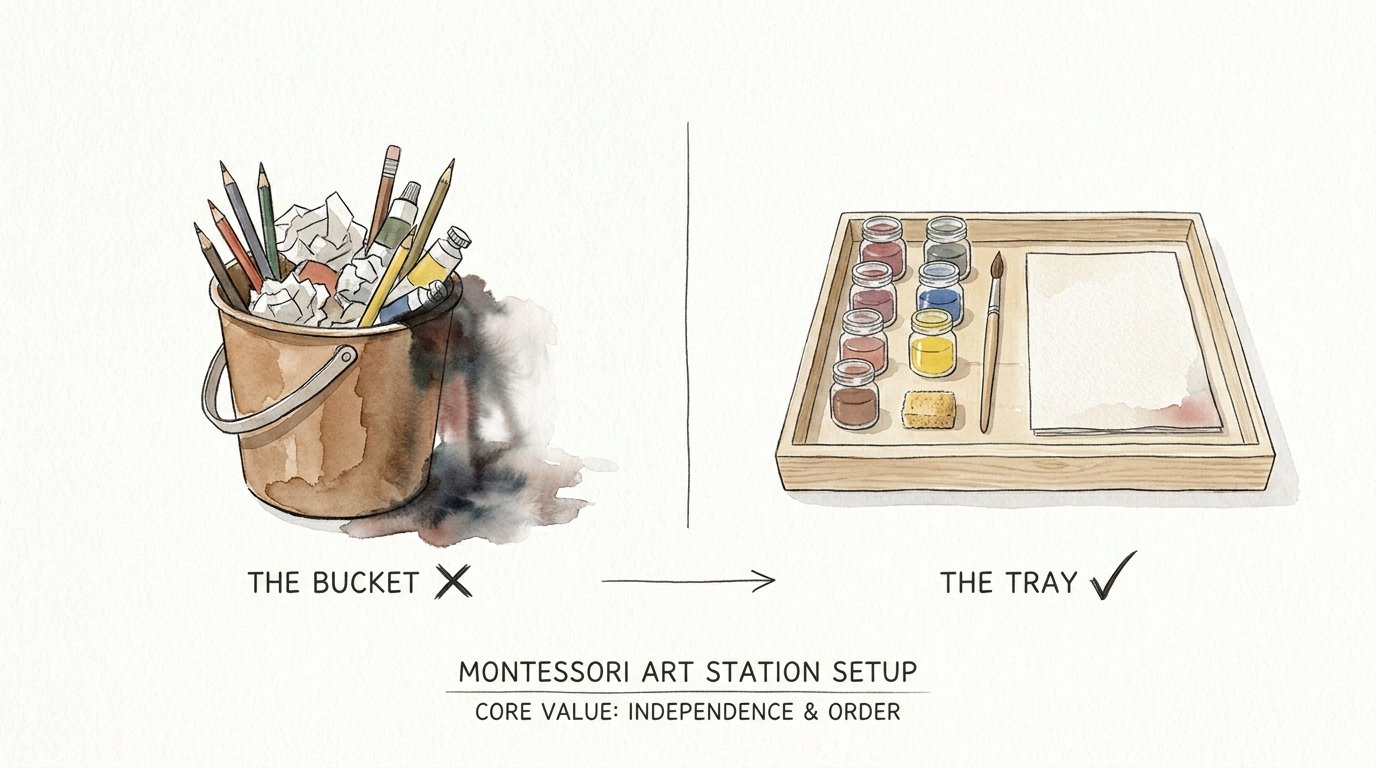
Why does a ‘full’ art bin often lead to a child saying ‘I don’t know what to make’? Visual noise is the enemy of the young artist. When you dump everything into one bucket, the brain spends all its energy ‘searching’ instead of ‘seeing.’ A curated ‘Invitation to Create’ tray limits choices to expand possibilities. Stop the digging; start the dreaming.

Setting up a creative space for a child is often approached with a “more is better” mentality. We buy the 120-pack of markers, the jumbo tub of glitter, and every shade of construction paper available. Then, we wonder why the child spends ten minutes dumping the bin on the floor and two minutes actually drawing. The problem isn’t a lack of interest; it is an overload of input.
By shifting from a chaotic “bucket” to a structured “tray,” you change the child’s neurological response to the environment. Instead of feeling overwhelmed by a mountain of plastic, they are greeted by a clear, manageable invitation. This approach doesn’t just keep your floor cleaner; it builds the child’s executive function, focus, and artistic confidence.
Montessori Art Station Setup For Kids
A Montessori art station is a prepared environment designed to foster independence and creative mastery. Unlike a traditional craft cupboard where supplies are hidden or tangled, this setup prioritizes visibility and order. It is a dedicated space—usually a low shelf or a specific table—where every tool has a “home.”
In the Montessori philosophy, art is not viewed as a hobby to be supervised, but as a vital form of self-construction and communication. The station exists to allow the child to work at their own pace, following their internal drive to explore color, texture, and form. You will find these setups in Montessori classrooms worldwide, but they are increasingly common in homes where parents want to encourage self-directed play.

Visualization is key here. Imagine a low, wooden shelf at the child’s waist height. On this shelf sit two or three beautiful trays. One tray holds everything needed for watercolor painting: a small jar for water, a single paintbrush, a palette with three harmonious colors, and a few sheets of thick paper. The child doesn’t have to ask for permission or help to start. The environment itself says, “You are capable of doing this.”
This setup moves art from a “special event” that requires adult setup and cleanup to a “practical life” skill. Because the materials are limited and the steps for cleanup are built into the design, children as young as 18 months can begin to engage with these stations. It is about removing the friction between an idea and the act of creation.
How the Invitation to Create System Works
The “Invitation to Create” is a technique where you set out a specific, curated selection of materials to spark a particular type of exploration. It is the bridge between a blank page and a finished masterpiece. Instead of saying “go draw,” you provide a prompt through the way the materials are staged.
To implement this, you follow the principle of “isolation of difficulty.” In Montessori terms, this means you focus on one skill at a time. If the goal is learning to use liquid glue, the tray contains glue, a small spreader or brush, and a few specific items to stick—perhaps autumn leaves or geometric paper scraps. You aren’t asking them to draw, cut, AND glue all at once; you are inviting them to master the “glue” part first.
The process of setting up these invitations involves three distinct phases:
First, observe the child’s current interest. Are they obsessed with cutting? Do they want to mix colors in the sink? Use these observations to choose your theme. If they love nature, your tray might include rocks and tempera paint. If they are in a “maximum effort” phase, give them clay and heavy wooden sculpting tools.
Second, curate the tray. Every item on the tray must be functional and beautiful. Use real glass jars for water (with supervision) and natural bristle brushes. High-quality materials signal to the child that their work is important. Avoid “filler” items. If you are offering a collage tray, don’t include 500 sequins; include ten. This forces the child to be intentional with every placement.
Third, present the tray. Show the child how to carry the tray to the table with two hands. Demonstrate the “work” with minimal talking—Montessori guides often use silent demonstrations so the child focuses on the hands, not the voice. Show them exactly where the dirty brush goes and how to wipe a spill. Once the demonstration is over, step back. Your role shifts from teacher to observer.
Benefits of the Curated Tray Approach
Choosing a curated tray over a giant art bin offers measurable developmental advantages. The most immediate benefit is the extension of concentration. When a child isn’t distracted by 50 other options, they enter a “flow state” more easily. This deep focus is the foundation of all future learning.
Another practical benefit is the development of fine motor precision. Because Montessori art stations often use real, “adult-like” tools, children learn to handle items with care. Using a glass jar for water teaches a child about weight and fragility in a way a plastic cup never can. They learn the “pincer grip” naturally by picking up small beads for a collage or holding a thin watercolor brush.
Creativity actually thrives under constraints. This is known as the “Paradox of Choice.” When faced with infinite possibilities, the brain often freezes. By limiting the color palette to just blue, yellow, and white, you invite the child to discover that they can create different shades of green and light blue. They become scientists of color rather than just consumers of it.
Finally, this system builds self-reliance and order. Because the tray is a self-contained unit, the child learns to complete a “cycle of work.” They choose the tray, perform the activity, and return the tray to the shelf. This internalizes a sense of “beginning, middle, and end,” which reduces the chaotic “mess-making” often associated with kids’ art projects.
Challenges and Common Mistakes
The biggest mistake parents make is overcrowding the shelf. It is tempting to put out every art supply you own because you want to be “resourceful.” However, a shelf with ten trays is just as overwhelming as a bucket full of markers. Start with two trays and rotate them weekly. If the child hasn’t touched a tray in three days, it’s time to swap it for something else.
Another pitfall is interfering with the process. We often want to “fix” a child’s drawing or show them the “right” way to make a flower. In the Montessori art station, the product doesn’t matter. If the child spends 30 minutes painting the paper solid brown, they are exploring the “load” of the brush and the saturation of the pigment. Interrupting them to suggest a “prettier” color breaks their concentration and discourages risk-taking.
Failing to prepare for the mess is a common reason these stations get shut down. If you are constantly hovering with a wet wipe, the child feels your anxiety. To avoid this, place the station on an easy-to-clean surface like linoleum or tile. Use a heavy-duty splash mat under the table. Provide a child-sized apron and a “cleaning caddy” with a small sponge and a cloth. When the mess is manageable, the creativity becomes fearless.
Lastly, watch out for low-quality supplies. Cheap markers that dry out or paper that tears the second it gets wet lead to frustration. A frustrated child will stop trying. You don’t need a lot of supplies, but the ones you have should work perfectly. Sharp scissors, vibrant pigments, and sturdy paper are non-negotiable for a successful station.
Limitations of the Montessori Art Station
While highly effective, this setup has realistic constraints. It requires dedicated space. If you live in a very small apartment, a permanent art shelf might not be feasible. In these cases, you might need a “rolling cart” system, but even then, the cart must be kept organized to avoid the “visual noise” trap.
Environmental limitations also include safety and supervision. A Montessori station encourages independence, but “independent” does not mean “unsupervised,” especially for toddlers. If your child is in a phase of eating crayons or painting the walls, you cannot leave the station fully accessible. In these instances, the “prepared environment” might be a shelf behind a baby gate or materials kept in a high cupboard that you bring down “on request.”
Furthermore, this method may not work for highly impulsive children who have not yet developed the “pre-requisite” skills of the classroom. If a child cannot yet carry a tray without dumping it, they aren’t ready for a watercolor station. You must meet the child where they are. Sometimes the “art station” starts with just one basket of chunky crayons and a clipboard until the child masters the physical movements required for more complex trays.
Comparison: The Art Bucket vs. The Art Tray
To understand why the tray is superior for development, let’s look at the measurable differences in a typical 20-minute art session.
| Feature | The Art Bucket (Chaos) | The Art Tray (Montessori) |
|---|---|---|
| Visual Input | High (Noise/Clutter) | Low (Focus/Clarity) |
| Decision Fatigue | High (Too many choices) | Low (Curated options) |
| Cleanup Time | 10-15 minutes (Parent led) | 2-3 minutes (Child led) |
| Skill Focus | Scattered/General | Targeted/Intentional |
| Independence | Dependent on adult help | Fully autonomous |
Practical Tips and Best Practices
If you are ready to transition from a bucket to a tray system, start with these actionable steps. First, audit your current supplies. Throw away the broken crayons, the dried-out markers, and the tiny scraps of paper that are too small to use. Keep only what is in excellent condition.
Next, invest in uniform containers. Using the same style of small glass jars or wooden baskets creates a sense of visual harmony. When the containers look the same, the focus remains on the *content* (the colorful beads, the vibrant paint) rather than the plastic packaging.
Establish a “One Tray at a Time” rule. This is fundamental for maintaining order. The child can use any tray they want, but they must return it to the shelf before taking the next one. This prevents the “material creep” where every supply in the house ends up in a giant pile on the table.
Rotate seasonally to keep the interest alive. In the spring, your tray might include flower petal pressing. In the winter, it could be “painting with ice” or white chalk on black paper. You don’t need to buy new things; you just need to re-package your existing supplies in a way that feels “new” to the child’s eyes.
Advanced Considerations for Growing Artists
As your child moves from the toddler years (the First Plane of Development) into the elementary years (the Second Plane), the art station should evolve. Older children are less interested in the pure sensory “process” and more interested in technique and realism.
For a child aged 6-9, the art station might transition from simple trays to a “Technical Studio.” This means adding specialized tools like charcoal pencils, different grades of graphite, or a proper easel. You might include a “technique book” that shows how to shade a sphere or mix skin tones. The “limitation” now isn’t about choice overload, but about providing the specific resources they need to execute their increasingly complex visions.
Consider horizontal and vertical expansion. Horizontal expansion means adding more mediums—clay, textiles, wood-burning, or printmaking. Vertical expansion means going deeper into one medium, like moving from “washable school paint” to “artist-grade gouache.”
At this stage, you should also introduce art history as a prompt. Place a book of Van Gogh’s landscapes next to the painting tray. Don’t tell them to “copy” the work, but let the visual language of a master artist serve as a silent mentor. This integrates art into the wider “Cosmic Education” of the Montessori elementary curriculum, connecting the child to the history of human expression.
Example Scenarios for Your Station
To help you visualize how this looks in practice, here are three realistic “Invitations to Create” you can set up today.
Scenario 1: The Texture Collage Tray (Ages 2-4)
The tray contains a small bowl of various blue and green fabric scraps (silk, cotton, wool), a small bottle of white glue with a brush, and a piece of heavy cardboard.
The child explores how glue works and how different textures feel when layered. There is no “picture” to make; it is an exploration of “sticky” and “soft.”
Scenario 2: The Secondary Color Mixing Tray (Ages 3-6)
The tray holds three small glass droppers, three jars of water tinted with primary colors (Red, Blue, Yellow), and an empty ice cube tray or a porcelain palette with deep wells.
The child uses the droppers to transfer the “primary” water into the empty wells to “discover” orange, purple, and green. This builds hand strength (via the dropper) and scientific reasoning.
Scenario 3: The Nature Still Life (Ages 5-8)
The tray features a single, beautiful flower in a vase, a set of high-quality colored pencils (12 colors), a sharpener, and a small sketchbook.
The child is invited to observe the flower and try to match the colors they see on the petals. This shifts art from “imagination” to “observation,” a key skill for scientific drawing and detailed focus.
Final Thoughts
Transforming your child’s art space from a cluttered bin to a curated Montessori station is one of the most effective ways to support their development. By reducing visual noise, you aren’t limiting their creativity; you are providing the clarity they need to find it. When a child can see their tools and understand how to use them, they move from being a passive consumer of supplies to an active creator of ideas.
The “Invitation to Create” approach honors the child’s natural drive for order and mastery. It respects their ability to handle real tools and their need for deep, uninterrupted focus. While the initial setup requires more thought from the adult, the long-term payoff is a more independent, confident, and focused young artist.
Start small. Clear one shelf. Put out one tray. Watch how your child’s interaction with the materials changes when they no longer have to dig through the “bucket” to find their dream. Art is not about the mess; it’s about the connection between the hand, the eye, and the heart. A prepared environment makes that connection possible.
Sources
1 cloudmontessori.com | 2 dannicowoodworks.com | 3 trilliummontessori.org | 4 montessori.org | 5 woodandhearts.com | 6 montessori-art.com | 7 msu.edu | 8 ourmontessorilife.com | 9 storiesofplay.com | 10 woodandhearts.com | 11 cloudmontessori.com | 12 montessorifamilycenter.com | 13 xiairworld.com | 14 montessori-art.com | 15 raisedgood.com