Diy Playground Anchoring Best Practices
The longevity of your playground isn’t determined by the wood you see, but by the engineering you bury. Most DIY playground ‘fails’ happen at the ground level. Standard kits rely on flimsy stakes that heave with the frost and pull with the wind. Pro-level DIYers know that a legacy structure requires a deep-set pier foundation. We spent the extra Saturday digging below the frost line and setting concrete sleeves to ensure our kids—and their future kids—will have a rock-solid place to play. Don’t build on a wobble; build on a foundation.

Diy Playground Anchoring Best Practices
Diy playground anchoring refers to the techniques used to secure a play structure to the earth. This process prevents the set from tipping, shifting, or collapsing during use. In the real world, children generate massive amounts of lateral force when they swing high or jump off platforms. Without proper anchoring, that force transfers directly to the structure’s frame, causing it to lift or “walk” across the yard.
Proper anchoring acts as the invisible safety net for your backyard. Think of it like the roots of an oak tree. While the branches take the wind, the roots hold the weight. Most high-end residential setups use either heavy-duty augers or concrete pier foundations. The goal is to create a connection to the subsoil that is stronger than the momentum of four or five active kids playing at once.
The Anatomy of a Professional Pier Foundation
Building a pro-level pier starts with understanding your soil and the frost line. The frost line is the depth to which the ground freezes in winter. If your foundation stops above this line, the water in the soil will freeze, expand, and push your entire playground upward. This is known as frost heave. It ruins levels and snaps bolts.
To do it right, you need to dig. You are looking for a depth that exceeds your local frost line—often 24 to 48 inches in northern climates. Use a post-hole digger or a power auger to create a clean, vertical shaft. Drop two inches of all-purpose gravel into the bottom of the hole to facilitate drainage. This prevents water from pooling under your concrete and rotting the bottom of your wooden posts.

Next, use a fiber-form tube, often called a Sonotube. This tube keeps the concrete contained and prevents the rough edges of the soil from “grabbing” the pier during a freeze. Level the tube, pour your mixed concrete, and while it is still wet, sink a galvanized post base into the center. This hardware keeps the wood 1 to 2 inches above the concrete, stopping moisture from wicking into the grain and causing premature rot.
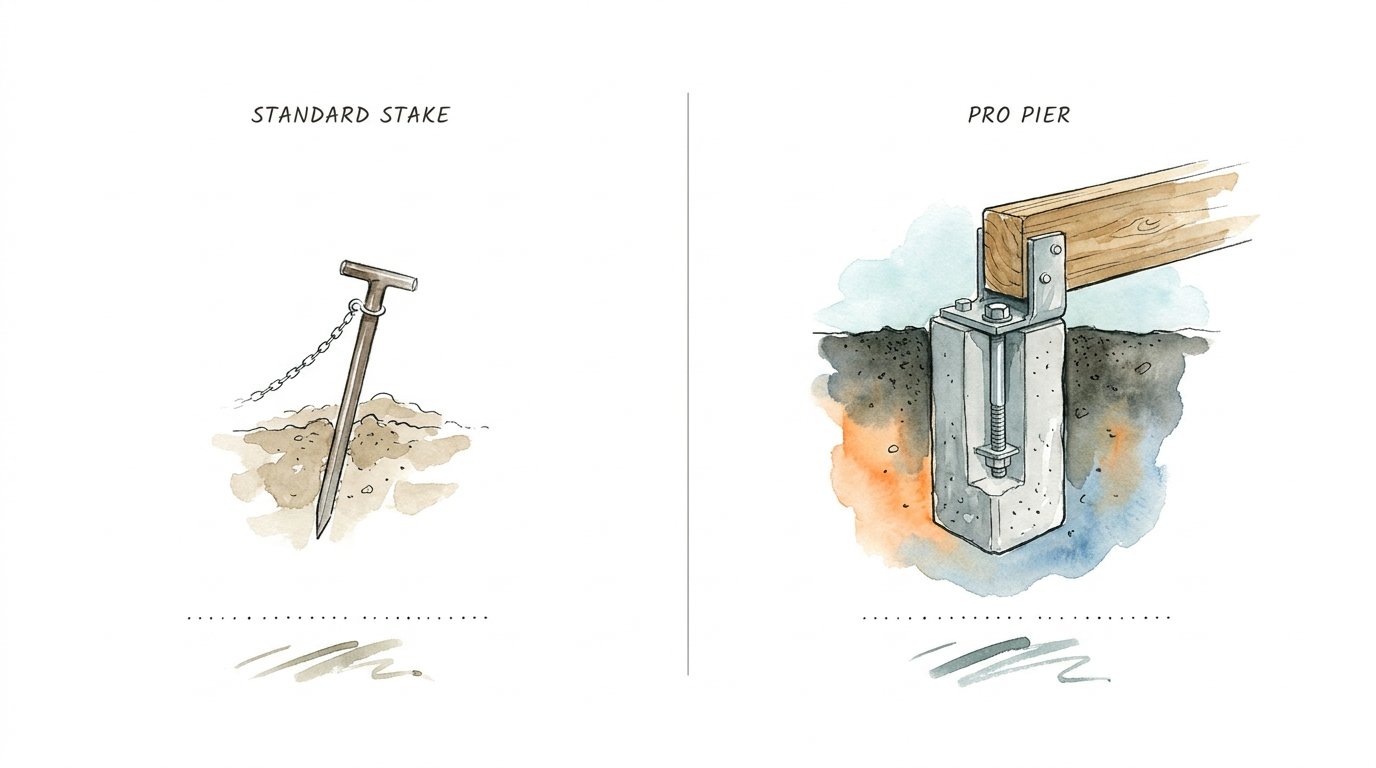
Why Standard Stakes Fail the Stress Test
Standard stakes are the thin metal “corkscrews” included in most big-box store kits. They are designed for convenience, not for decades of play. These stakes typically penetrate only 12 to 15 inches into the topsoil. In many regions, this layer of soil is loose, organic, and subject to significant movement during rain or temperature changes.
When a child reaches the peak of a swing arc, the opposite side of the playset experiences an upward pull. A standard stake relies on the friction of the topsoil to resist this. Over time, that friction weakens. The hole around the stake widens, creating a “wobble” that slowly rattles the rest of the structure’s hardware loose. A pier foundation doesn’t rely on friction; it relies on the sheer weight of the concrete and the stability of the deep subsoil.
Benefits of a Concrete Pier System
The primary advantage of a pier system is absolute stability. You will notice the difference the second the kids start playing. There is no creaking, no swaying, and no lifting. This stability preserves the integrity of the wooden beams. When a set doesn’t wobble, the joints aren’t being stressed, which means your lag bolts won’t strip out over time.
Another benefit is the protection against environmental decay. By using a post base on a concrete pier, your lumber never actually touches the dirt. Ground contact is the number one killer of outdoor wood, even if the wood is pressure-treated. Keeping the posts elevated ensures they stay dry and prevents the “invisible rot” that usually happens three inches below the grass line.
Challenges and Common DIY Mistakes
The biggest mistake is the “shallow dig.” Many DIYers get tired after 18 inches and decide it is “good enough.” In areas with deep winters, this is a recipe for disaster. Another frequent error is pouring concrete directly around the wooden post. While it feels secure at first, the wood will eventually shrink, leaving a gap between the post and the concrete. Water fills that gap, freezes, and rots the post from the inside out.
Using the wrong hardware is another pitfall. You must use hot-dipped galvanized or stainless steel brackets. Standard zinc-plated hardware will corrode within a few seasons when in contact with the chemicals in pressure-treated lumber. If your hardware fails, the entire foundation becomes useless. Always verify that your brackets are rated for structural loads and ground-contact lumber.
Limitations and Environmental Constraints
Concrete piers aren’t always the perfect solution. If you are in a rental property, a permanent concrete installation might violate your lease. In those cases, heavy-duty 30-inch auger anchors are a better compromise. They offer more security than standard stakes but can still be removed with a large pipe wrench when you move.
Soil type also plays a role. In extremely rocky soil or solid bedrock, digging a 36-inch hole might be impossible without specialized demolition hammers. In these environments, you may need to use wedge anchors to bolt a base directly to the rock. Conversely, in very sandy or swampy soil, a standard pier might sink. You would need a “belled” pier—a hole that is wider at the bottom than the top—to distribute the weight over a larger area.
Comparison: Pro Pier vs. Standard Stake
| Feature | Standard Stake | Pro Pier (Concrete) |
|---|---|---|
| Installation Time | 30 Minutes | 6-8 Hours |
| Cost | $20 – $40 | $150 – $300 |
| Wind Resistance | Low | High (Storm Rated) |
| Lifespan | 2-5 Years | 20+ Years |
| Skill Level | Beginner | Intermediate |
Practical Tips for a Rock-Solid Setup
Start by assembling the main fort structure first, then mark your hole locations. Do not rely on the manual’s measurements alone. Real-world lumber has slight variances. By marking the actual “footprint” of your built fort, you ensure your piers line up perfectly with the posts. Use a string line and a line level to make sure all your piers are at the same height relative to each other, even if your yard has a slight slope.
When mixing concrete, aim for the consistency of thick peanut butter. If it’s too soupy, it will be weak. If it’s too dry, it won’t settle around your post bases. Once poured, use a scrap piece of rebar to “puddle” the concrete. This involves stabbing the wet mix repeatedly to release air bubbles. This simple step can increase the strength of your pier by up to 20 percent by eliminating internal voids.
Advanced Considerations for Large Structures
For massive playsets with multiple “bridges” or high-flying tire swings, consider adding rebar to your piers. A single #4 rebar vertically centered in the concrete pier adds significant tensile strength. This is especially important in high-wind zones where the structure might act like a sail. The rebar ensures the concrete pier itself doesn’t snap if the soil shifts laterally.
Think about drainage for the entire play area. If you are building a concrete foundation, you are likely also adding a safety surface like rubber mulch or wood chips. Install a perimeter of pressure-treated 4x4s around your play zone to contain the mulch. This “curb” should be integrated with your anchoring plan so that water doesn’t pool against your concrete piers, which could lead to soil erosion around the foundation over time.
Scenario: The “Monster Swing” Application
Imagine you’ve built a custom 10-foot tall A-frame for a heavy-duty rubber belt swing. At full height, a 100-pound child creates hundreds of pounds of dynamic force. In a standard stake scenario, you will see the “uphill” leg lift off the ground by half an inch every time the child swings forward. This creates a rhythmic pounding that eventually pulls the stake out of the dirt like a loose tooth.
In a pro-pier scenario, that same A-frame is bolted to a 300-pound cylinder of concrete buried three feet deep. The force is distributed into the earth. The structure remains perfectly still. There is no energy loss, meaning the child actually swings higher and smoother because the frame isn’t absorbing and wasting the momentum through movement and vibration.
Final Thoughts
Building a playground is a labor of love, but the real work happens where nobody can see it. Choosing a pier foundation over standard stakes is the difference between a structure that lasts five years and one that lasts twenty. It requires more sweat, more digging, and a bit more money, but the peace of mind is worth every drop of effort.
When you see your kids—and eventually your grandkids—running across those platforms without a single creak or wobble, you’ll know that extra Saturday was the best investment you ever made. Take the time to engineer for the future. Build a foundation that matches the energy of the kids playing on it. Experiment with these techniques on your next backyard project and see the difference a pro-level anchor makes.
Sources
1 playgroundequipment.com | 2 swingsetmall.com | 3 fixtman.com | 4 gorillaplaysets.com | 5 adventureworldplaysets.com | 6 shedplans.org | 7 apexpergola.com | 8 hammerpedia.com | 9 youtube.com | 10 americanswing.com | 11 woodkingdomwest.com