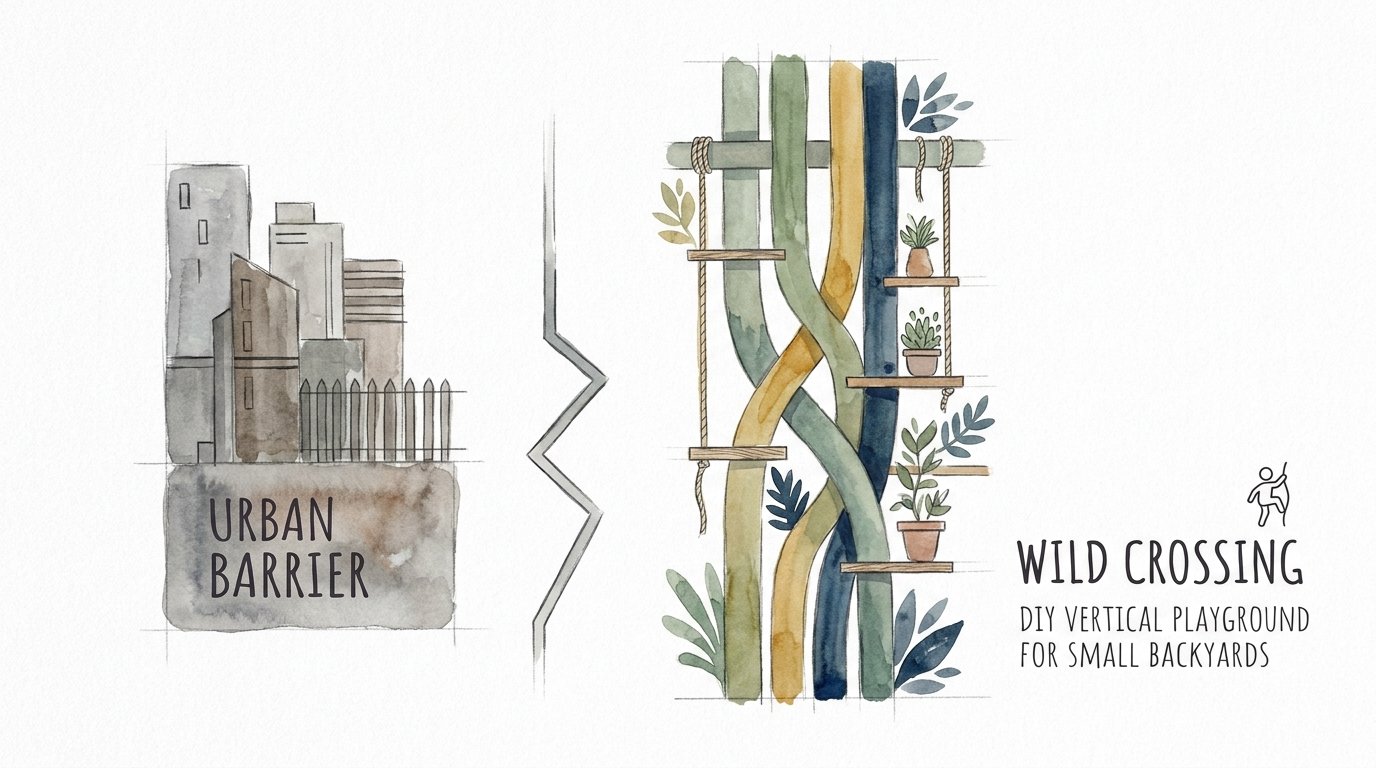
Diy Vertical Playground For Small Backyards
A fence is only a wall if you don’t treat it like a mountain range. Small backyards often feel cramped because we only think about the horizontal square footage. Turning our ‘urban barrier’ into a ‘wild crossing’ added 100 square feet of play space without taking up a single inch of grass. We reinforced the posts and added climbing holds and ropes to turn a boring boundary into a physical challenge that builds grip strength and confidence.

Every square inch of an urban lot is precious. Most people view their perimeter fence as a static line that simply keeps things in or out. Thinking vertically changes that dynamic completely. This approach allows children to burn energy, develop motor skills, and engage with their environment in a way that traditional flat yards simply cannot offer.
Modern families are looking for ways to maximize outdoor time without needing a massive estate. This project bridges the gap between a standard security fence and a full-scale adventure park. It transforms a functional necessity into a centerpiece for growth and play.
Diy Vertical Playground For Small Backyards
A vertical playground is a specialized play structure built directly onto or against an existing vertical surface like a fence or exterior wall. It typically incorporates rock climbing holds, cargo nets, and pulling ropes to create an upward movement path. In small residential spaces, this setup serves as a “wild crossing,” allowing kids to move across the perimeter of the yard rather than just through the center.
Most traditional play sets are “islands” that sit in the middle of the lawn, eating up space where you might want to place a table or garden bed. A vertical playground occupies the “dead space” of the fence line. It exists in the transition zone between your property and the next. This setup is particularly effective in townhomes, city lots, and suburban yards where the lawn is less than 500 square feet.

Real-world applications range from simple bouldering traverses that stay low to the ground to multi-layered walls with integrated rope ladders. These structures are common in “natural play” designs where the goal is to blend play equipment with the landscape. Instead of a bright plastic tower, the yard features a reinforced wooden wall that matches the home’s aesthetic while providing a rugged physical outlet.
How to Build Your Vertical Adventure Wall
Creating a stable and safe climbing surface requires more than just screwing plastic rocks into fence pickets. Pickets are thin and often brittle; they cannot support the dynamic weight of a growing child. The process begins with structural reinforcement.
Step 1: Reinforce the Skeleton
Existing fence posts are usually 4×4 timber buried in concrete. These are the anchors for your project. You must secure 2×4 horizontal stringers between these posts to create a frame that can handle weight. Use 3-inch exterior-grade structural screws to attach these stringers. This framework ensures that the force of a child climbing is transferred to the posts and the ground, not the decorative fence slats.
Step 2: Prepare the Panels
Exterior-grade ACX plywood is the industry standard for home climbing walls. Choose 3/4-inch thickness to prevent the board from flexing during use. Before mounting the panels, drill a grid of holes for your T-nuts. A standard 6×10 grid on a 4×8 sheet provides enough options for various “routes.” Hammer the T-nuts into the back of the plywood so they are flush. This allows you to bolt and unbolt climbing holds from the front whenever you want to change the layout.
Step 3: Mounting and Weatherproofing
Seal the plywood with an outdoor-rated stain or paint to prevent rot. Mount the panels to your 2×4 frame using galvanized screws. Ensure there is a small gap at the bottom of the plywood to prevent it from sitting in standing water or damp soil. This airflow keeps the wood dry and extends the life of the structure.
Step 4: Installing the Grips
Select a variety of resin or polyurethane holds. Polyester resin holds provide a gritty, rock-like texture that helps develop superior grip strength compared to smooth plastic versions. Bolt the holds into the pre-installed T-nuts. Include “jugs” (large, easy-to-grab holds) for younger children and “crimps” or “slopers” for older kids who need a challenge.
Benefits of the Wild Crossing Approach
Vertical play offers unique developmental advantages that horizontal running does not. It forces a child to engage in “cross-body” movement, where the right hand moves in coordination with the left foot. This type of movement is essential for brain development and bilateral coordination.
Spatial efficiency is the most obvious practical benefit. You retain your entire lawn for other activities while the perimeter becomes an active zone. This is a massive win for parents who want a beautiful yard and active children simultaneously.
Physical benefits include:
- Grip Strength: Hanging and pulling builds hand and forearm strength.
- Core Stability: Staying upright on a wall requires constant abdominal engagement.
- Problem Solving: Navigating a “route” from one side of the fence to the other is a physical puzzle.
- Confidence: Overcoming the fear of height in a controlled environment builds resilience.
Challenges and Common Mistakes
One frequent error is mounting holds directly to fence pickets. Pickets are designed for privacy, not load-bearing. This mistake leads to cracked wood and potential falls. Always build a secondary frame or attach directly to the structural posts.
Ignoring the “fall zone” is another dangerous pitfall. Even if the wall is only five feet high, a fall onto hard-packed dirt or concrete can cause injury. You must clear the area 6 feet out from the wall and install proper impact-absorbing material.
Failure to use weather-resistant hardware is a common maintenance headache. Standard interior bolts will rust within one season, seizing inside the T-nuts. Use stainless steel or hot-dipped galvanized hardware to ensure the wall remains adjustable for years.
Limitations and Environmental Constraints
Rented properties present a significant limitation. Most landlords do not allow structural modifications to fences. In these cases, a freestanding “A-frame” climbing wall that sits near the fence without being attached is a better alternative.
Neighbor relations are a critical factor. If you share a fence line, the noise of kids kicking the wall or peering over the top can lead to disputes. It is wise to keep the height of the climbing holds below the top of the fence line to respect privacy.
Local zoning laws often dictate the maximum height of residential fences. Building a climbing structure that extends above the legal fence height (usually 6 feet) might require a permit or could trigger a code violation. Always check local ordinances before building upward.
Vertical vs. Horizontal Playground Equipment
Choosing between a vertical wall and a traditional swing set involves several trade-offs.
| Feature | Vertical Play Wall | Traditional Swing Set |
|---|---|---|
| Footprint | Minimal (Depth of 4-6 inches) | Large (100+ square feet) |
| Skill Level | Scalable (Beginner to Advanced) | Static (Limited growth) |
| Maintenance | Moderate (Tightening bolts/staining) | Low to Moderate (Cleaning/checking ropes) |
| Cost | $300 – $800 (DIY) | $500 – $3,000 (Pre-built) |
Practical Tips for Best Results
Safety surfacing is non-negotiable. For a wall up to 7 feet, use at least 9 inches of uncompressed wood mulch or 6 inches of shredded rubber mulch. This depth provides the necessary impact attenuation to prevent head injuries.
Route setting keeps the interest alive. Move the holds every three months to create a “new” playground. Label routes with colored tape to create difficulty levels—green for easy, blue for medium, and red for hard.
Add a “finish bell” or a high-five plate at the end of a traverse. Giving kids a specific goal increases the “gamification” of the wall and encourages them to complete the crossing multiple times.
Advanced Considerations for Serious Builders
Serious practitioners may want to experiment with wall angles. A slight “overhang” of just 5 or 10 degrees significantly increases the physical demand on the climber. You can achieve this by building a frame that leans away from the fence at the top, supported by heavy-duty 4×4 kickstands.
Integrated sensory elements can also be added. Incorporating different textures—like a section of the wall covered in artificial turf or a corrugated metal panel—provides tactile variety. This is especially beneficial for children with sensory processing needs.
Lighting extends the use of the wall into the evening. Solar-powered LED spotlights mounted at the base of the wall can create a dramatic look while ensuring children can see their handholds during twilight hours.
Scenario: The Standard 15×15 Urban Yard
Imagine a small townhouse backyard measuring 15 feet by 15 feet. A traditional playground would occupy the entire center, leaving no room for a patio or a dog to run. In this scenario, we install two 4×8 plywood panels along the back fence.
The build uses 40 holds of varying sizes and a 10-foot knotted polyester rope hanging from a reinforced top beam. The “fall zone” consists of a 4-foot wide strip of rubber mulch along the fence. This layout leaves 165 square feet of open grass in the center of the yard. The children can now “circumnavigate” the yard by climbing from the back corner to the side gate, turning a small space into a continuous loop of movement.
Final Thoughts
The transition from an urban barrier to a wild crossing represents a shift in how we perceive our living limits. A fence does not have to be the end of the world; it can be the beginning of an adventure. By utilizing vertical space, we provide our children with the high-intensity physical activity they need without sacrificing the utility of a small yard.
This project is a high-reward DIY endeavor that grows with your family. As children get stronger, you can move holds further apart or introduce smaller “chips” that require more precision. It is a living piece of equipment that challenges the body and the mind.
Start with a single panel and see how the dynamic of your backyard changes. You will likely find that the kids spend more time on the wall than they ever did on the grass. Embrace the vertical and turn your boundaries into bridges for development. Maximizing small spaces isn’t about having more room; it’s about seeing the room you already have in a new way.
Sources
1 backyardboss.net | 2 whitetech.in | 3 pps.org | 4 aritulla.com | 5 todayshomeowner.com | 6 iliketomakestuff.com | 7 calamus.graphics | 8 blogspot.com | 9 agvinylfencing.com | 10 gearjunkie.com | 11 atomikclimbingholds.com | 12 redfin.com | 13 ga.gov | 14 discountplaygroundsupply.com