Multi-functional Diy Playground Design
If your playground only teaches them how to do one thing, it’s not a playground—it’s a waiting room. We waste 200 square feet on a swing set that kids grow out of in two years. This multi-use tower combines physical climbing, sensory gardening, and creative art in the same footprint. It’s not just play; it’s a lifestyle hub.

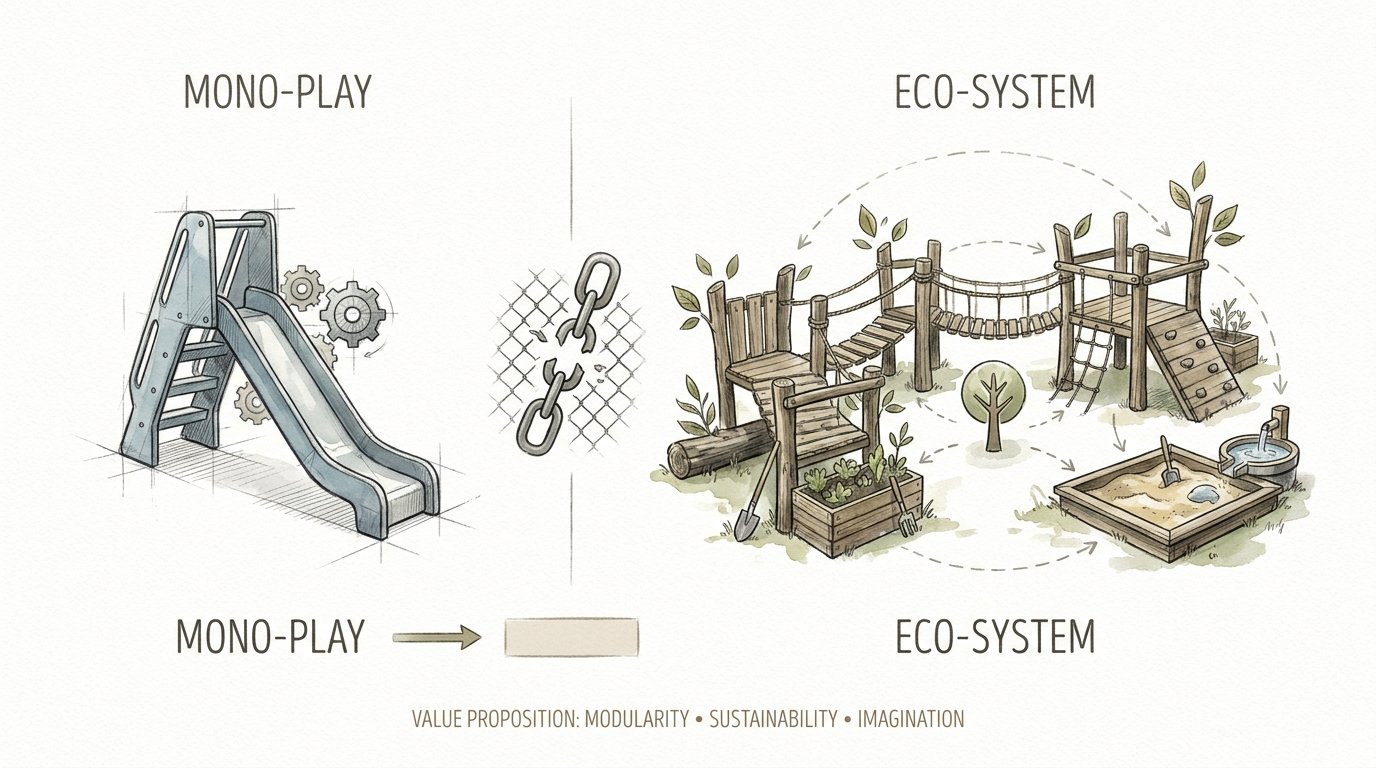
Most traditional backyard setups suffer from “Mono-Play” syndrome. You buy a slide, they slide. You buy a swing, they swing. But what happens when they want to create, explore, or nurture? Usually, they go back inside.
The modern multi-functional DIY playground design changes that. By shifting from a single-purpose structure to a holistic “Eco-System,” you maximize every square inch of your yard. This approach respects your space, your budget, and the evolving needs of a growing child.
In this guide, we will break down how to design a structure that hits the three pillars of childhood development: the physical, the sensory, and the creative. Let’s stop building waiting rooms and start building hubs for growth.
Multi-functional Diy Playground Design
A multi-functional DIY playground design is a consolidated structure that integrates multiple play modalities into a single, cohesive footprint. Instead of separate stations scattered across the lawn, this design stacks activities vertically and wraps them around a central core.

Think of it as the “Swiss Army Knife” of backyard builds. At its heart is a structural tower—built from high-quality, rot-resistant lumber like Cedar or Redwood—that serves as the anchor for secondary zones. These zones might include a climbing wall on the north face, a chalkboard art station on the south, and a vertical herb garden on the west.
This design exists because modern families often have limited space but unlimited expectations. It’s used in urban backyards, suburban lots, and even community spaces where efficiency is king. By centralizing play, you maintain a clear line of sight for supervision and preserve the rest of your yard for adult relaxation or landscaping.
The Eco-System approach treats the playground as a living part of the yard. It’s not a plastic eyesore; it’s a destination that invites children to stay longer by offering variety. When they get tired of climbing, they can immediately pivot to painting or checking on their plants without leaving the play zone.
How to Design and Build Your Play Eco-System
Building a multi-functional tower requires a blend of structural engineering and creative zoning. You aren’t just following a blueprint; you’re mapping out a child’s day. Follow these steps to ensure a balanced and safe build.
Phase 1: Selecting Your Lumber and Hardware
The foundation of your “Eco-System” must be durable. Western Red Cedar is the gold standard for DIY playgrounds because it naturally resists rot and insects without the need for heavy chemical treatments. If you opt for pressure-treated lumber, ensure it is rated for “Ground Contact” for the posts and use “Above Ground” grade for the decking.
Use stainless steel or high-grade ceramic-coated screws to prevent rust. Avoid standard zinc-plated hardware, as the acids in cedar and the chemicals in treated pine will corrode them within a few seasons. Stability is non-negotiable—anchor your posts at least 24 inches deep or use heavy-duty steel footings set in concrete.
Phase 2: Zoning the Three Modalities
To make the structure truly multi-functional, you must designate specific faces of the tower for different activities. This prevents “play traffic jams” and keeps the experience fresh.
- The Physical Face: Install a climbing wall using modular rock holds. Space them appropriately for your child’s age—closer together for toddlers, wider for older kids.
- The Creative Face: Mount a large sheet of 1/2-inch MDO (Medium Density Overlay) plywood painted with three coats of exterior-grade chalkboard paint. Add a small shelf for chalk storage that includes drainage holes for rain.
- The Sensory Face: Attach cedar planter boxes at various heights. This allows children of different ages to participate in gardening. Use non-toxic finishes on the wood to ensure the soil remains clean.
Phase 3: The Safety “Use Zone”
Safety isn’t just about the structure; it’s about the space around it. Following ASTM F1148 standards, you must maintain a 6-foot “clear zone” in all directions. This area should be free of fences, trees, and other hard structures.
Fill this zone with at least 9 inches of impact-absorbing material. Options include engineered wood fiber (mulch), pea gravel, or rubber nuggets. Never install a multi-use tower over grass or dirt, as these surfaces compact over time and offer zero protection during a fall.
Benefits of a Multi-Functional Approach
Why choose a complex multi-functional build over a standard store-bought kit? The advantages are measurable in both space and child engagement.
Space Efficiency: A traditional swing set requires a massive horizontal footprint. A multi-use tower uses verticality to deliver the same amount of “play value” in 50% less space. This is a game-changer for smaller properties.
Extended Engagement: “Mono-Play” structures often lead to boredom within 15 minutes. An “Eco-System” encourages a flow-state. A child might spend 10 minutes climbing (physical), then transition to drawing what they saw from the top (creative), and finally water their plants (sensory/nurturing).
Longevity and Adaptability: You can swap out modular components as your kids grow. A sandbox at the base can be converted into a “mud kitchen” or a quiet reading nook for teenagers. The structure evolves with your family.
Challenges and Common Mistakes
Building a custom multi-use structure is more difficult than assembling a pre-cut kit. Avoiding these common pitfalls will save you time and potential injury.
The “Over-Complexity” Trap: Beginners often try to add too many features at once. This leads to a cluttered structure where kids don’t have enough room to move safely. Stick to three main modalities (Physical, Creative, Sensory) and leave room for the structure to breathe.
Ignoring Wood Movement: Wood expands and contracts with the seasons. If you bolt large panels (like chalkboards or climbing walls) too tightly without allowing for slight movement, the wood will eventually warp or crack. Use “oversized” pilot holes and washers to give the material room to flex.
Neglecting Drainage: Any area where wood meets horizontal surfaces—like the base of a planter or a sandbox—must have excellent drainage. Standing water is the fastest way to kill a DIY playground. Drill 1/2-inch holes in the bottom of all “vessels” and use a liner that allows moisture to escape.
Limitations of the Multi-Functional Design
While powerful, the multi-use tower isn’t the perfect solution for every situation. Understanding these constraints will help you decide if it’s right for your yard.
Structural Weight: Because these structures are densely packed with features, they are significantly heavier than simple swing sets. They require a perfectly level, stable base. On sloped or soft ground, you may need professional grading before you can safely build.
The Maintenance Debt: More features mean more maintenance. You aren’t just staining a frame; you’re managing a garden, cleaning a chalkboard, and checking the tension on climbing holds. If you aren’t prepared for a couple of hours of upkeep each month, a simpler design may be better.
Climate Constraints: In very wet or humid climates, vertical gardens attached to the main structure can trap moisture against the wood, accelerating rot. In these areas, it is better to keep the garden “adjacent” rather than “attached” to the structural posts.
Optional Comparison: Mono-Play vs. Eco-System
Deciding which direction to go? This table compares the two philosophies across key factors for most homeowners.
| Feature | Mono-Play (Standard Kit) | Eco-System (Multi-Use) |
|---|---|---|
| Space Required | High (Horizontal) | Low (Vertical/Compact) |
| Initial Cost | Lower (Mass Produced) | Higher (Custom Materials) |
| Interest Duration | Short (15-30 mins) | Long (Hours of Play) |
| Skill Required | Basic Assembly | Intermediate Carpentry |
| Longevity | 2-4 Years (Interest fades) | 8-10 Years (Adaptable) |
Practical Tips and Best Practices
Ready to start your build? Keep these professional tips in mind to ensure the best possible outcome for your project.
- Use “Kid-Safe” Plants: In your sensory garden, choose plants that are non-toxic and tactile. Lamb’s Ear (soft and fuzzy), Mint (high fragrance), and Snapdragons (interactive shapes) are perfect choices. Avoid anything with thorns or poisonous berries.
- Double-Sided Art Walls: If you use a clear acrylic panel for a painting station, kids can paint on both sides simultaneously. This is great for collaborative play and easy to clean with a garden hose.
- Hidden Storage: Build a flip-up bench at the base of the tower. This provides a place for kids to sit and doubles as weather-proof storage for toys, chalk, and garden tools.
- Color Choice Matters: Avoid dark colors for surfaces children touch, like slides or climbing walls. Dark colors absorb UV heat and can cause minor burns during summer months. Stick to lighter tones or natural wood.
Advanced Considerations
For the serious practitioner who wants to push the “Eco-System” concept further, consider these high-level upgrades.
Vertical Water Management: Integrate a rainwater collection system at the roof of the tower. Use a simple gutter and a small barrel with a child-safe spigot. This teaches children about conservation and provides a self-sustaining water source for their sensory garden.
Integrated “Smart” Play: Use weather-resistant solar lighting on the interior of the tower. This extends play hours into the early evening and makes the structure a safe, welcoming hub during the winter months when the sun sets early.
Physiological Scaling: Design the climbing wall with a “transition zone.” Use 2×4 cleats at the bottom for easy footing, and transition to smaller, more difficult rock grips as the height increases. This forces the child to engage their problem-solving skills as they ascend.
Example Scenario: The 8×8 Power-Hub
Imagine a standard 8-foot by 8-foot footprint in a corner of your yard. In a Mono-Play world, this fits a small sandbox. That’s it.
In an Eco-System design, here is how that same space works:
The center is a 4×4 raised tower with a 5-foot deck height. Under the deck is a “Secret Reading Nook” with a built-in bench. The north face has a 10-foot slide. The south face is a vertical climbing wall. The east face is a sensory garden with three tiers of planters. The west face is a large chalkboard. You have just packed five distinct activities into the same 64 square feet that once only held a pile of sand.
This is the power of multi-functional design. It’s not about how much space you have; it’s about how many layers of experience you can build into it.
Final Thoughts
A playground should be more than a place to burn off energy; it should be a place where a child’s world expands. By moving away from the “waiting room” mentality and embracing a multi-functional DIY design, you create a structure that respects both your child’s development and your home’s aesthetic.
The beauty of the “Eco-System” approach is its flexibility. You don’t need to be a master carpenter to start. Begin with a solid, safe tower and add modalities as you gain confidence and as your children’s interests evolve. Whether it’s the tactile joy of a sensory garden or the physical challenge of a climbing wall, every addition makes your backyard a more valuable part of your home.
Stop settling for structures that kids outgrow in a single season. Build for the long haul. Build for variety. Most importantly, build a hub that encourages your kids to stay outside and keep exploring.
Sources
1 playtec.com.au | 2 swingsesh.com | 3 assemblysmart.com | 4 backyardboss.net | 5 psu.edu | 6 kidsgardening.org | 7 cpcmg.net | 8 pags.com | 9 diysprout.com | 10 lawncaremadeeasy.com | 11 lhplandscaping.com | 12 penndutchstructures.com | 13 outdoortoys.com