Salt Dough Recipe For Kids Crafts
The difference between ‘keeping them busy’ and ‘cultivating a craftsman’ is the end result. Store-bought putty is designed to be squished and forgotten. But when you introduce the precision of flour, salt, and heat, art becomes permanent. My kids transitioned from mindless squeezing to intentional carving. They aren’t just making a mess; they’re making artifacts that will hang on our tree for twenty years.

Salt Dough Recipe For Kids Crafts
Salt dough is a timeless modeling material made from three staple kitchen ingredients: flour, salt, and water. This simple mixture creates a malleable clay that can be shaped into almost anything. Once baked or air-dried, it hardens into a stone-like consistency, preserving every fingerprint and fine detail for decades [1.1, 1.9].
This medium exists as the bridge between temporary play and permanent art. While standard playdough is designed to stay soft and eventually gets tossed, salt dough is intended for the kiln—or in this case, your kitchen oven. It is the gold standard for holiday ornaments, handprint keepsakes, and classroom dioramas because it is non-toxic, incredibly inexpensive, and biologically stable [1.4, 1.15].
The high salt content serves a dual purpose. First, it provides structural integrity by reinforcing the gluten bonds in the flour. Second, it acts as a powerful preservative. The salt prevents mold and bacterial growth by drawing moisture away from organic components, effectively “mummifying” the art [1.6, 1.7]. In real-world applications, this allows families to keep ornaments for over 40 years without degradation [1.6].
To visualize the process, think of salt dough as the “beginner’s ceramic.” You don’t need a thousand-degree furnace or expensive minerals. You just need a bag of all-purpose flour and a low-heat setting on your oven to turn a soft lump of dough into a hard, paintable artifact [1.20].
The Golden Ratio: Proportions That Work
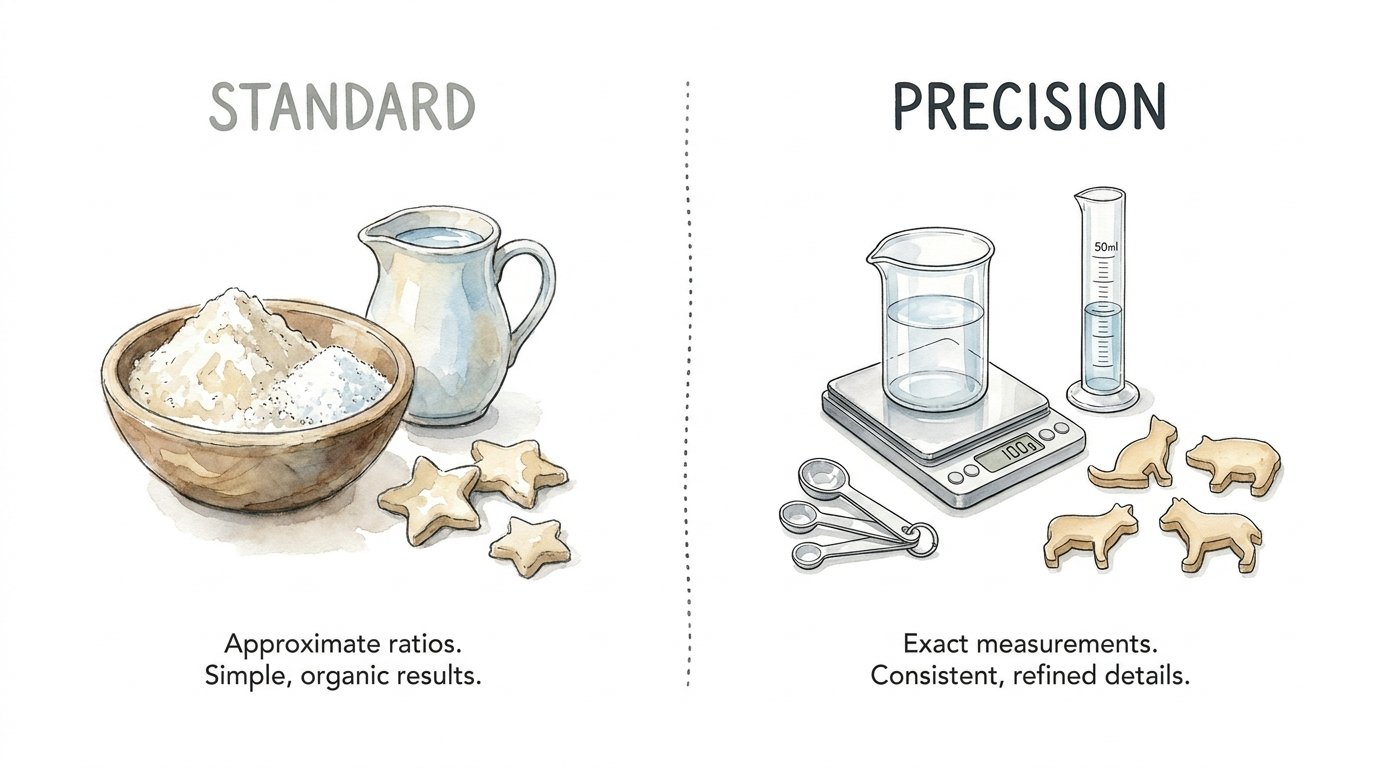
Success starts with the right chemistry. Most experts recommend a 2:1:1 ratio—two parts flour, one part salt, and one part water [1.6]. However, fine-tuning the water is where the precision comes in. You want a dough that is firm, not sticky, and certainly not crumbly [1.10].
- 2 Cups All-Purpose Flour: Do not use self-rising flour. The leavening agents will cause your art to puff up like a biscuit in the oven [1.2, 1.12].
- 1 Cup Fine Table Salt: Use the cheapest, finest salt you can find. Large sea salt crystals will create a grainy texture that is difficult to paint [1.18].
- 1 Cup Lukewarm Water: Warm water helps dissolve the salt slightly, creating a smoother finish and a more cohesive dough [1.2, 1.10].
The Master Process: How to Do It Correctly
Making salt dough is easy, but making permanent salt dough requires a specific sequence of actions. Skipping the kneading or rushing the drying phase is the fastest way to ruin a weekend project.
Step 1: Mixing and Kneading
Combine your dry ingredients in a large bowl first. Whisk the flour and salt together until they are perfectly integrated. This ensures the salt is distributed evenly, which prevents “weak spots” in the final sculpture [1.3].
Add the water gradually. Do not dump it all in at once. Start with half and stir. Add the rest tablespoon by tablespoon until the dough pulls away from the sides of the bowl [1.10]. Once it forms a ball, move it to a floured surface for kneading.
Kneading is non-negotiable. Spend at least 5 to 10 minutes pushing, pulling, and folding the dough. This develops the gluten, making the dough elastic enough to hold fine carvings without cracking [1.1, 1.9]. If the dough feels too sticky, add a pinch of flour. If it’s too dry, add a few drops of water [1.5].
Step 2: Shaping and Sculpting
Roll the dough out to a uniform thickness of about 1/4 inch (6mm). If it’s too thin, it will be brittle and break easily. If it’s too thick, the center won’t dry properly, leading to internal rot or mold [1.5, 1.18].
Use cookie cutters for clean shapes, or use a butter knife to carve custom designs. For ornaments, remember to poke a hole for the string *before* baking. A drinking straw works perfectly for creating a clean, circular hole [1.2, 1.5].
Step 3: The Low-Heat Cure
The goal is dehydration, not cooking. Preheat your oven to a low temperature—170°F to 200°F (75°C to 100°C) is ideal [1.11, 1.12]. Placing salt dough in a hot oven (above 250°F) will cause the air pockets inside to expand, resulting in “puffy” ornaments that look like pita bread [1.4, 1.10].
Bake for 2 to 4 hours depending on the thickness of the pieces. Flip the ornaments halfway through to ensure both sides dry evenly and to prevent the edges from curling upward [1.2, 1.10]. The pieces are done when they feel hard to the touch and sound hollow when tapped [1.10, 1.21].
Benefits of Choosing Salt Dough
In a world of expensive hobby clays and plastic kits, salt dough offers several distinct advantages for parents and educators. It is the most accessible high-yield craft available today.
Unmatched Cost-Efficiency
You can make enough dough for an entire classroom for less than five dollars. A five-pound bag of flour and a large container of salt are all that stands between you and dozens of finished projects. This makes it ideal for large-scale school events or community workshops [1.15, 1.20].
Safety and Non-Toxicity
Unlike polymer clays, which are plastic-based and require careful handling, salt dough is made from food-grade ingredients. While it is too salty to be “edible” in a snack sense, it is perfectly safe for toddlers who might accidentally take a nibble [1.15].
Permanent Heritage
When handled correctly, salt dough is an archival medium. It captures the exact size of a child’s hand at a specific moment in time. Because it doesn’t shrink significantly during the drying process, those measurements stay accurate for a lifetime [1.1, 1.6].
Surface Versatility
The dried surface of salt dough is highly porous. It accepts almost any medium: acrylics, watercolors, tempera, permanent markers, and even glitter glue. This allows for layers of artistic expression that smoother, non-porous clays can’t match [1.2, 1.5, 1.18].
Common Challenges and How to Avoid Them
Most “salt dough fails” shared on social media are the result of three specific errors. Understanding these pitfalls allows you to troubleshoot the dough before you ever turn on the oven.
The “Puffiness” Problem
If your ornaments look like they’ve been inflated, your oven was too hot or you used self-rising flour [1.4, 1.12]. Heat causes the gas produced by leavening agents (or steam from trapped water) to expand. To prevent this, always use plain flour and keep your oven at its lowest possible setting. If your oven doesn’t go below 200°F, leave the door slightly ajar to let excess heat escape [1.10].
Cracking and Crumbling
Cracks usually appear when the dough is too dry during the kneading phase or when it is dried too rapidly [1.18, 1.20]. If you see cracks forming while you’re shaping the dough, dip your finger in water and “weld” the crack shut immediately [1.18]. Ensure you knead the dough long enough to create a smooth, elastic surface before you start cutting shapes.
The “Soggy” Ornament
Salt is hygroscopic, meaning it pulls moisture from the air. In humid environments, an unsealed salt dough ornament will eventually absorb enough water to become soft and moldy [1.1, 1.7]. This is why sealing is the most important “hidden” step in the recipe. If your ornament feels sticky weeks after baking, it wasn’t dried fully or wasn’t sealed against the environment [1.6].
Limitations and Environmental Constraints
While salt dough is versatile, it isn’t the right choice for every project. Understanding its boundaries will save you from frustration.
Not for Outdoor Use
Even with a heavy-duty sealant, salt dough is fundamentally a mixture of salt and flour. Rain, snow, or high humidity will eventually win the battle. Do not use salt dough for garden markers or outdoor decorations [1.7].
Fragility of Thin Projections
Salt dough is strong in thick, rounded shapes, but it is brittle in thin, spindly forms. If you are making a figurine with thin arms or legs, they will likely snap off if the item is dropped [1.14]. For detailed figurines, consider using internal wire supports or switching to a more flexible medium like polymer clay.
Texture and Grain
You will never achieve the glass-smooth finish of professional ceramic or cold porcelain with standard salt dough. There will always be a slight graininess from the salt crystals [1.13]. If you need a hyper-smooth surface for professional jewelry, salt dough might be too “rustic” for your needs.
Optional Comparison: Standard vs. Precision Materials
When choosing a modeling medium, it’s helpful to know how salt dough stacks up against alternatives. Often, the choice depends on whether you value low cost or high durability.
| Feature | Salt Dough (Standard) | Polymer Clay (Precision) | Cold Porcelain (DIY) |
|---|---|---|---|
| Ingredients | Flour, Salt, Water [1.4] | PVC, Plasticizers [1.16] | Cornstarch, PVA Glue [1.14] |
| Cost | Very Low [1.15] | High [1.16] | Medium [1.14] |
| Longevity | 20-40 Years (If sealed) [1.6] | Indefinite (Waterproof) [1.16] | High (If kept dry) [1.16] |
| Detail | Moderate [1.15] | Extreme [1.15] | High [1.13] |
| Drying Method | Low Oven / Air Dry [1.4] | Oven Baked [1.15] | Air Dry [1.14] |
Practical Tips for Best Results
Follow these professional-level tips to move from “craft project” to “heirloom quality.” These adjustments make the difference in the final finish.
- The Sandpaper Secret: Once your ornaments are baked and cooled, you can use fine-grit sandpaper to smooth out any rough edges or “salt bumps” on the back of the piece [1.5, 1.13].
- Prevent Sticking: Roll your dough out directly on parchment paper. This allows you to transfer the shapes to the baking sheet without deforming them [1.3, 1.5].
- The “Hybrid” Dry: For the flattest ornaments, let them air dry for 24 hours at room temperature before putting them in the oven. This stabilizes the surface and significantly reduces the risk of puffing [1.4, 1.11].
- Scent Your Dough: Add a tablespoon of cinnamon, ginger, or cloves to the dry mix. Not only does this give the ornaments a beautiful rustic color, but it also makes your home smell like a bakery during the curing process [1.2, 1.6].
Advanced Considerations for Serious Practitioners
If you want to push the medium further, you can treat salt dough like professional sculpting clay. This requires a few additional tools and techniques.
Using Armatures
For 3D sculptures that stand upright, you need an internal skeleton. Use crumpled aluminum foil or galvanized wire to build the core shape, then “flesh” it out with salt dough. This reduces the total volume of dough, which prevents cracking and speeds up the drying time [1.14, 1.18].
The Double-Sealing Method
To ensure a 20-year lifespan, do not rely on a single coat of paint. First, apply a base layer of acrylic paint to all surfaces (including the back). Once dry, apply at least two coats of a clear acrylic spray or Mod Podge [1.1, 1.5]. This creates a non-permeable plastic shell that locks out humidity forever [1.6, 1.7].
Adding Pigment Pre-Bake
You can color the dough before you even start sculpting. Use food coloring, liquid watercolors, or even a dollop of white acrylic paint directly in the water before mixing [1.3, 1.10]. Adding white paint to the dough results in a bright, porcelain-like finish once baked, rather than the natural “bready” tan color [1.3].
Examples and Realistic Scenarios
To see how these principles apply, let’s look at two common projects and the logic behind the steps.
Scenario A: The Kindergarten Handprint
A teacher wants to make 25 handprint keepsakes for Mother’s Day. Because the dough needs to be thick to capture the impression (about 1/2 inch), the drying time will be much longer. The Precision Move: Use the 200°F oven for 30 minutes, then turn the oven off and leave the pieces inside overnight. Repeat this the next day. This “residual heat” method prevents the thick dough from cracking on the outside while remaining wet on the inside [1.4].
Scenario B: Detailed Gift Tags
A crafter wants to make thin, elegant tags with stamped letters. The Precision Move: Roll the dough very thin (1/8 inch). Use a rubber stamp with permanent ink directly on the raw dough. Bake at 170°F for only 60 minutes. Because they are thin, they will harden quickly. Seal them with a matte spray to maintain the “paper-like” look of the tags while protecting the ink [1.3, 1.11].
Final Thoughts
Salt dough is more than just a rainy-day activity; it is a gateway to understanding material science and craftsmanship. By controlling the ratios of flour and salt and respecting the slow dehydration process, you transform humble pantry items into permanent records of your family’s history. Success lies in the details—using the right flour, keeping the oven low, and sealing the final product against the elements.
The beauty of this craft is its forgiveness. If a batch is too sticky, you add flour. If a piece cracks, you weld it with water. It is a low-stakes environment that encourages experimentation and high-energy creativity. Once you master the basic recipe, you can begin exploring advanced techniques like armatures and custom pigments.
Encourage your children to look past the “squish” and focus on the “make.” When they realize that their creations can last for decades, their approach to art changes. They stop making messes and start making artifacts. Grab a bowl, preheat your oven to its lowest setting, and start building something that will still be on your shelf twenty years from now.
Sources
1 emmaowl.com | 2 adelle.com.au | 3 globalbakes.com | 4 imthecheftoo.com | 5 youtube.com | 6 marialouisedesign.com | 7 reddit.com | 8 narkive.com | 9 marialouisedesign.com