Diy Natural Paint For Kids
Is your child learning color theory from a factory or from the earth? We spent years buying plastic palettes, thinking that’s the only way to teach art. But when we started boiling beet skins and crushing charcoal, the experience changed. My kids didn’t just see ‘red’—they saw the chemistry of a root. This is how you bridge the gap between art and science without a single screen.

Modern art supplies often come in sterile tubes filled with synthetic pigments and plastic binders. While convenient, these materials miss a vital connection to the world around us. Natural paint turns a simple afternoon project into a deep dive into biology, history, and chemistry. You aren’t just making a mess; you are uncovering the hidden vibrant life inside your kitchen and backyard.
Stepping away from the “perfect” consistency of store-bought acrylics opens a door to curiosity. Children begin to wonder why a blueberry makes a purple stain but a red cabbage can turn bright green with a pinch of baking soda. This process values the journey of discovery over the final result on the paper.
Exploring these methods allows you to teach your children about sustainability and self-sufficiency. Every petal, root, and spice becomes a potential tool for expression. Let’s look at how you can transform your home into a vibrant artist’s laboratory using only what nature provides.
Diy Natural Paint For Kids
Diy natural paint for kids is the practice of extracting pigments from plants, minerals, or organic matter and mixing them with a binder to create a medium for art. Instead of relying on petroleum-based dyes, this method uses the inherent colors found in the environment. It exists as a bridge between the ancient techniques of our ancestors and modern sensory play for developing minds.
Real-world applications of natural pigments are everywhere, from the food we eat to the clothes we wear. Many high-end fashion brands are returning to botanical dyes to reduce their environmental footprint. In the world of fine art, professional painters still use earth ochres and lapis lazuli because of their unique depth and light-reflecting properties.
Think of natural paint like a “living” medium. Unlike synthetic paint that stays exactly the same in the bottle for years, natural paint evolves. It might change color as it dries, or it might fade gracefully over time like a dried flower. This unpredictability is part of the magic, teaching children that nature is dynamic and ever-changing.
Context matters when starting this journey. You are not just making a substitute for Crayola; you are participating in a tradition that dates back to the cave paintings of Lascaux. Every time your child mashes a berry or boils an onion skin, they are following the same steps as the first artists in human history.
The Science of the Palette: Understanding Pigments
Before you start boiling pots of water, it helps to understand what makes these colors work. Plants contain specific chemical compounds that produce the hues we see. These are the “active ingredients” in your homemade art supplies.
Anthocyanins: The Color Chameleons
Anthocyanins are responsible for the reds, purples, and blues found in berries, red cabbage, and flower petals. These pigments are highly sensitive to pH levels. This means you can change the color of your paint by adding an acid like lemon juice or a base like baking soda. It is a fantastic way to introduce basic chemistry to children through visual “magic.”
Chlorophyll: The Green Engine
Chlorophyll is the most famous plant pigment. It captures sunlight for photosynthesis and provides the lush greens of spinach, grass, and kale. Because chlorophyll is designed to absorb light, it can be a bit tricky to stabilize as a paint, often fading to a brownish-yellow if not handled correctly.
Carotenoids and Betalins
Carotenoids produce the brilliant oranges and yellows in carrots and marigolds. They are very stable and resist fading better than many other plant dyes. Betalins, found exclusively in beets and certain fungi, provide that intense, deep magenta that is almost impossible to wash off. Understanding these groups helps you predict how your colors will behave on the page.
How to Make It: Step-by-Step Recipes
Creating your own paint involves two main stages: extracting the color and adding a binder. Extraction can be done through heat, pressure, or time.
The Kitchen Scrap Method
Start with the leftovers in your crisper drawer. Red cabbage, beet skins, and onion skins are the heavy hitters of the kitchen lab.
- Gather Materials: Collect skins from 3-4 beets or a quarter head of red cabbage.
- Simmer: Place the scraps in a small pot and cover with just enough water to submerge them. Too much water will dilute your color.
- Reduce: Boil the mixture, then simmer until the liquid is dark and concentrated. This usually takes 15 to 20 minutes.
- Strain: Use a fine-mesh strainer or cheesecloth to remove the solids. The remaining liquid is your concentrated dye.
The Spice Rack Method
Spices like turmeric, paprika, and even instant coffee provide immediate, vibrant color without the need for boiling.
- Mix: Combine one tablespoon of spice with one tablespoon of warm water.
- Whisk: Stir until the mixture is a smooth paste. Turmeric produces a glowing yellow, while coffee offers a range of earthy browns.
- Fine-Tune: Add more water for a watercolor effect or more powder for a thicker, gouache-like consistency.
The Foraged Earth Method
If you have access to red clay or dark soil, you can make authentic earth paints. This is how many professional “earth paint” kits are developed.
- Sift: Collect dry dirt and pass it through a fine sieve to remove rocks and twigs.
- Grind: Use a mortar and pestle to grind the soil into a very fine powder. The finer the powder, the smoother the paint.
- Hydrate: Mix the powder with a little water until it reaches the consistency of thick cream.
Choosing Your Binders
A pigment is just a color; a binder is what makes it “paint.” Without a binder, your colors will simply flake off the paper once the water evaporates.
Egg Tempera: The Renaissance Choice
Egg yolk is one of the most durable binders in history. It dries to a hard, water-resistant finish with a beautiful slight sheen.
- Separate the yolk from the white carefully.
- Puncture the yolk sac and let the liquid drain into a jar, discarding the membrane.
- Mix equal parts yolk and concentrated pigment liquid. Use this immediately, as it does not store well.
Gum Arabic: The Professional Watercolor Binder
Gum Arabic is a natural resin from the acacia tree. It is the gold standard for watercolors because it remains water-soluble even after it dries.
- Dissolve one part Gum Arabic powder into two parts boiling water.
- Add a drop of honey to improve flexibility and prevent the paint from cracking on the paper.
- Mix this solution with your extracted dyes at a 1:1 ratio.
Flour or Cornstarch: The Toddler-Safe Paste
For very young children, a simple starch paste is the safest and easiest option. It creates a thick, finger-paint consistency that is easy to handle.
- Whisk two tablespoons of cornstarch with a small amount of cold water to make a slurry.
- Add one cup of boiling water and stir until it thickens into a translucent gel.
- Stir in your natural dyes once the paste has cooled.
Benefits of Natural Painting
Choosing natural materials over synthetic ones offers immediate and long-term advantages for both the child and the environment.
The most obvious benefit is safety. Many commercial paints contain “trace” amounts of chemicals that parents might prefer to avoid. Homemade paints using food-grade ingredients are often taste-safe, which is a massive relief when working with toddlers who treat every paintbrush like a snack.
Environmental impact is another major factor. Synthetic paints often contain microplastics and liquid acrylic resins that don’t break down. When you wash natural paint down the sink, you are essentially just rinsing away vegetable juice and earth. It is a closed-loop system that respects the planet.
Sensory learning is heightened during this process. A plastic tube of blue paint doesn’t smell like anything. A jar of blueberry paint, however, has a distinct scent, a specific texture, and a story. Children engage their noses, their hands, and their minds simultaneously. This multi-sensory approach has been shown to improve memory retention and creative problem-solving.
Challenges and Common Mistakes
Working with nature means giving up a bit of control. Beginners often run into a few common hurdles that can be easily avoided with a little preparation.
Consistency is a frequent issue. Natural pigments are often “grittier” than their synthetic counterparts. If the paint feels too sandy, you likely haven’t ground your earth pigments long enough or strained your vegetable dyes well enough. Always use a fine-mesh strainer or even an old nylon stocking to get the smoothest liquid possible.
Spoilage is the biggest enemy of DIY paint. Because these are organic materials, they will eventually grow mold if left at room temperature. Many parents make the mistake of mixing a huge batch and leaving it in a cupboard. Treat your natural paints like food—keep them in the refrigerator and use them within a week.
Vibrancy can also be a challenge. Beets look incredibly bright in the pot, but they can dry to a pale pink on the paper. To fix this, you must reduce your liquids. Boil your dye until it is a thick, dark syrup. The more water you evaporate during the cooking process, the more intense your final color will be.
Limitations: When This May Not Be Ideal
While natural paints are wonderful for exploration, they have specific boundaries that are important to understand.
Lightfastness is the most significant limitation. Some botanical dyes, especially those from flowers and berries, are “fugitive.” This means they will fade if exposed to direct sunlight for long periods. If you want to create a masterpiece that will last 50 years on a sunny wall, natural vegetable dyes might not be the right choice. Earth pigments (clays and minerals), however, are much more permanent.
The color range is also more restricted. It is very difficult to achieve a true, neon “electric blue” or a “hot pink” using only backyard materials. Nature provides a palette of sophisticated, earthy tones. If your child is specifically looking for a bright primary color palette, they may find the natural versions a bit muted or “muddy.”
Paper choice matters more here than with acrylics. Natural paints are often very watery and will soak through thin printer paper instantly. You need thick watercolor paper or heavy cardstock to handle the moisture. Using the wrong substrate can lead to warping and frustration for the young artist.
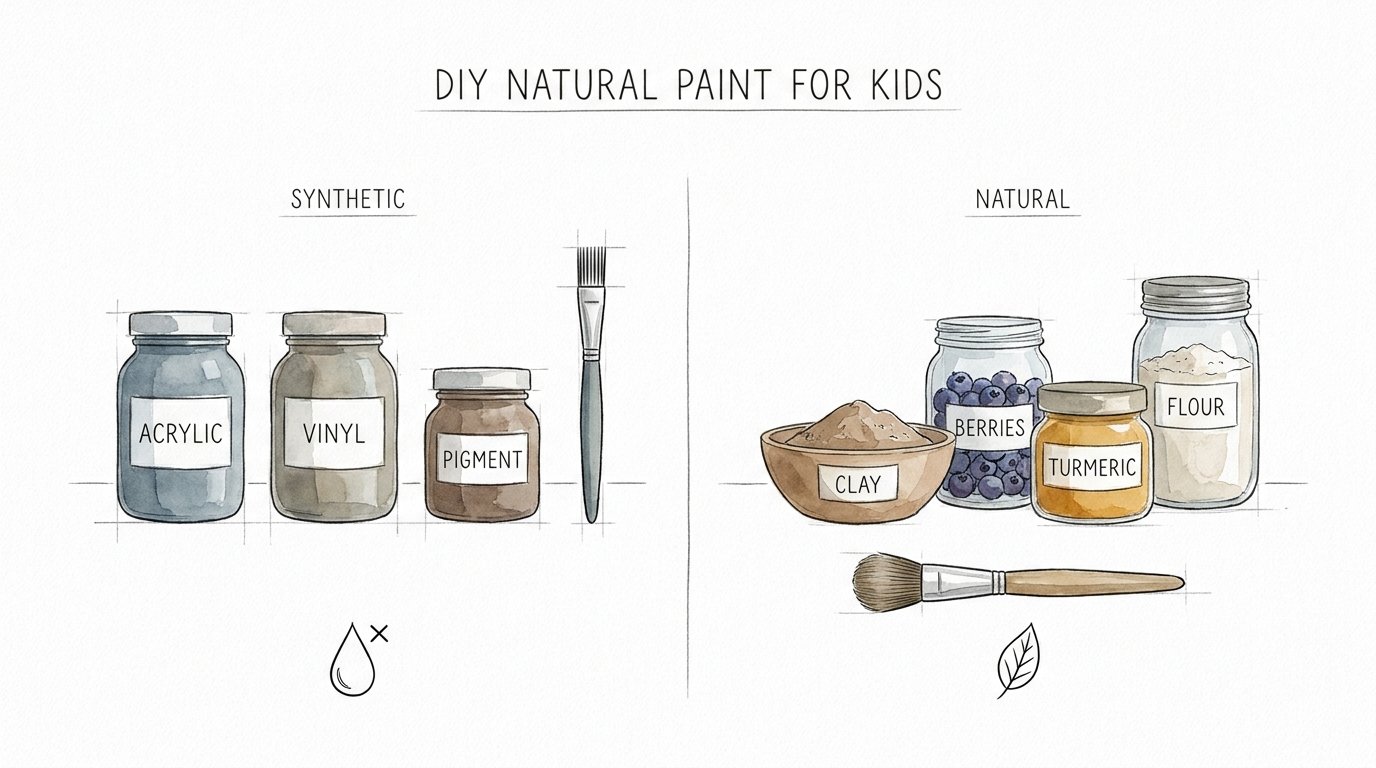
Synthetic vs. Natural Paints
Understanding the differences between these two options helps you decide when to use each in your home curriculum.
| Feature | Synthetic (Store-Bought) | Natural (Homemade) |
|---|---|---|
| Safety | Non-toxic but not edible. Contains preservatives. | Food-grade and often taste-safe. |
| Shelf Life | Years (unopened) to months (opened). | 1-2 weeks (must be refrigerated). |
| Color Permanence | High. Designed for longevity. | Variable. Earth pigments last; berries fade. |
| Cost | Low to Moderate per tube. | Near zero (uses kitchen scraps). |
| Educational Value | Instructional (how to use tools). | Experiential (biology, chemistry, history). |
Practical Tips for Best Results
Apply these tips to ensure your painting session is as smooth as possible.
Use preservatives. Add a single drop of clove oil or tea tree oil to your liquid paints. These natural antimicrobials will slow down the growth of mold and give your paints a pleasant, spicy scent. A pinch of salt also acts as a mild preservative and can create interesting textures on the paper as it dries.
Prepare the paper. If you are using vegetable-based watercolors, try “sizing” your paper with a little diluted gelatin or starch first. This prevents the color from soaking in too deep and helps the pigment sit on the surface, making the colors appear much more vibrant.
Store in glass. Use small baby food jars or condiment containers with tight-fitting lids. Plastic can sometimes react with the natural acids in the dyes, whereas glass is neutral and easy to clean. Label your jars with the date and the source of the pigment.
Experiment with tools. Don’t limit yourself to plastic brushes. Use a twig with a frayed end, a bundle of pine needles, or a carved potato. Nature’s colors look best when applied with nature’s tools. It reinforces the theme of the entire project.
Advanced Considerations: The pH Shift
For older children or those who want to go deeper, the chemistry of color shifting is a must-try. This technique turns the painting process into a live laboratory experiment.
Anthocyanin-rich liquids, like red cabbage juice, are natural pH indicators. This means their molecular structure changes depending on how acidic or basic their environment is. When you have a jar of deep purple cabbage paint, try the following:
- The Acid Shift: Add a teaspoon of lemon juice or vinegar. The purple will instantly turn a bright, vivid pink or red.
- The Base Shift: Add a pinch of baking soda. The purple will shift into a deep blue, then a teal, and eventually a bright lime green if you add enough.
- The Neutralization: Try to get back to the original purple by carefully balancing the two.
This allows a child to “create” a full spectrum of colors from just one pot of boiled cabbage. It teaches the concepts of acidity, chemical reactions, and the visible spectrum in a way that is impossible to forget.
Example Scenario: The “Rainy Day” Kitchen Lab
Imagine it’s a Tuesday afternoon and the rain is pouring down. Instead of reaching for the tablet, you pull out a single red cabbage, a bag of turmeric, and some old coffee grounds.
You set up three stations on the kitchen table. At station one, the kids help you chop the cabbage and watch the water turn dark indigo on the stove. At station two, they whisk turmeric and warm water, marveling at how it looks like “liquid gold.” At station three, they use a mortar and pestle to grind up charcoal from the fireplace or some dry soil from a potted plant.
By the time the cabbage water has cooled, they have three distinct mediums. They start painting a forest. The turmeric becomes the sun, the coffee becomes the tree trunks, and the cabbage juice becomes the sky. Halfway through, you hand them a small bowl of lemon juice and a cotton swab. They “paint” over the purple sky, and suddenly, pink clouds appear.
This isn’t just an art project. It’s an hour of engagement where they’ve practiced fine motor skills, learned about plant biology, and seen a chemical reaction in real-time. The mess on the table is temporary, but the understanding of how the world works is permanent.
Final Thoughts
Diy natural paint for kids is about more than just finding a cheaper way to stock an art cupboard. It is a return to a slower, more intentional way of creating. It encourages children to look at a beet or a handful of dirt not as waste or a boring object, but as a source of hidden potential.
Bridging the gap between art and science helps foster a holistic mindset. When a child understands that the color on their page came from a living root, they develop a deeper respect for the environment. They begin to see the world as an interconnected system of chemistry and beauty.
Start small by boiling some onion skins or mashing a handful of berries. You don’t need a professional laboratory to begin—you just need a pot, some water, and a bit of curiosity. Let the earth be your child’s first art teacher, and watch how their perspective changes when they realize that color isn’t something bought in a store, but something discovered in the world.
Sources
1 diynatural.com | 2 ecokidsart.com | 3 youtube.com | 4 montshire.org | 5 kidzone.ws | 6 pigment.tokyo | 7 naturalearthpaint.com | 8 organicnaturalpaint.co.uk | 9 ecokidsart.com | 10 childrensartmuseumofindia.com | 11 smilogykids.com