Diy Multi-functional Playground Platforms
Is your play equipment a one-hit wonder or a platform for a thousand different adventures? A slide is fun for a week. A multi-use play deck is a pirate ship today, a laboratory tomorrow, and a theater the day after. See how to design ‘open-ended’ structures that grow with your child’s imagination instead of limiting it.

Children crave novelty. Most backyard sets fail because they offer a fixed path. You climb the ladder. You slide down the slide. You repeat. Eventually, the brain turns off. Open-ended play structures flip the script. They provide the “skeleton” for whatever story your child wants to tell.
By focusing on a multi-functional platform, you create a hub for activity. This approach is more sustainable and more engaging. It saves space in your yard. It saves money in your pocket. Most importantly, it creates a “yes” environment where creativity has no ceiling.
Diy Multi-functional Playground Platforms
A DIY multi-functional playground platform is a raised deck designed for versatility. Unlike a standard playhouse, it often lacks permanent walls. It is the “blank canvas” of the backyard. You build a rock-solid foundation, then add or remove features as your child develops.
These structures exist to bridge the gap between physical exercise and imaginative play. In the real world, you see these in nature-based playgrounds or “adventure playgrounds” where the environment changes daily. A platform can host a puppet show in the morning and a rigorous climbing session by lunch.

Imagine a simple 4×4 or 6×6 deck. Without a roof, it becomes a star-gazing deck. With a temporary tarp, it is a survivalist’s tent. By leaving the design “unfinished,” you invite the child to finish it with their mind. This is the heart of modular playground design.
The Foundation: How to Build a Versatile Play Deck
Building a platform requires a mix of deck-building logic and playground safety. You need a structure that won’t wobble when three kids are jumping on it. You also need a surface that won’t give them a palm full of splinters.
First, select your site. Choose a level area. Ensure you have a 6-foot safety buffer in all directions. This is the “use zone.” If a child falls, they shouldn’t hit a fence, a tree, or a garden gnome.
Next, choose your supports. 4×4 posts are the industry standard. You can bury them 2 feet deep in concrete or use deck blocks for a semi-permanent setup. If you use deck blocks, ensure the ground is compacted and level to prevent shifting over time.
Frame the deck with 2×6 or 2×8 joists. Use joist hangers and galvanized nails for maximum strength. For the flooring, 5/4-inch deck boards are ideal. They have rounded edges, which are much friendlier for bare feet than sharp-edged 2x4s.
Essential Features for Open-Ended Play
The magic isn’t in the wood; it’s in the attachments. To make a platform multi-functional, you need “loose parts” and “swappable accessories.” Think of your platform like a tool belt.
The Pulley System
A bucket and a rope can keep a child busy for hours. Attach a simple pulley to a high beam. Add a galvanized bucket with a carabiner. Suddenly, the platform is a construction site. Children will haul “precious cargo”—rocks, sticks, or stuffed animals—up to their secret base.
The Weatherproof Chalkboard
Don’t just buy a flimsy plastic board. Use cement backer board (like HardieBacker). It won’t rot, warp, or absorb water. Prime it and apply three coats of outdoor chalkboard paint. Mount it to one side of the platform. It’s now a menu for a cafe, a mission control map, or an art gallery.
The Sensory Mud Kitchen
Integrated sensory play is a game-changer. You can build a small counter at the base of your platform. Cut holes to drop in stainless steel mixing bowls. Add a few hooks for old pots and pans. This “mud kitchen” encourages fine motor skills and social cooperation as kids “cook” for the “customers” on the deck above.
Benefits of a Modular Approach
Why choose a modular platform over a pre-packaged kit from a big-box store? The reasons are measurable and long-term. A modular system respects the child’s changing needs.
* Adaptability: A toddler needs a gentle ramp. A seven-year-old wants a cargo net. You can swap these features in a single afternoon.
* Skill Leveling: You can start with a low platform (12-24 inches) and increase the height or complexity as your child gains confidence.
* Cost Efficiency: You don’t have to spend $2,000 upfront. You can build the core deck this year and add the rock wall or the zip line next year.
* Durability: DIY builds often use higher-grade lumber than mass-produced kits. A cedar or redwood platform can last 10 to 15 years with basic maintenance.
Challenges and Common Mistakes
The biggest trap in DIY playground building is “over-building.” You might want to add every bell and whistle immediately. Resist the urge. If the structure is too “busy,” there is no room for the child to innovate.
Structural instability is the primary safety risk. Many builders forget to use diagonal bracing. Without “X” bracing between the posts, the platform will sway. This “racking” eventually loosens the bolts and creates a collapse hazard.
Another common error is ignoring head entrapment hazards. Any gap on a playground must be smaller than 3.5 inches or larger than 9 inches. This prevents a child’s head from getting stuck while their body moves through. Check your railings and ladder rungs twice.
Finally, don’t skimp on the fasteners. Interior-grade screws will snap or rust within a season. Always use hot-dipped galvanized or stainless steel hardware. Using GRK-style structural screws is a best practice for “serious” builds.
Limitations: When This Isn’t the Best Choice
Multi-functional platforms aren’t for everyone. If you have a very small yard, a sprawling platform might dominate the space. In these cases, a vertical “climbing tower” might be better.
Environmental constraints also play a role. If you live in a high-wind area or a flood zone, an elevated platform requires advanced anchoring. You may need helical piers or deep concrete footings that exceed a standard DIY skill level.
If your child has very specific physical needs, a custom open-ended design might require professional consultation. While “loose parts” play is great, some children thrive on the predictable, structured feedback of a traditional slide or swing.
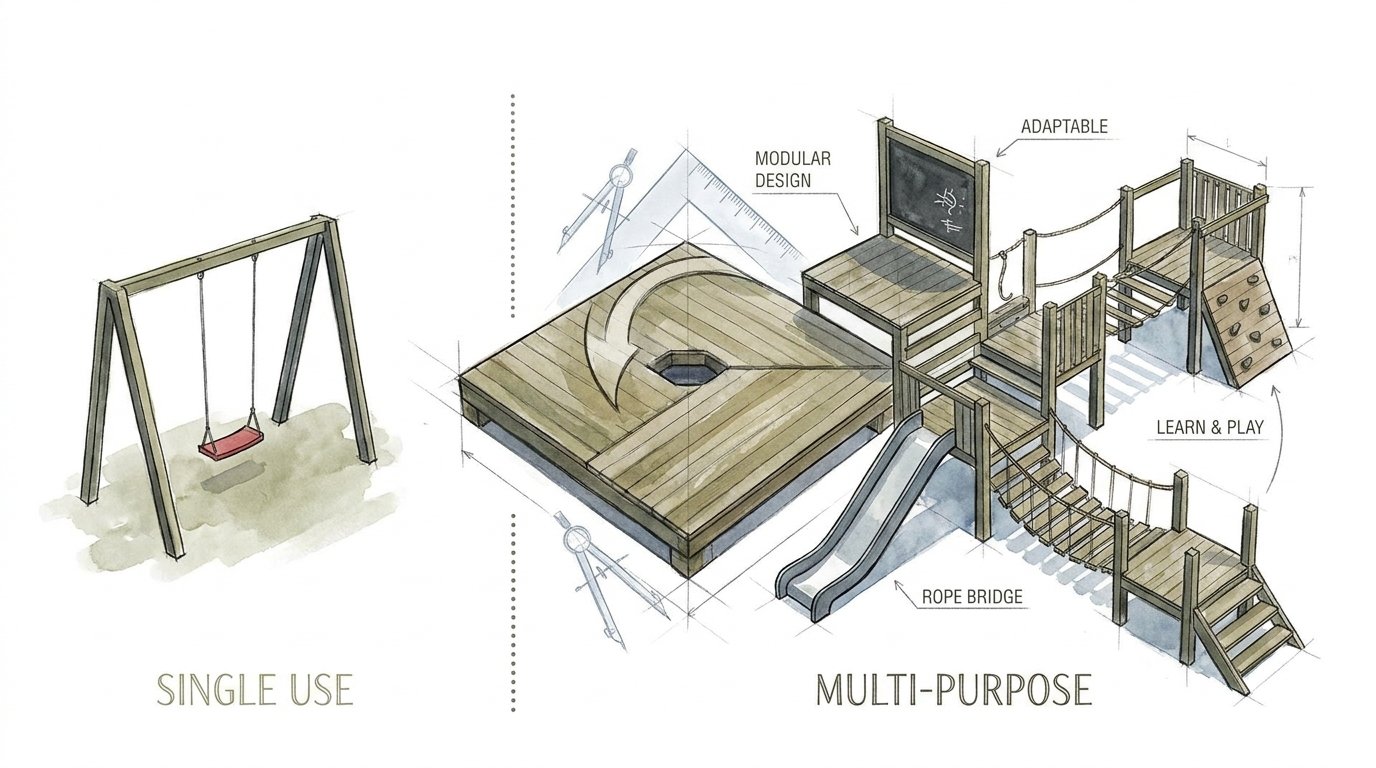
Comparing Design Philosophies
When choosing your path, consider how the structure will function over five years. The following table compares a traditional Single-Use Set with a Multi-Purpose Platform.
| Feature | Single-Use Structure | Multi-Purpose Platform |
|---|---|---|
| Initial Cost | High (Upfront) | Low to Moderate (Incremental) |
| Skill Level Required | Low (Assembly only) | Moderate (Framing skills) |
| Play Value Longevity | 1-2 Years | 5-10 Years |
| Maintenance | Moderate (Plastic fades/cracks) | Moderate (Wood needs sealing) |
| Space Efficiency | Fixed Footprint | Vertical/Modular Storage |
Practical Tips and Best Practices
If you are ready to break ground, keep these professional tips in mind. They make the difference between a “backyard eyesore” and a “neighborhood landmark.”
* Choose the Right Wood: Cedar and Redwood are naturally rot-resistant. If using Pressure-Treated Pine, ensure it is “ground-contact” rated. Sand all surfaces to a 120-grit finish to prevent splinters.
* Manage the Fall Zone: Grass is not a safety surface. It packs down like concrete. Use at least 9 inches of engineered wood fiber (EWF) or rubber mulch.
* Round Your Corners: Use a router or a sander to “break” all sharp edges on the wood. A 1/2-inch radius makes the structure much safer for active play.
* Add “Anchor Points”: Install heavy-duty eye bolts in the frame. These allow you to quickly clip in a hammock, a rope ladder, or a “talking tube” without drilling new holes.
* Plan for Drainage: If you add a sandbox under the platform, use a weed barrier at the bottom so water can drain into the earth. Never let water sit in a “box” or it will become a breeding ground for insects.
Advanced Considerations for Serious Builders
For the practitioner who wants to go further, consider Loose Parts Theory. This concept, developed by architect Simon Nicholson, suggests that the more “movable” a space is, the more creative the play.
Integrate “loose parts” storage into the platform itself. Build a cubby under the floorboards to hold PVC pipes, wood cookies, and old tires. These items don’t have a “right” way to be used. They are the building blocks of a truly complex play environment.
Consider risky play integration. This doesn’t mean “dangerous” play. It means providing “challenges” that help kids evaluate risk. A slightly higher balance beam or a “wobbly” bridge helps develop the vestibular system. Just ensure the fall surfacing is adequate for the height.
Scenario: The “Adventure Hub” Build
Let’s look at how this works in a real backyard. A family builds a 5×5 platform at a 48-inch height.
In Year One, they add a wide ramp and a low-profile chalkboard for their three-year-old. The space under the deck is a “sand-den.”
In Year Three, the ramp is replaced by a rock climbing wall. They add a pulley system and a “periscope” to the railing. The sand-den becomes a “laboratory” with a wooden counter and old plastic beakers.
In Year Five, the rock wall is steeper. They attach a zip line to the main post. The chalkboard is now used for keeping score during neighborhood obstacle courses. The platform hasn’t changed, but the play has evolved perfectly with the children.
Final Thoughts
Designing a multi-functional playground platform is an investment in your child’s cognitive development. By moving away from “single-use” equipment, you encourage critical thinking and problem-solving. You aren’t just giving them a place to burn energy; you are giving them a stage for their dreams.
The beauty of this project is that it never has to be “finished.” You can tweak, add, and refine the structure as your family grows. It becomes a collaborative project between you and your kids. They provide the ideas; you provide the structural integrity.
Don’t be afraid to start small. A simple, well-built deck is the strongest foundation for a decade of fun. Once the platform is up, step back and watch. The children will show you exactly what it needs to become next.
Sources
1 creativesystems.com | 2 brightgreendoor.com | 3 assemblysmart.com | 4 swingnslide.com | 5 swingnslide.com | 6 ifonlyapril.com | 7 biggerthanthethreeofus.com | 8 heytherehome.com | 9 littletackertoys.com.au | 10 gorillaplaysets.com | 11 youtube.com | 12 beinwonderdesign.com | 13 pathways.org | 14 happyhooligans.ca