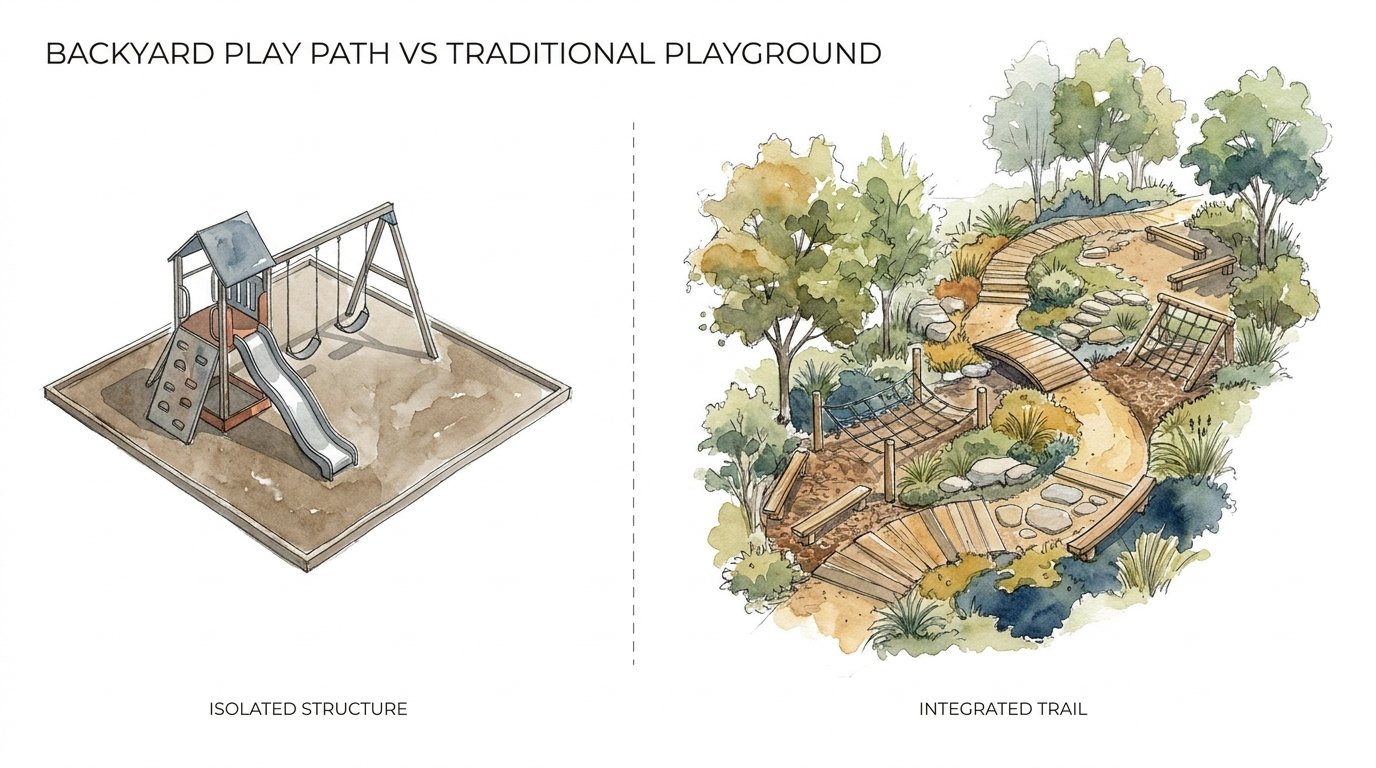
Backyard Play Path Vs Traditional Playground
Stop putting your playground in a ‘timeout’ corner and start making the whole yard the destination. When you isolate play to one metal structure, kids get bored in 10 minutes. Building a ‘Play Trail’ that winds through your garden encourages continuous movement and exploration. Turn your walk to the garden shed into an obstacle course.

This approach changes how families use their outdoor space. Instead of a single static object taking up a square of dead grass, the entire landscape becomes a living, breathing adventure. Your backyard stops being a yard with a toy in it and starts being a functional ecosystem for growth.
Backyard Play Path Vs Traditional Playground
A traditional playground is a destination. You walk to it, you climb it, you finish, and you leave. It is often a singular metal or plastic structure placed on a square of mulch. While these provide exercise, they often lack the variety needed for long-term engagement.
A Backyard Play Path is a circulation system. It is a series of interconnected routes that guide children through different “zones” of the yard. This might include a primary loop for trikes or running, secondary paths that cut through bushes, and tertiary trails that lead to hidden nooks. This system mimics the way children naturally explore the world—through discovery and movement rather than repetitive loops on a single slide.
Traditional playgrounds focus on gross motor skills like swinging or sliding. Play paths integrate those skills with sensory exploration, imaginative play, and cognitive problem-solving. This concept is used in high-end “natural learning environments” and botanical gardens to keep children engaged for hours rather than minutes.

How to Design Your Integrated Play Path
Creating a play trail requires looking at your yard as a map of possibilities. Start with a primary loop. This is the main artery of the yard. It should be wide enough for two children to pass and made of a durable material like crushed stone or smooth pavers.
Secondary paths branch off this main loop. These are narrower and more adventurous. They might weave behind a large hydrangea or circle around a tree. Use stepping stones or “tree cookies”—horizontal slices of logs—to create a sense of challenge. This forces children to adjust their gait and balance, which builds core strength.
Divide your yard into functional zones along the path. One area might be a “High Energy Zone” with a rope swing or a small hill for rolling. Another area could be a “Quiet Zone” with a small bench or a willow tunnel for reading. Connecting these with a path ensures that children transition naturally between different types of play.
Include verticality in your design. If your yard is flat, build a small earthen mound. A one-foot elevation change feels like a mountain to a toddler. Place a slide directly onto the side of this mound instead of using a ladder. This integrates the equipment into the landscape, making it feel like part of the terrain.
Benefits of the Integrated Play Approach
Integrated play paths foster physical literacy in a way that static equipment cannot. Navigating uneven terrain, stepping over logs, and balancing on narrow planks develops the vestibular system. This system is responsible for balance and spatial orientation.
Imaginative play thrives in these environments. A plastic slide is always a slide. A path that disappears behind a row of tall grasses can be a jungle trail, a secret hallway, or a mountain pass. This open-ended nature allows the play to evolve as the child grows.
Movement becomes constant rather than episodic. On a traditional swing set, kids often wait for a turn or sit still while swinging. On a trail, the very act of moving from point A to point B is the play. This increases daily step counts and cardiovascular health without making it feel like a workout.
Sensory growth is a massive advantage. Walking through a garden of lavender, touching mossy rocks, and hearing the crunch of gravel provides a rich “sensory diet.” This helps children learn to process environmental stimuli, which can lead to better focus and emotional regulation.
Challenges and Common Mistakes to Avoid
Avoiding the “Straight Line Trap” is the first rule of trail design. Straight paths are for commuting; curved paths are for playing. A straight path allows a child to see the end immediately, which kills the sense of discovery. Always add a bend or a “blind curve” using tall plants or structures.
Neglecting drainage is a common pitfall. If your path becomes a muddy swamp after every rain, nobody will use it. Ensure your trail has a slight crown to shed water or use porous materials like wood chips or pea gravel. These allow water to soak back into the ground rather than pooling on the surface.
Isolation is another error. People often build a beautiful path but forget to give it a reason to exist. Every path should lead somewhere. Whether it is a “fairy house” at the end of a narrow trail or a sandpit at the bottom of a hill, there must be a payoff for the journey.
Safety must be balanced with “positive risk.” A path that is too safe is boring. However, sharp edges on rocks or poisonous plants in the garden are genuine hazards. Stick to non-toxic greenery like sunflowers, snapdragons, or blueberry bushes. Ensure any “fall zones” under climbing elements have 9 to 12 inches of soft mulch.
Limitations and Realistic Constraints
Small yards present a unique challenge. You may not have room for a 50-foot winding trail. In these cases, you must use “loop-backs” and verticality. Use the perimeter of the yard as your primary path to maximize the central open space. A path that hugs the fence line can still offer plenty of adventure.
Maintenance is higher for integrated trails than for a single plastic structure. Plants need pruning, and mulch needs to be topped off every year or two. If you want a “zero-maintenance” yard, this approach might not be for you. This is a living landscape that evolves with the seasons.
Budget can vary wildly. A DIY trail using scavenged logs and wood chips is incredibly cheap. A professionally landscaped path with flagstone and custom hills can cost thousands. Determine your budget early and focus on “loose parts”—like stumps and rocks—that offer high play value for low cost.
Isolated Structure vs Integrated Trail Comparison
| Feature | Traditional Playground | Backyard Play Path |
|---|---|---|
| Engagement Time | Short (10-20 mins) | Long (1-2 hours) |
| Movement Style | Repetitive / Static | Continuous / Fluid |
| Landscape Integration | Poor (Stands out) | High (Blends in) |
| Cost (DIY) | $500 – $2,500 | $100 – $1,000 |
| Developmental Focus | Gross Motor Skills | Sensory, Cognitive, Physical |
Practical Tips for Immediate Application
Choose your ground cover wisely. Engineered Wood Fiber (EWF) is the gold standard for safety and durability. It knits together to form a firm surface that is still soft enough for falls. For a more “natural” look, use triple-shredded hardwood mulch, which stays in place better than large nuggets.
Incorporate “Loose Parts” along the trail. Place a basket of “adventure tools” like magnifying glasses, buckets, and shovels at the start of the path. Scatter pinecones, smooth river rocks, or even old tires along the route. These items allow kids to manipulate their environment, which is a key component of deep play.
Add edible waypoints. Plant thornless blackberries or cherry tomatoes along the path. This creates “grazing” opportunities that keep kids energized and teaches them where food comes from. It also makes the trail a destination for the senses—sight, touch, and taste.
Use lighting to extend play. Solar-powered path lights are inexpensive and make the trail usable at dusk. This adds a “night adventure” element that kids love. It also helps adults navigate the yard safely when the kids aren’t using it.
Advanced Considerations for the Serious Practitioner
Scaling for age is critical. A path for a toddler should be wide and flat with very low stepping stones. As the child reaches 6 or 7 years old, they need more challenge. You can add “balance beams” made of fallen logs or a “ninja line” suspended between two trees along the trail.
Topography can be your best friend. If you have a slope, don’t level it. Use it. A hill is a natural slide, a lookout point, and a physical challenge all in one. Excavate a small portion of the hill to create a “gully” for the path to run through. This creates a feeling of being “inside” the landscape.
Consider adult integration. A play path doesn’t have to be just for kids. Design the primary loop to be a walking path for yourself. Place a bench in a “Quiet Zone” so you can relax while supervising. When the play elements blend into the landscaping, the yard remains a beautiful space for hosting guests while still being a powerhouse for child development.
Environmental sustainability should guide your choices. Use local stone and native plants. Native species require less water and attract local wildlife like butterflies and birds. This turns the play trail into a nature study area, adding an educational layer to the physical activity.
Example Scenario: The 40-Foot Yard Transformation
Imagine a standard suburban backyard: 40 feet wide, mostly flat grass, with a single metal swing set in the corner. The grass under the swings is dead, and the rest of the yard is rarely used.
To transform this, we remove the swing set and create a “Figure 8” path using wood chips. The center of the “8” is an existing oak tree. On one side of the loop, we build a 2-foot earthen mound with a plastic slide embedded in the turf. On the other side, we place three large boulders for climbing.
The path between the mound and the boulders isn’t just mulch; it has “tree cookie” stepping stones that require balance. We plant tall grasses along the curve to hide the boulders from view until the child rounds the corner. Near the oak tree, we hang a simple rope swing.
The result is a yard where the child runs from the slide, balances across the stones, climbs the boulders, and then swings under the tree. They are moving constantly. They are using their imagination. The yard feels twice as large because they aren’t seeing it all at once.
Final Thoughts
Building a play trail is a shift in mindset. It is about moving away from “equipment” and toward “environment.” When the whole yard is the playground, the possibilities for adventure become endless. You are creating a space that challenges the body and feeds the mind.
Start small by adding one simple path behind your bushes or a few stumps near the patio. Observe how your children interact with these changes. You will likely find that they spend more time in those few feet of trail than they ever did on a traditional slide.
This approach creates a landscape that grows with your family. Years from now, when the kids are older, the “play trail” simply becomes a beautiful, well-designed garden path. The investment you make today in their movement and creativity will pay dividends for a lifetime.
Sources
1 wrightlandscape.ca | 2 naturalearning.org | 3 playlsi.com | 4 idlandscaping.com.au | 5 tomsofmaine.com | 6 loveyourlandscape.org | 7 superiorplay.com | 8 backyardfunfactory.com | 9 mhsplanning.com | 10 advantagenv.com | 11 activeforlife.com | 12 mwranches.com | 13 yardzen.com | 14 miracle-recreation.com | 15 soilandstone.com