Diy Modular Climbing Wall For Kids
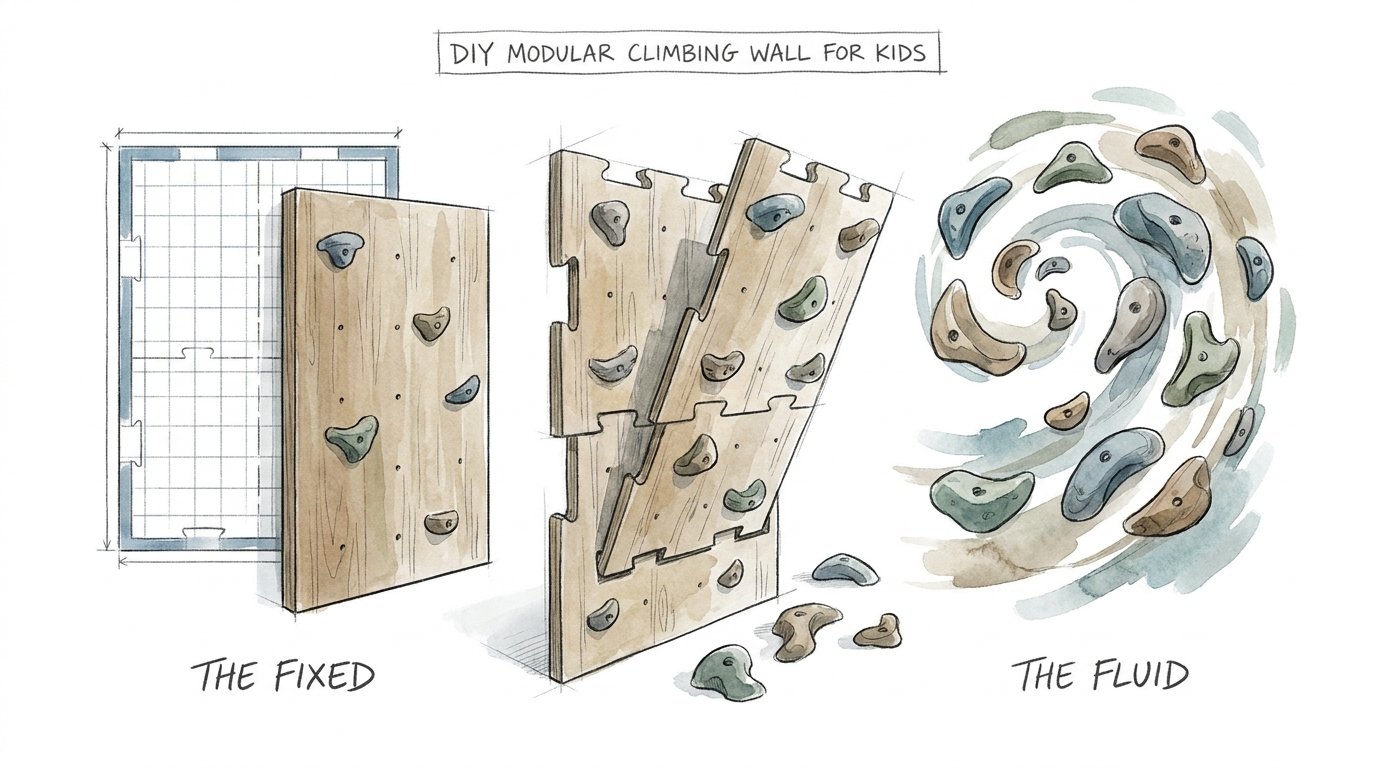
When the path never changes, the brain stops growing—discover the secret to a playground that evolves with your child. Most DIY playgrounds are ‘one and done.’ You build it, they play for a week, and then it becomes a giant lawn ornament. Switching from a fixed wall to a modular peg system turns a simple climb into a daily problem-solving mission. It’s not just a wall; it’s a new puzzle every single morning.

Kids crave novelty because their brains are wired for discovery. A standard climbing frame offers a set path that they master in hours. Once the physical challenge is gone, the equipment loses its value. This is where modularity changes the game. You create a living structure that changes as they grow.
Building a home climbing wall is a major investment in your child’s physical and cognitive development. It provides a controlled environment for risk-taking. It builds grip strength, core stability, and spatial awareness. Best of all, it keeps the adventure inside your home regardless of the weather.
This guide explores how to design and build a system that never gets boring. We will look at the materials, the hardware, and the logic behind a “fluid” playground. You are not just building a wall; you are building a tool for lifelong resilience.
Diy Modular Climbing Wall For Kids
A DIY modular climbing wall is a customizable vertical playground designed to grow with a child’s skill level. Unlike a static rock wall with permanently fixed holds, a modular system uses a grid of pre-drilled holes and threaded inserts called T-nuts. This allow parents or children to move, rotate, and swap climbing holds whenever a challenge becomes too easy.

These systems are common in professional bouldering gyms but are perfectly suited for home use. They exist to solve the problem of “play plateau,” where a child stops using a toy because they have solved its pattern. Modularity introduces the concept of “route setting,” which is the art of creating specific paths of varying difficulty.
Think of it like a giant, vertical LEGO board. The wall provides the base, and the holds are the bricks. One day it might be a simple ladder-style ascent for a toddler. Six months later, it becomes a technical traverse that requires balance and finger strength. This adaptability makes it a “fluid” system rather than a “fixed” one.
Real-world applications range from small bedroom “traverse” walls that stay close to the floor to full-height garage bouldering walls. Some parents even integrate these systems into the back of bunk beds or playhouse exteriors. The modular nature means the wall evolves alongside your child’s height and confidence.
Hardware and Mechanical Principles
The secret to a successful modular wall lies in the T-nut grid. These threaded steel fasteners are hammered into the back of the plywood before the panels are mounted to the wall. They allow bolts to pass through the climbing holds and lock into the wood with immense strength.
Standard climbing hardware uses a 3/8″-16 thread size. This is the universal standard for almost all commercial and high-quality home climbing holds. Using this standard ensures that any hold you buy from a reputable manufacturer will fit your wall perfectly. Four-prong T-nuts are the budget-friendly choice, but screw-in T-nuts are the gold standard because they never “pop out” or spin during maintenance.
Grid spacing determines the flexibility of your “puzzle.” A standard 8-inch staggered grid is the most popular layout. This pattern provides roughly 72 to 75 T-nut locations per 4’x8′ sheet of plywood. Having a high density of holes allows you to place holds exactly where a child needs them to reach the next level of difficulty.
Climbing holds themselves come in various materials. Professional-grade holds are made from polyurethane or polyester resin, offering a “rock-like” texture that provides excellent grip. Cheaper plastic holds found in many kits can be slippery and less durable. Investing in resin holds helps children develop better technique, such as “edging” and “crimping.”
Recommended Grid Patterns
- Staggered Grid: The best for flexibility. It ensures no two holes are perfectly aligned vertically, forcing more creative movement.
- Square Grid: Easier to measure and drill but limits the “natural” feel of the routes.
- Random Placement: Looks more like real rock but often leaves “dead zones” where no holds can be placed.
How to Build Your Modular Wall Step-by-Step
Safety and stability must be your top priorities during construction. A child’s safety depends on the structural integrity of the frame and the quality of the plywood. Follow these steps to ensure a professional-grade result.
Step 1: Selecting Your Wood. Always use 3/4-inch plywood. Thinner wood will flex and may fail under the stress of a falling load or tightened bolts. ACX or BCX grade plywood is ideal for indoor use because one side is sanded smooth, protecting little fingers from splinters. For outdoor walls, use pressure-treated or marine-grade plywood to resist rot.
Step 2: Planning the Grid. Lay your plywood sheet flat on a pair of sawhorses. Use a chalk line or a long straightedge to mark your grid. If you are using an 8-inch staggered grid, mark your first row at 4 inches from the edge, then 12 inches, then 20 inches. Offset the second row by 4 inches to create the staggered effect. Ensure you leave a 4-inch “dead zone” around the perimeter where the framing studs will sit so the bolts don’t hit the wood behind the panel.
Step 3: Drilling and Sanding. Use a 7/16-inch or 1/2-inch drill bit depending on your specific T-nut size. Drill slowly to avoid “blowout” on the back of the board. Once all holes are drilled, sand both sides of the plywood thoroughly. Soften the edges and corners of the entire sheet to prevent scrapes.
Step 4: Installing T-Nuts. Flip the board so the “ugly” side is up. Hammer a T-nut into every hole. Make sure they sit perfectly flush and square with the wood. If you are using screw-in T-nuts, use a small drill bit for the pilot holes and secure them with the provided screws. This extra step prevents the most common headache: “spinners” that make it impossible to remove a hold later.
Step 5: Building the Frame. Locate the studs in your room using a stud finder. Mount 2×4 or 2×6 horizontal “stringers” or vertical studs to the wall using 3.5-inch lag screws. This frame creates a 1.5-inch to 3.5-inch gap between the plywood and the drywall. This gap is critical; without it, the climbing bolts will hit your drywall and prevent the holds from tightening.
Step 6: Mounting the Panels. Lift the plywood panels into place and screw them into your frame using high-quality wood screws every 12 inches. Check for level and plumb as you go. Once the wall is secure, it’s time to “set” your first routes by bolting on the holds using an Allen wrench.
Benefits of a Modular System
Choosing a fluid modular system over a fixed one provides measurable advantages for a child’s development. It transforms a physical activity into a cognitive one. The benefits extend far beyond just burning off energy.
Enhanced Problem Solving: Every time you move a hold, the “puzzle” changes. Children must look at the wall and plan their sequence of moves before they leave the ground. This develops “beta,” which is climbing terminology for the strategy required to complete a route. They learn to visualize success and adjust their plan when a move doesn’t work.
Physical Longevity: A fixed wall is outgrown in a year. A modular wall can be adjusted to match a child’s increasing reach and strength. You can swap out large “jug” holds for smaller “crimps” or “slopers” as their grip strength improves. This ensures the equipment remains useful for a decade rather than a season.
Confidence and Resilience: Overcoming a specific “problem” on the wall provides a massive boost to self-esteem. Because the routes are adjustable, you can set “attainable challenges”—routes that are just barely within their reach. This teaches the value of persistence and the reward of hard work.
Spatial Awareness and Proprioception: Climbing requires moving the body through three-dimensional space. It teaches children where their limbs are in relation to their core. A modular wall allows you to create “traverses” (horizontal movement) and “ascents” (vertical movement), providing a variety of sensory inputs that aid in motor development.
Challenges and Common Mistakes
Building a home climbing wall is rewarding, but several common errors can ruin the experience or create safety hazards. Awareness of these pitfalls is the first step toward a successful build.
The “Spinner” T-Nut: This is the most frustrating issue in home climbing. If a T-nut is not seated properly, it may spin when you try to tighten or loosen a bolt. This locks the hold in place permanently. Using screw-in T-nuts or high-quality four-prong versions with a bit of epoxy can prevent this. Always test every T-nut with a bolt before mounting the panel to the wall.
Poor Wood Choice: Using 1/2-inch plywood or particle board is a major mistake. These materials lack the structural density to hold T-nuts under tension. Over time, the T-nuts will pull through the wood or cause the panel to crack. Stick to 3/4-inch ACX plywood for safety and longevity.
Incorrect Bolt Length: Using bolts that are too long will cause them to bottom out against the drywall or the framing studs. This prevents the hold from tightening, making it unsafe. Using bolts that are too short means they won’t fully engage the T-nut threads, risking a failure. Always ensure at least 3-5 full thread turns are engaged.
Ignoring the “Fall Zone”: Parents often focus so much on the wall that they forget the floor. A child falling from even three feet can sustain an injury if they land on a hard surface. Never use thin yoga mats or blankets. Professional bouldering pads or high-density foam mats are non-negotiable for a safe home setup.
Limitations and Trade-offs
While modular walls are superior to fixed systems, they are not without constraints. Understanding these trade-offs helps you set realistic expectations for your home playground.
Space is the most significant limitation. A vertical wall is easy to fit, but true bouldering often requires “overhanging” sections to challenge older children. These angled walls take up significant floor space and require more complex framing. If you have a small room, a vertical traverse wall is a better compromise than a cramped overhanging wall.
Cost is another factor. A single high-quality climbing hold can cost between $5 and $20. Outfitting a full 8’x8′ wall can easily cost several hundred dollars in holds alone. While you can save money by buying “seconds” or used holds, the initial investment for a modular system is significantly higher than a basic wooden ladder or plastic play set.
Maintenance is a recurring requirement. Unlike a fixed plastic slide, a modular wall needs regular check-ups. Bolts can loosen over time due to wood expansion and vibration. You must commit to tightening the holds every few weeks to ensure they don’t spin while a child is climbing. The plywood should also be inspected for splinters or cracks annually.
The Fixed Wall vs The Fluid System
Understanding the difference between these two approaches is key to long-term success. The following table compares the measurable factors of each style.
| Feature | Fixed Wall (The Fixed) | Modular System (The Fluid) |
|---|---|---|
| Initial Setup Cost | Lower (Fewer holds, basic mounting) | Higher (T-nuts, more holds, framing) |
| Mental Engagement | Low (Static patterns) | High (Infinite route options) |
| Lifespan of Interest | Weeks to Months | Years |
| Maintenance Level | Very Low | Moderate (Periodic bolt checks) |
| Skill Development | Basic motor skills | Advanced technique and strategy |
Practical Tips and Best Practices
Applying a few “pro” techniques can elevate your wall from a basic DIY project to a professional-feeling training center. These tips improve the user experience and the aesthetics of the room.
- Use Color-Coded Routes: Group your holds by color to create specific “paths.” A “Red Route” might be easy, while a “Blue Route” requires more technical moves. This helps kids set goals and track their progress.
- Texture Your Paint: Mix a small amount of fine sand into your paint or use a specialized “deck grip” coating. This gives the plywood a texture similar to real rock, allowing kids to “smear” their feet against the wall for balance.
- Mark Your Studs: After the wall is up, use a permanent marker or a small piece of tape on the floor to show where the studs are located. This helps you avoid trying to bolt a hold into a spot that is blocked by wood behind the panel.
- Install a “Finish” Hold: Place a unique, brightly colored hold or a small bell at the very top. Having a clear “win state” encourages children to finish the climb even when they feel tired.
Advanced Considerations for Serious Practitioners
If your child becomes a dedicated climber, you may want to expand the system beyond simple flat panels. Scaling the wall allows for more advanced training and varied movement patterns.
Adding “Volumes”: Volumes are large wooden boxes or triangles that bolt onto your T-nut grid. They change the geometry of the wall, creating “features” like corners or arêtes. Because volumes often have their own T-nuts, you can mount regular holds on top of them. This adds a third dimension to a flat wall.
Adjustable Angles: Serious home walls often feature a “MoonBoard” or a “Kilter Board” style adjustable frame. Using a heavy-duty hinge system at the base and a winch at the top allows you to change the wall from vertical (easy) to 40 degrees overhanging (expert). This requires significant engineering and structural reinforcement but offers the ultimate training tool.
Integration with Technology: You can install LED kits behind the plywood that shine through the T-nut holes. Using a smartphone app, you can “light up” specific holds to show a route. This is the gold standard for modern climbing gyms and makes the wall incredibly engaging for tech-savvy kids.
Examples and Scenarios
To visualize how this works, consider a typical “Growth Scenario.” A family builds an 8-foot wide by 8-foot tall wall in their basement for a 4-year-old. They start with 40 large, easy-to-grab “jug” holds placed close together in a random pattern. The child spends the first six months simply getting comfortable with the height.
Fast forward to age six. The parents rearrange the holds into three distinct color-coded routes. The “Yellow Route” is a ladder. The “Green Route” requires the child to move sideways across the wall (traversing). The “Blue Route” uses smaller holds that require more finger strength. The child is no longer just “climbing”; they are “training.”
By age nine, the child has developed significant skill. The parents add a small overhanging “roof” section at the top and introduce “volumes” to create a 3D experience. The wall has remained the central feature of the playroom for five years, adapting to every stage of the child’s physical growth. This is the power of a fluid system.
Final Thoughts
Building a DIY modular climbing wall is one of the most impactful projects you can undertake for your child’s play space. It rejects the “one and done” nature of traditional toys in favor of a system that evolves. By prioritizing a high-density T-nut grid and quality materials, you ensure that the wall remains a fresh challenge for years to come.
Focus on the fundamentals first: 3/4-inch plywood, a sturdy frame with a clearance gap, and a safe landing zone. Once the structure is sound, the real fun begins with route setting. Treat the wall like a laboratory for your child’s physical and mental growth. Experiment with different hold types, angles, and challenges.
Start small if you need to, but always build with modularity in mind. The ability to change the path is what keeps the brain growing. As your child masters one route, you simply turn a wrench to create the next one. You are providing more than just exercise; you are giving them a lifelong lesson in how to solve problems, one handhold at a time.
Sources
1 uncarvedblock.com.au | 2 eldowalls.com | 3 playfuntastic.com | 4 outdoortoys.com | 5 resilite.com | 6 instructables.com | 7 everlastclimbing.com | 8 ucsspirit.com | 9 gearjunkie.com | 10 elementclimbing.com | 11 ledgeclimbing.com | 12 growingslower.com | 13 homedepot.com | 14 pacificplayground.com