Durable Diy Backyard Playground Materials
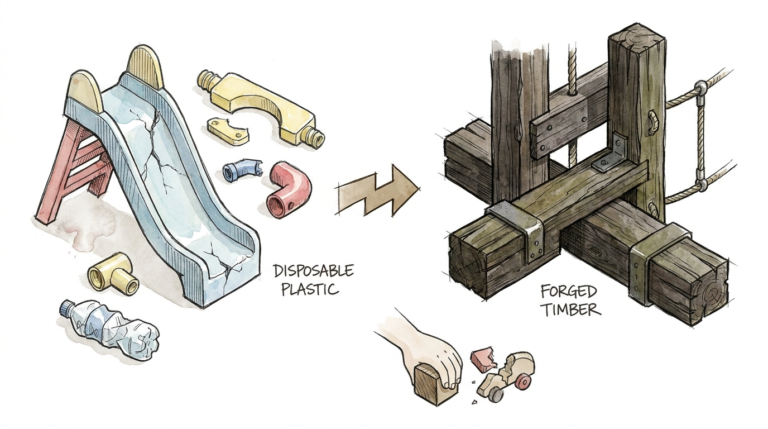
One is a five-year commitment to the landfill; the other is a fifty-year legacy for three generations. The modern ‘box store’ playground is designed for planned obsolescence. If you want a play space that survives your kids and waits for your grandkids, you have to trade the hollow plastic for the density of resilient timber.

Building a backyard playground is more than just a weekend project. It is an investment in the childhood of your family. When you choose the right materials, you are choosing how many times you want to rebuild this structure over the next few decades.
Most off-the-shelf kits use thin, brittle wood that warps before the first season is over. By focusing on durable DIY backyard playground materials, you ensure that every swing, climb, and jump happens on a foundation that can handle the elements and the energy of growing children.
This guide will walk you through the world of high-density timbers, corrosion-resistant hardware, and the structural choices that separate a temporary toy from a permanent landmark in your backyard.
Durable Diy Backyard Playground Materials
Durable materials are the foundation of any structure that lives outside 365 days a year. In the world of playgrounds, “durable” means more than just being strong; it means being resistant to rot, UV degradation, insect infestation, and the physical stress of active play.

The primary material for high-end DIY builds is premium timber. Unlike the pressure-treated pine found at local lumber yards—which often uses chemicals to mimic durability—naturally resilient woods like Redwood and Western Red Cedar contain tannins and oils that protect the wood from the inside out. These materials are “temperature neutral,” meaning they don’t burn little hands in the summer or become brittle and crack in the freezing winter.
Beyond the wood, durability extends to the hardware. Using standard zinc-plated screws in an outdoor environment is a recipe for “bleeding” and structural failure. True durability requires hot-dipped galvanized steel or stainless steel components that can withstand moisture without rusting through the core of your posts.
Finally, the ground surfacing itself is a material consideration. Whether you choose engineered wood fiber or rubber mulch, the goal is to create a soft landing that doesn’t wash away or decompose into a muddy mess after the first rainstorm.
How to Select and Prep Your Playground Materials
Choosing your materials is only the first step. You must understand how these materials interact with the environment to maximize their lifespan. Not all “Cedar” is created equal, and not all “Galvanized” hardware offers the same protection.
Lumber Grades and Selection
When shopping for lumber, you want to look for “Heartwood” rather than “Sapwood.” The heartwood is the dense, inner core of the tree. It contains the highest concentration of natural preservatives. Sapwood is the lighter, outer ring that is more prone to moisture absorption and rot.
For structural posts, 4×4 or 4×6 dimensions are the gold standard. Thinner 2×4 posts might be cheaper, but they are prone to bowing under the weight of a swing set. If you are using Redwood, aim for “Construction Heart” or “Deck Heart” grades to ensure maximum longevity without the premium price of “Clear Heart” grades.
Hardware Standards
Never use standard deck screws for load-bearing playground joints. Instead, utilize 1/2-inch or 3/8-inch carriage bolts with locking nuts. Movement is the enemy of a long-lasting playground. Over time, kids swinging and jumping create vibrations that back out standard screws. Nylon-insert lock nuts ensure that once a bolt is tightened, it stays tight for years.
Surface Preparation
The secret to a 50-year playground is keeping the wood away from standing water. This starts with ground prep. Excavate the area and install a layer of crushed stone for drainage before adding your safety mulch. For the posts themselves, consider using “post sleeves” or mounting them on concrete piers above the grade to prevent the “wicking” of moisture from the soil into the end-grain of the timber.
Benefits of High-Density Timber Playgrounds
The most immediate benefit is safety. High-density timbers like Redwood and Cedar are less likely to splinter than cheap, fast-growth pine. This means fewer emergency trips for tweezers and more time playing. Because these woods are naturally stable, the structure remains “true” and level over time, preventing the wobbling that plagues cheaper sets.
Aesthetics play a huge role in the value of your property. A weathered, silver-patina Redwood fort looks like a natural extension of a high-end landscape, whereas a faded, peeling plastic playset often becomes an eyesore. A well-built timber playground can actually increase the curb appeal of a home.
Environmental health is another major factor. Naturally resistant woods don’t require the heavy chemical cocktails used in traditional pressure-treated lumber. This creates a “cleaner” play environment where children aren’t touching wood treated with copper or other heavy metals. You are building with a renewable resource that, eventually, will return to the earth without leaving a toxic footprint.
Challenges and Common Building Mistakes
The biggest challenge is the upfront cost. Premium materials like Redwood can cost three to four times more than standard pressure-treated pine. However, when you factor in the “cost per year of use,” the premium timber actually becomes the cheaper option. A $500 kit that lasts 5 years costs $100 per year. A $3,000 custom build that lasts 50 years costs only $60 per year.
A frequent mistake is the use of “mixed metals.” If you use stainless steel screws with galvanized brackets, you may trigger galvanic corrosion, where one metal eats the other. Stick to one type of hardware throughout the entire build—ideally hot-dipped galvanized for most residential applications.
Another common pitfall is ignoring the “end-grain.” The ends of your posts are like straws; they suck up moisture faster than the sides of the board. If you don’t seal the end-grain with a dedicated wax-based sealer or a high-quality stain, the posts will rot from the bottom up, even if the rest of the structure is perfectly maintained.
Limitations: When Premium Timber May Not Work
In extremely humid, tropical climates where the ground never truly dries out, even the best Redwood has its limits. In these specific environments, you may need to look into composite materials or recycled plastic timbers for the components that sit in direct contact with the soil. These materials offer zero rot potential, though they lack the structural “stiffness” of real wood and may require more frequent support joists.
Budget constraints are a real boundary. If you cannot afford a full Redwood or Cedar build, the best compromise is to use premium timber for the “touch points” (railings, ladders, decks) and use high-quality pressure-treated lumber for the hidden structural sub-frame. This allows you to prioritize safety and skin-contact areas while staying within a tighter budget.
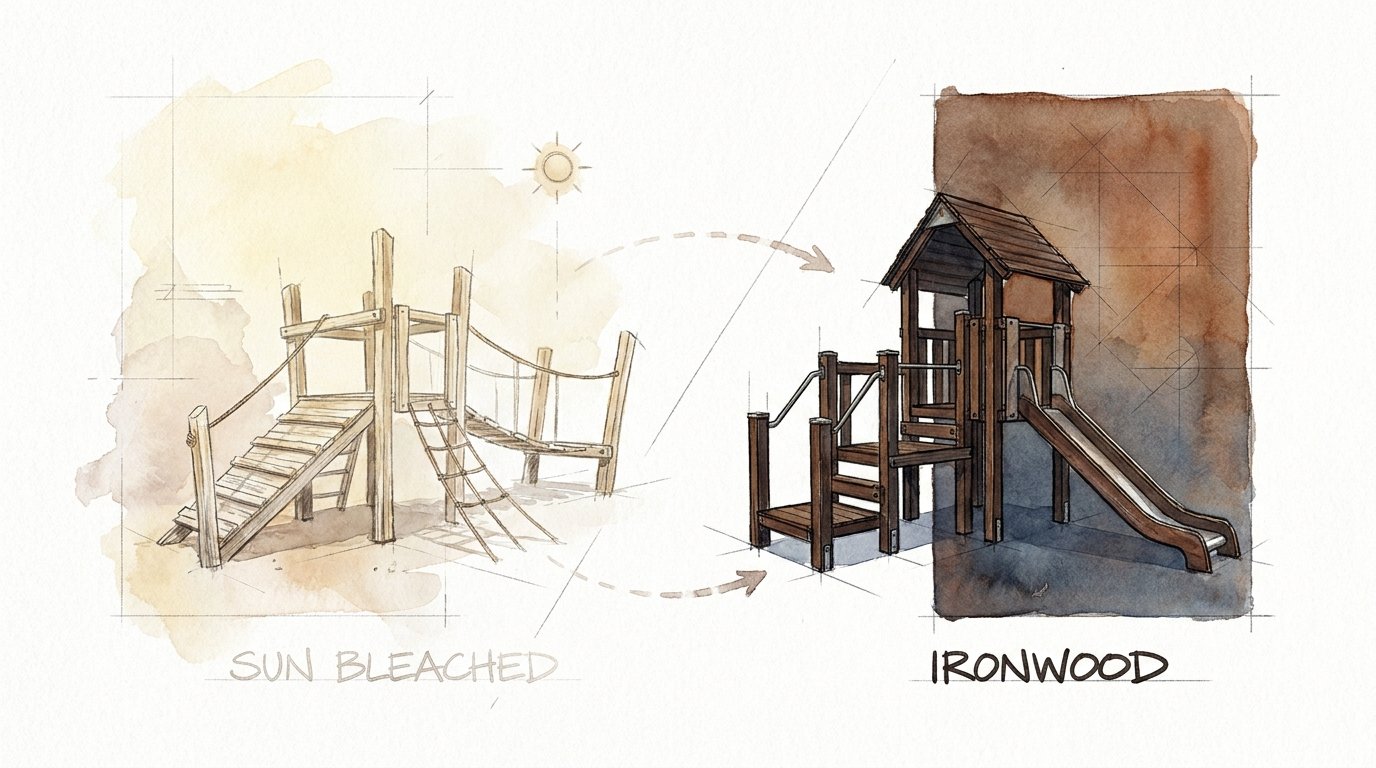
SUN BLEACHED vs IRONWOOD: Choosing Your Path
When it comes to the final look and protection of your playground, you generally face two distinct paths: the natural, weathered look or the deep, protected finish. These aren’t just colors; they represent different philosophies of maintenance and longevity.
| Factor | SUN BLEACHED (Natural/Weathered) | IRONWOOD (Dark/Protected) |
|---|---|---|
| Primary Aesthetic | Silvery-gray, rustic, coastal. | Deep espresso, modern, rich. |
| Maintenance Level | Low: Requires occasional cleaning. | Medium: Requires re-staining every 2-3 years. |
| UV Protection | Low: The graying is the result of UV. | High: Pigments block UV rays. |
| Surface Feel | Textured, potentially drier. | Smooth, supple, oily protection. |
| Best Wood Match | Cedar, White Oak. | Redwood, Ipe, Douglas Fir. |
Choosing the SUN BLEACHED path means leaning into the natural aging process. This is ideal for those who want a “set it and forget it” playground that blends into a natural or wooded backyard. The graying doesn’t necessarily mean the wood is failing; it is simply the natural patina of the wood’s surface cells protecting the core.
The IRONWOOD path is for those who want the playground to look brand-new for decades. By using a high-pigment, oil-based stain, you are effectively “feeding” the wood. The oils penetrate the fibers to keep them flexible, while the dark pigments act like sunblock for your lumber. This path offers the ultimate 50-year protection but requires a commitment to a weekend of staining every few years.
Practical Tips for a Lifetime Build
- Round Every Edge: Use a 1/4-inch round-over bit on a router for every single piece of wood. This doesn’t just prevent splinters; it helps paint and stain adhere better to the corners.
- Pre-Drill Everything: To prevent the wood from splitting, always pre-drill your bolt holes. Use a bit that is 1/16-inch smaller than the bolt for a snug fit.
- Use Swing Hangers with Bearings: Standard “eyebolt” hangers create metal-on-metal friction that squeaks and eventually shears off. Heavy-duty hangers with nylon or ball bearings are silent and last a lifetime.
- Install a Weed Barrier: Before you dump your mulch, lay down a professional-grade landscape fabric. This keeps the dirt and mulch separate, which prevents the mulch from turning into soil and rotting your posts.
Advanced Considerations for Serious Builders
If you are building a large, multi-level fort, you need to consider “Dynamic Load.” This is the force generated when a group of kids all run to one side of the structure at once. Adding diagonal bracing (K-braces) to every corner of your tower is not optional for a 50-year build; it is a structural necessity.
Scaling your playground for the future is also key. A playground designed for a toddler is useless in four years. Build your decks at 5 feet or 7 feet high. This allows you to install larger, more exciting slides and climbing walls that will remain challenging for your children until they are teenagers. Use modular “bolt-on” designs so you can swap a baby swing for a tire swing or a trapeze bar as your kids’ skills evolve.
Scenario: The “Eternal Fort” Project
Imagine you are building a 10×10 clubhouse. You start with four 6×6 Redwood posts. Instead of burying them, you set them into galvanized “post anchors” bolted into concrete footings that sit 2 inches above the grass. This simple move alone adds 20 years to the life of the structure by eliminating ground-contact rot.
For the decking, you use 2×6 Cedar boards spaced 1/8-inch apart to allow for expansion and drainage. You fasten them with stainless steel trim-head screws that vanish into the wood. Finally, you apply a deep chocolate “Ironwood” finish to the structure. Every three years, you spend two hours with a pump sprayer refreshing the stain. Thirty years later, your grandchildren are playing in that same fort, and the wood is as solid as the day you bought it.
Final Thoughts
Building with durable DIY backyard playground materials is an act of foresight. It is the refusal to accept the “disposable” culture of modern retail. By selecting the right timber, the right hardware, and the right finish, you create more than just a place to play; you create a landmark of childhood stability.
The extra effort you put into ground prep and material selection today will pay dividends for decades. While the neighbor’s plastic set is cracking in the sun and heading for the landfill, your timber legacy will still be standing—strong, safe, and ready for the next generation of adventurers.
Do not be afraid of the complexity. Start with a solid plan, buy the best lumber your budget allows, and take your time. The memories you are building are just as permanent as the Redwood and steel you are using to build them.
Sources
1 playworx.com | 2 thetravelingred.com | 3 swingsetwarehouse.com | 4 stikwood.com | 5 playsetservices.com | 6 aaastateofplay.com | 7 honolulu.gov | 8 atozwoodcompany.com | 9 discountplaygroundsupply.com