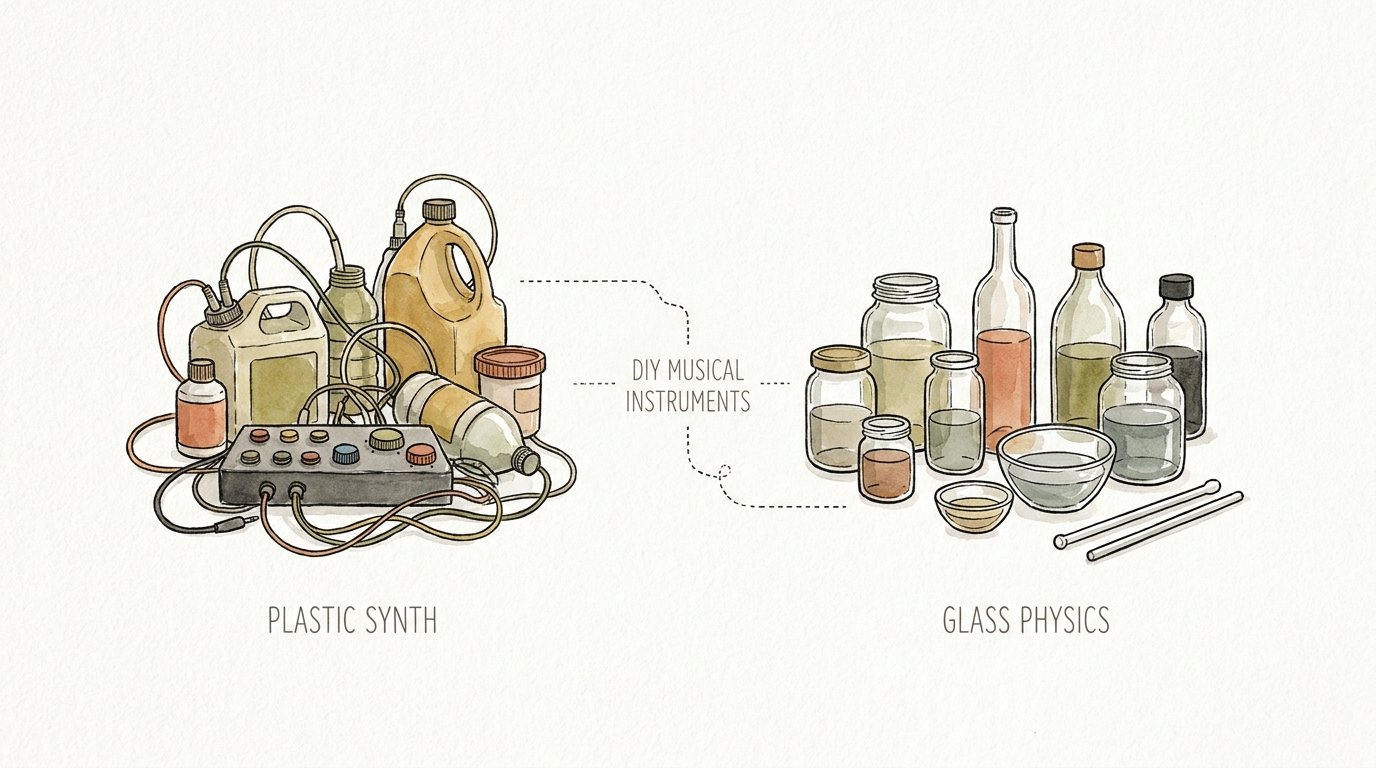
Diy Musical Instruments From Kitchen Items
Your kitchen cabinets contain a better orchestra than the toy store’s premium aisle. The $100 plastic keyboard teaches a child to press a button and receive a pre-recorded sound. The ‘Glass Orchestra’ teaches them that frequency is tied to volume and mass. One is a consumption device; the other is a physics laboratory. When you open a drawer to find a whisk, a spatula, or a set of measuring cups, you are not just looking for cooking tools. You are looking at a collection of acoustic resonators, friction idiophones, and percussion surfaces that can explain the fundamental laws of the universe.

Modern toys often abstract the relationship between cause and effect. A digital sound chip removes the physical labor of creating a vibration, replacing the nuance of a strike with a binary signal. In contrast, using everyday items to create music forces a direct engagement with material science. You learn that a heavy cast iron skillet produces a different decay than a thin aluminum lid. You discover that a half-full glass of water vibrates slower than an empty one. This is the difference between learning a result and learning a process.
Diy Musical Instruments From Kitchen Items
Diy musical instruments from kitchen items are functional sound-making devices created using common household objects like glassware, metal pots, plastic containers, and silverware. This practice exists at the intersection of music education and physics, allowing individuals to explore acoustics without expensive equipment. These instruments serve as the primary tools for “found sound” percussion and experimental melodic arrangements. They are used in classrooms to demonstrate STEM concepts, in therapy to encourage sensory play, and by professional musicians looking for unique, organic timbres for recordings.
The kitchen is a unique environment for acoustics because it houses a vast array of materials with different densities and elasticities. Metal provides bright, sustained tones through resonance. Glass offers clear, crystalline pitches that can be tuned with liquid. Plastic provides muted, percussive thuds that mimic bass drums or tom-toms. Even the handles of spoons can become mallets with distinct hardness levels, affecting the “attack” of the sound produced. This variety makes the kitchen a comprehensive sound library for anyone willing to experiment.
Real-world applications of these instruments go beyond simple play. Professional percussionists often use “junk percussion” to add layers of texture to orchestral scores. Sound designers for film and video games frequently record kitchen items—like a knife sharpening on a stone or a metal bowl scraping across a counter—to create otherworldly effects. By understanding how to manipulate these objects, you gain access to a professional-grade foley studio and a melodic ensemble located right next to your refrigerator.
How the Physics of Your Pantry Works
Every sound you hear is a result of a physical vibration traveling through a medium, usually air. In the kitchen, you manipulate three primary factors to change how an object sounds: mass, tension, and length. Understanding these principles allows you to “tune” a colander or a rubber band with surprising precision.
The Water Xylophone: Mass and Frequency
The water glass xylophone is the most recognizable melodic instrument in the kitchen. When you strike a glass with a spoon, the glass itself vibrates. This vibration is transferred to the air inside and around the glass, reaching your ears as a specific pitch. Adding water increases the total mass of the vibrating system. Because it takes more energy to move a greater mass, the glass vibrates more slowly. Slower vibrations result in a lower frequency, which our ears perceive as a lower pitch.
Percussion Surfaces: Material Density
Percussion in the kitchen relies on the “timbre” or tone quality of materials. A stainless steel pot lid has high elasticity, meaning it returns to its original shape quickly after being struck, allowing it to ring out like a cymbal. A plastic Tupperware container has high internal damping, which stops the vibration quickly and creates a short, punchy sound. You can think of a large pot as a bass drum and a small ceramic ramekin as a high-pitched woodblock.
String Theory with Rubber Bands
Stretching a rubber band over a tissue box creates a simple chordophone. The pitch of the rubber band is determined by its tension and its length. Tightening the band increases the potential energy and allows it to vibrate faster, raising the pitch. Shortening the “vibrating length” by pressing a finger down on the band also increases the frequency. This mimics the mechanics of a guitar or a violin, providing a tactile lesson in how string instruments function.
Step-by-Step Construction Guide
Building a full kitchen orchestra requires attention to detail and a bit of scientific curiosity. Follow these steps to create a balanced ensemble.
Constructing the Chromatic Glass Harp
First, gather six to eight identical glass jars or wine glasses. Using identical containers is crucial because it ensures the only variable affecting the pitch is the amount of water. Line them up on a flat, stable surface. Pour a small amount of water into the first glass and a larger amount into the last.
Next, use a digital tuner app on your smartphone to find a specific note, such as C4. Strike the glass gently with a wooden skewer. If the pitch is too high, add a few drops of water to increase the mass. If it is too low, remove some water. Repeat this process for each glass until you have a full major scale.
Finally, add a few drops of food coloring to each glass. This serves a practical purpose beyond aesthetics; it helps the player visually identify the notes of the scale. A red glass might always be “Do,” while a blue glass represents “Sol.”
Building the “Tupperware” Drum Kit
Select three plastic containers of varying sizes. A large mixing bowl acts as your kick drum, a medium sandwich container as your snare, and a small lid as your hi-hat. Secure the lids tightly to trap air inside, which acts as a resonator for the vibration.
Place these containers on a soft towel. The towel prevents the containers from sliding and stops the table surface from vibrating, which would muddy the sound. This is called “decoupling” the instrument from its environment.
Experiment with different mallets. A metal spoon provides a sharp, bright attack, while a wooden spoon wrapped in a thick rubber band creates a soft, muffled sound similar to a felt-covered drum mallet.
Designing a Silverware Wind Chime
Find an old metal colander and a handful of stainless steel spoons and forks. Tie a piece of fishing line or twine to the handle of each piece of silverware. Loop the other end of the twine through the holes in the colander so the silverware hangs at different heights.
Position the silverware so that they barely touch one another. When a breeze or a hand moves them, the metal-on-metal contact creates a series of high-frequency “pings.” Because each spoon has a slightly different mass and shape, the resulting sound is a complex, shimmering chord.
Benefits of Kitchen-Based Music
Choosing to build instruments from kitchen items offers cognitive and practical advantages that commercial toys cannot match. These benefits span across educational development, economic savings, and environmental sustainability.
Cognitive and STEM Development
Building these instruments turns abstract physics concepts into tangible experiences. A child doesn’t just read about frequency; they feel the vibration of the glass change as they pour water. This hands-on learning reinforces “object permanence” and cause-and-effect reasoning. It also encourages “divergent thinking,” as the learner must look at a common object like a cheese grater and imagine it as a musical scraper or “guiro.”
Economic Accessibility
Musical education is often gated by the high cost of entry. Professional-grade instruments can cost thousands of dollars, and even entry-level keyboards require a significant investment. Kitchen instruments are essentially free, utilizing items already present in the home. This democratizes music education, ensuring that any curious mind can explore the world of sound regardless of their financial situation.
Sensory and Fine Motor Integration
The act of tuning a glass or plucking a rubber band requires precision and delicate motor control. For younger learners, these activities help develop the hand-eye coordination necessary for writing and other complex tasks. The variety of textures—the coldness of the glass, the roughness of a wooden spoon, the elasticity of a rubber band—provides a rich sensory environment that stimulates brain development.
Challenges and Common Mistakes
While the kitchen is a great laboratory, several common errors can hinder the quality of the sound or the success of the project. Being aware of these pitfalls ensures a more rewarding experience.
The Damping Problem
A common mistake is placing instruments directly on a hard, resonant surface like a granite countertop. When you strike a pot on a stone counter, the vibration travels directly into the stone, which absorbs the energy and “kills” the sound. This results in a dull thud rather than a ringing tone.
To avoid this, always use a “damper” or an insulator. A simple kitchen towel or a silicone baking mat placed under your instruments will isolate the vibration. This allows the object to vibrate freely in the air, resulting in a much clearer and longer-lasting sound.
Over-Stressing Materials
When building string instruments with rubber bands, there is a temptation to stretch them as tightly as possible to achieve high notes. However, most household containers are not designed to withstand high tension. Excessive force can cause plastic containers to buckle or tissue boxes to collapse, ruining the instrument.
Instead of over-tightening, use thinner rubber bands for higher pitches. Thinner bands have less mass and naturally vibrate at higher frequencies without needing extreme tension. This protects your “instrument body” and prevents the bands from snapping during a performance.
Incorrect Striking Technique
Beginners often hit kitchen items too hard, thinking volume is the goal. For glass instruments, excessive force can lead to shattering. For metal items, it can create “overtones” that are harsh and unmusical. The “sweet spot” for most kitchen items is near the rim or the center of a flat surface, struck with a light, flicking motion of the wrist.
Limitations and Realistic Constraints
It is important to recognize that diy musical instruments from kitchen items have inherent boundaries. They are not intended to replace professional instruments but to complement them as educational and experimental tools.
| Feature | Kitchen Instruments | Professional Instruments |
|---|---|---|
| Tuning Stability | Low (Water evaporates, bands stretch) | High (Mechanical tuners) |
| Durability | Fragile (Glass can break) | Robust (Designed for travel) |
| Volume | Moderate (Requires close proximity) | High (Designed for concert halls) |
| Cost | Near Zero | Variable ($100 – $10,000+) |
| Learning Curve | Immediate/Intuitive | Steep (Requires formal study) |
Environmental factors also play a significant role. If you are using a water xylophone, the pitch will slowly rise over several days as the water evaporates, decreasing the mass in each glass. Similarly, humidity can affect the tension of rubber bands or the resonance of wooden spoons. These instruments require constant recalibration, which can be seen as a limitation or a further opportunity for learning.
Practical Tips for Success
To get the most out of your kitchen orchestra, apply these optimization techniques. Small adjustments can make a significant difference in the clarity and musicality of your sounds.
- Use a Tuner App: Do not rely solely on your ears if you want to play recognizable songs. Free chromatic tuner apps can tell you exactly which frequency your glass is producing, making the tuning process much faster.
- Vary Your Mallets: Keep a collection of “beaters.” A metal fork, a wooden spoon, a plastic spatula, and a silicone whisk all produce different sounds on the same pot. Changing the mallet is the easiest way to change the “voice” of your instrument.
- Mind the Material: Not all glasses are created equal. Lead crystal vibrates much longer than standard soda-lime glass. If you want a “singing” glass effect, crystal is the superior choice due to its high lead content and structural regularity.
- Temperature Matters: Warm water is slightly less dense than cold water. While the difference is negligible for a casual setup, serious practitioners might notice a slight pitch shift if they fill their glasses with boiling water versus ice water.
Advanced Considerations for Serious Practitioners
For those who wish to take kitchen acoustics into a professional or artistic realm, the focus shifts to recording and digital manipulation. This is where the “physics laboratory” meets the modern recording studio.
The history of glass music provides a roadmap for advanced study. In 1761, Benjamin Franklin took the concept of “singing glasses” and mechanized it into the Glass Armonica. He replaced individual water-tuned glasses with a series of nested glass bowls on a rotating rod. This allowed the player to perform complex chords and melodies by simply touching the spinning rims with moistened fingers. Understanding this history can inspire you to move beyond striking objects and toward “friction” based sound production.
In the digital age, many composers use “sampling” to turn kitchen sounds into high-quality virtual instruments. By recording a single strike of a copper pan at a high sample rate (e.g., 96kHz), you can then drop that sound into a digital audio workstation (DAW). You can stretch the pitch, add reverb, and trigger the sound with a MIDI keyboard. This allows you to play a “cast iron piano” or a “silverware synthesizer,” blending the organic physics of the kitchen with the infinite possibilities of digital processing.
Examples and Scenarios
Imagine a Saturday morning with the family. Instead of turning on the television, you decide to form the “Cabinet Quintet.” You assign roles based on the acoustic properties of the items found.
The youngest child takes the “Percussion Station,” which consists of three plastic bowls and two wooden spoons. Their job is to provide the steady “heartbeat” or bass note of the group. Because the plastic is muted, it won’t drown out the more delicate sounds.
The older child manages the “String Section”—a series of rubber bands stretched over an empty cereal box. They focus on the rhythm, strumming the bands to provide a middle-frequency texture. They quickly learn that moving the box against the table changes the resonance, adding a “wah-wah” effect to their playing.
You take the lead on the “Melodic Glasses.” Having tuned them to a simple C-major scale, you can play the melody of “Twinkle Twinkle Little Star.” Because you used food coloring, the children can easily follow along, knowing that “Red-Red-Blue-Blue” corresponds to a specific part of the song. This collaborative environment fosters teamwork and listening skills, all while teaching the fundamental laws of vibration and frequency.
Final Thoughts
The kitchen is not just a room for food preparation; it is a profound educational resource that challenges the “button-pressing” culture of modern technology. By engaging with DIY musical instruments from kitchen items, you reclaim the direct connection between physical action and acoustic result. You move from being a consumer of pre-recorded sounds to an explorer of physical laws.
These experiments reinforce the idea that science and art are not separate disciplines. To make a glass “sing” perfectly, you must understand mass and friction. To play a rhythm on a pot lid, you must understand timing and resonance. This integrated approach to learning creates a more holistic understanding of the world, proving that the most complex scientific principles can be found in the simplest household objects.
Whether you are a parent looking for a rainy-day activity, a teacher designing a STEM curriculum, or a musician seeking new textures, the kitchen offers infinite possibilities. Start with a single glass and a spoon. Observe how the sound changes. Then, expand your orchestra, one drawer at a time, and listen to the physics of your home come to life.
Sources
1 imthecheftoo.com | 2 greatstart.tas.gov.au | 3 globaldayofunplugging.org | 4 youtube.com | 5 themusicscientist.com | 6 scientificglassservices.co.uk | 7 pianobook.co.uk | 8 fi.edu | 9 youtube.com | 10 strazcenter.org | 11 homesciencetools.com | 12 boundlessbrilliance.org | 13 lsu.edu | 14 wikipedia.org | 15 britannica.com | 16 howstuffworks.com | 17 scifun.org | 18 kennedy-center.org | 19 babbledabbledo.com | 20 umich.edu