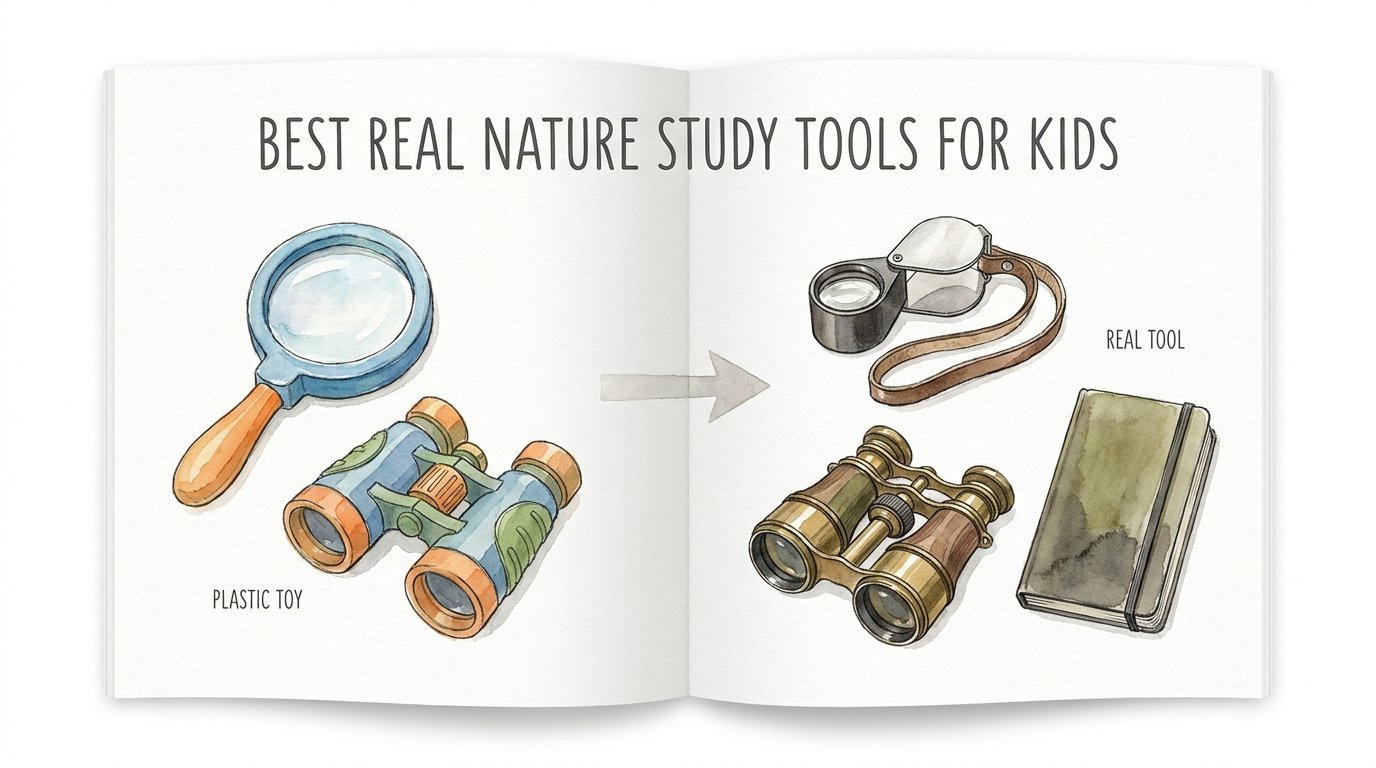
Best Real Nature Study Tools For Kids
The reason your child gets frustrated with nature isn’t their attention span—it’s the ‘toy’ in their hand. We give kids plastic versions of real things and then wonder why they lose interest after five minutes. A tool that fails is a lesson in frustration; a tool that works is an invitation to mastery. Switch to scaled-down professional gear and watch their engagement skyrocket.

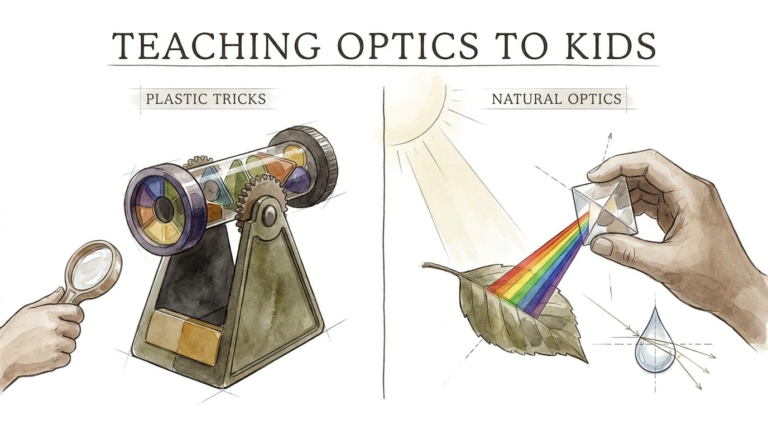
Most “exploration kits” sold in toy aisles are designed for landfill, not for learning. They feature blurry plastic lenses, flimsy hinges, and nets that tear on the first twig. When a child looks through a toy binocular and sees a smudged, dark image, they don’t blame the tool—they assume nature is boring. Real gear changes the internal narrative from “I can’t see it” to “I am a scientist.”
Best Real Nature Study Tools For Kids
Real nature study tools are professional-grade instruments scaled for smaller hands and lighter weights. These tools exist to bridge the gap between casual observation and scientific inquiry. They are used by ornithologists, botanists, and geologists to gather accurate data in the field.
A real tool offers precision. It uses optical glass instead of molded acrylic. It uses weather-treated steel and high-density polymers instead of brittle plastic. In the real world, these tools are used to identify species, track environmental changes, and document the hidden details of the ecosystem. For a child, using an Olympus 8×25 WP II binocular or a Bausch & Lomb Hastings Triplet isn’t just about seeing better; it is about being treated with the respect of a serious practitioner.
Examples of these tools include high-index prism binoculars, achromatic hand lenses, and archival-quality field journals. Imagine the difference between a blurry toy and a crisp, high-contrast view of a hawk’s talons. That clarity is what transforms a walk in the park into a focused expedition.
How to Choose Professional Gear for Small Hands
Selecting the right gear requires looking past the “kids” label and focusing on technical specifications. You are looking for professional entry-level equipment that fits a child’s physical dimensions.
Optical Magnification and Diameter
Magnification is often the first trap parents fall into. High magnification (10x or 12x) sounds better but is nearly impossible for a child to hold steady. Every slight hand tremor is magnified, resulting in a dizzying, shaky image. For children, 8x magnification is the “sweet spot.” It provides enough power to see detail while maintaining a stable image.
The objective lens diameter—the second number in 8×25—determines how much light enters the tool. A 25mm lens is large enough for a bright image but small enough to keep the unit lightweight. Look for multi-coated lenses to reduce glare and BAK-4 prisms for superior edge-to-edge clarity.
The Triplet Hand Lens
A standard magnifying glass is a “singlet” lens. It often distorts the edges of the image and shows “fringing” colors. A professional 10x Triplet Loupe uses three separate lenses bonded together. This design corrects for color and spherical aberration. When a child uses a triplet, the tiny veins on a leaf or the hairs on a bee’s leg appear perfectly sharp and true to life.
Field Journaling and Documentation
Documentation is the core of the scientific method. Avoid cheap spiral notebooks with thin paper. Professional naturalists use weather-resistant paper like Rite in the Rain or heavy-duty sketchbooks like Canson Mix Media. These allow for watercolor washes and ink drawings without the paper warping or tearing. Pair these with a 0.5mm archival ink pen to ensure their observations last for decades.
The Advantage of Professional Field Gear
The primary benefit of real gear is sustained engagement. When a tool works exactly as it should, the child’s focus remains on the specimen, not the equipment. A child who can actually see the serrated edge of a beetle’s mandible is a child who stays occupied for an hour.
Durability is another measurable advantage. Professional gear like the Celestron Nature DX series is often nitrogen-purged and O-ring sealed. This means it is waterproof and fog-proof. If it gets dropped in a puddle or used on a humid morning, it won’t be ruined. This reliability builds a child’s confidence, as they don’t have to “baby” a fragile toy.
Real tools also foster scientific literacy. Learning to calibrate a diopter on a binocular or find the focal point of a 10x loupe is a transferable skill. These are the same mechanics used in medical microscopes and survey equipment. You are giving them a head start on the technical world.
Common Traps in “Kid-Branded” Gear
The most frequent mistake is buying the “6-in-1 Explorer Kit.” These kits prioritize quantity over quality. They usually include a compass that doesn’t point north, a whistle that barely chirps, and a “microscope” that is essentially a hollow tube. These kits fail because they are designed by toy manufacturers, not optical engineers.
Another pitfall is excessive weight. While you want “real” gear, a full-sized 10×42 binocular may weigh over 1.5 pounds. This causes neck strain and leads to the tool being left in the car. Always check the weight—aim for under 12 ounces for younger children and under 20 ounces for teens.
Misunderstanding magnification is also common. Many parents assume a 30x pocket microscope is better than a 10x loupe. In reality, 30x magnification has a razor-thin focal plane. It is incredibly difficult for a child to keep the specimen in focus. A 10x lens is much more forgiving and often reveals more usable detail for a beginner.
When Professional Gear May Not Be Ideal
Real tools come with a higher price point. If a child is in a phase of “destructive play” where throwing and smashing are common, a $100 pair of binoculars is a poor investment. In these cases, high-quality “ruggedized” toys are a better bridge until the child develops the motor skills to handle glass optics.
Environmental limitations also play a role. If you live in an area with extreme saltwater spray, even “waterproof” gear requires rigorous freshwater rinsing after every use to prevent corrosion. If the maintenance of professional gear feels like a chore, it may dampen the fun of the outing.
Finally, consider the complexity of the interface. Some professional compasses require knowledge of “declination” to be useful. If the tool requires an hour of lecturing before it can be used, you might lose the “spark” of the moment. Always match the tool’s complexity to the child’s current frustration threshold.
Comparison: Toy Optics vs. Real Field Gear
| Feature | Toy “Explorer” Kit | Professional Scaled Gear |
|---|---|---|
| Lens Material | Molded Acrylic (Scratches easily) | Multi-Coated Optical Glass |
| Prism Quality | None or Plastic Mirrors | BAK-4 High-Index Prisms |
| Weatherproofing | None (Foggy in minutes) | Nitrogen-Purged / Waterproof |
| Focus System | Fixed or Loose Plastic Sliders | Damped Center Wheel + Diopter |
| Typical Lifespan | 1–3 Outings | 5–10+ Years |
Practical Tips for Field Mastery
To get the most out of these tools, you need to teach proper technique. A hand lens, for example, is not used like a magnifying glass. To use a 10x triplet loupe correctly, the child should hold the lens right up to their eye—almost touching their eyelashes—and then bring the object (like a flower or rock) toward the lens until it snaps into focus.
Use a harness instead of a neck strap for binoculars. This keeps the weight off the child’s neck and prevents the binoculars from swinging and hitting rocks when they lean over to look at the ground. It also keeps the tool “ready” at chest height, reducing the time between spotting a bird and seeing it.
Establish a “Gear Cleaning Ritual” after every hike. Teach the child to use a blower bulb and a microfiber cloth to remove dust from lenses. This isn’t just about maintenance; it’s about teaching the stewardship of professional equipment. A child who learns to care for a $50 tool is being prepared to care for a $500 tool later.
Advanced Considerations for Serious Explorers
As your child’s interest grows, consider adding specialized capture tools. A professional entomology net made of fine, soft mesh is essential for catching butterflies without damaging their wings. Cheap toy nets are often too abrasive and can tear delicate membranes.
For older students, look into digiscoping. This involves using a simple adapter to connect a smartphone to a binocular or spotting scope. This allows the child to take high-resolution photos of distant wildlife. It turns their nature study into a digital portfolio, which is excellent for science fair projects or long-term biodiversity tracking.
Don’t overlook the value of regional field guides. A general “Birds of the World” book is too overwhelming. A specific “Birds of [Your State]” guide by authors like Stan Tekiela or David Sibley provides a manageable set of data. When a child can successfully identify a bird in their own backyard, the dopamine hit reinforces the habit of observation.
The Backyard BioBlitz: A Practical Scenario
Imagine a Saturday afternoon. Instead of a “nature walk,” you announce a Backyard BioBlitz. Your child grabs their Olympus 8×25 binoculars, a BelOMO 10x Triplet, and a Rite in the Rain journal.
They start by scanning the canopy. With the real optics, they don’t just see a “brown bird”; they see the distinct white eye-ring and wing bars of a Ruby-crowned Kinglet. They jot down the date and the specific color of the bird’s crown in their waterproof journal.
Next, they find a patch of moss on an old oak tree. They bring the 10x loupe to their eye and lean in. Suddenly, the moss looks like a vast, vibrant forest. They see a tiny tardigrade or a springtail moving through the “trees.” They sketch the structure of the moss sporophyte, noting the texture of the capsule. Because the paper is high quality, their pencil doesn’t smudge, and the drawing looks like a real scientific plate. They have spent 45 minutes in a state of “flow” because their tools never got in the way.
Final Thoughts
Investing in real nature study tools is an investment in your child’s intellectual agency. When we provide kids with equipment that actually works, we tell them that their observations are important and their curiosity is worth a professional response. The transition from plastic to glass is often the moment a “hobby” becomes a lifelong passion for the natural world.
Start small. You don’t need a thousand dollars of laboratory equipment. A single pair of high-quality compact binoculars or a professional-grade hand lens can be the catalyst for years of discovery. These tools don’t just show them the world; they teach them how to look at it.
Encourage your child to experiment with these tools in different lightings and environments. Let them see the difference for themselves. Once they experience the clarity of a real tool, they will never want to go back to the toy aisle—and neither will you.
Sources
1 youtube.com | 2 space.com | 3 trueprepper.com | 4 urbannaturestore.ca | 5 wonderlearningliving.com | 6 babythinklab.com | 7 livescience.com | 8 hypergogo.com | 9 thekavanaughreport.com | 10 naeyc.org | 11 homeschoolinginprogress.com