Budget Diy Playground Ideas
Why are we financing plastic when the forest is giving away the best engineering tools for free? We are conditioned to think ‘play’ requires a credit card and a shipping container. In reality, the most complex, challenging, and rewarding play structures are currently lying on the forest floor waiting for an engineer with a shovel.

If you have ever watched a child ignore a $300 plastic playhouse to spend four hours digging a hole with a stick, you already understand the secret. Children do not want pre-packaged fun. They want raw materials. They want a world they can manipulate, change, and conquer. This guide is your blueprint for turning a patch of grass or a corner of the woods into a world-class developmental arena without the retail price tag.
Budget Diy Playground Ideas
A budget DIY playground is an outdoor space designed using natural or reclaimed materials rather than expensive, pre-fabricated kits. These spaces prioritize nature play—a concept where the environment itself provides the stimuli for physical and cognitive growth. Instead of a standard slide and swing set, a natural playground uses logs, boulders, sand, and plants to create a landscape of discovery.
These playgrounds exist because they fill a gap that modern plastic structures cannot. While a commercial set offers a fixed path of play, a natural play area is open-ended. A log can be a balance beam one minute, a pirate ship the next, and a seat for a forest tea party the minute after. You will find these designs in high-end “forest schools” and innovative city parks, but they are incredibly easy to replicate in your own backyard.
Visualizing this is simple. Think of a series of vertical tree stumps of varying heights for jumping. Picture a massive, fallen oak trunk stripped of its bark and polished smooth for climbing. Imagine a pit filled with smooth river stones and a “mud kitchen” made from an old wooden pallet and some stainless steel bowls. This is not just a place to burn energy; it is a laboratory for the senses.

How to Build a Natural Play Space Step-by-Step
Building a natural playground is more about curation and placement than complex carpentry. You are working with the weight and geometry of the materials provided by nature.
Step 1: Source Your Materials. Look for local arborists or tree removal services. They often have to pay to dispose of large logs and stumps. Often, they will drop them at your house for free just to save on dump fees. Seek out “hard” woods like cedar, redwood, or black locust, as these are naturally resistant to rot and insects without needing heavy chemical treatments.
Step 2: Prep the Site. Clear the area of any hazardous debris or sharp rocks. Ensure you have proper drainage. A play area that turns into a permanent swamp will not be used. If the ground is sloped, use it to your advantage by building “hill slides” or tiered climbing areas.
Step 3: Create the Anchor Points. For elements like stump jumps, you must secure the wood. Dig a hole roughly 1/3 the height of the stump. Add 2-3 inches of gravel at the bottom of the hole. This prevents the wood from sitting in standing water and rotting prematurely. Place the stump, level it, and backfill with soil or more gravel, tamping it down firmly.
Step 4: Craft the Balance Beam. Find a long, straight log. Use a chainsaw or a drawknife to strip the bark. Sand the top surface until it is smooth to the touch. To stabilize it, you can notch two smaller “cradle” logs to hold the main beam in place. Secure them with long, heavy-duty landscape screws or lag bolts to ensure nothing shifts during use.
Step 5: Install the Fall Zone. Safety is non-negotiable. For any structure where a child’s feet are more than 18 inches off the ground, you need a dedicated fall zone. This area should extend at least 6 feet in every direction from the equipment. Fill this zone with a minimum of 9 to 12 inches of loose material like engineered wood fiber, playground-grade mulch, or deep sand.
Benefits of Nature-Based Playgrounds
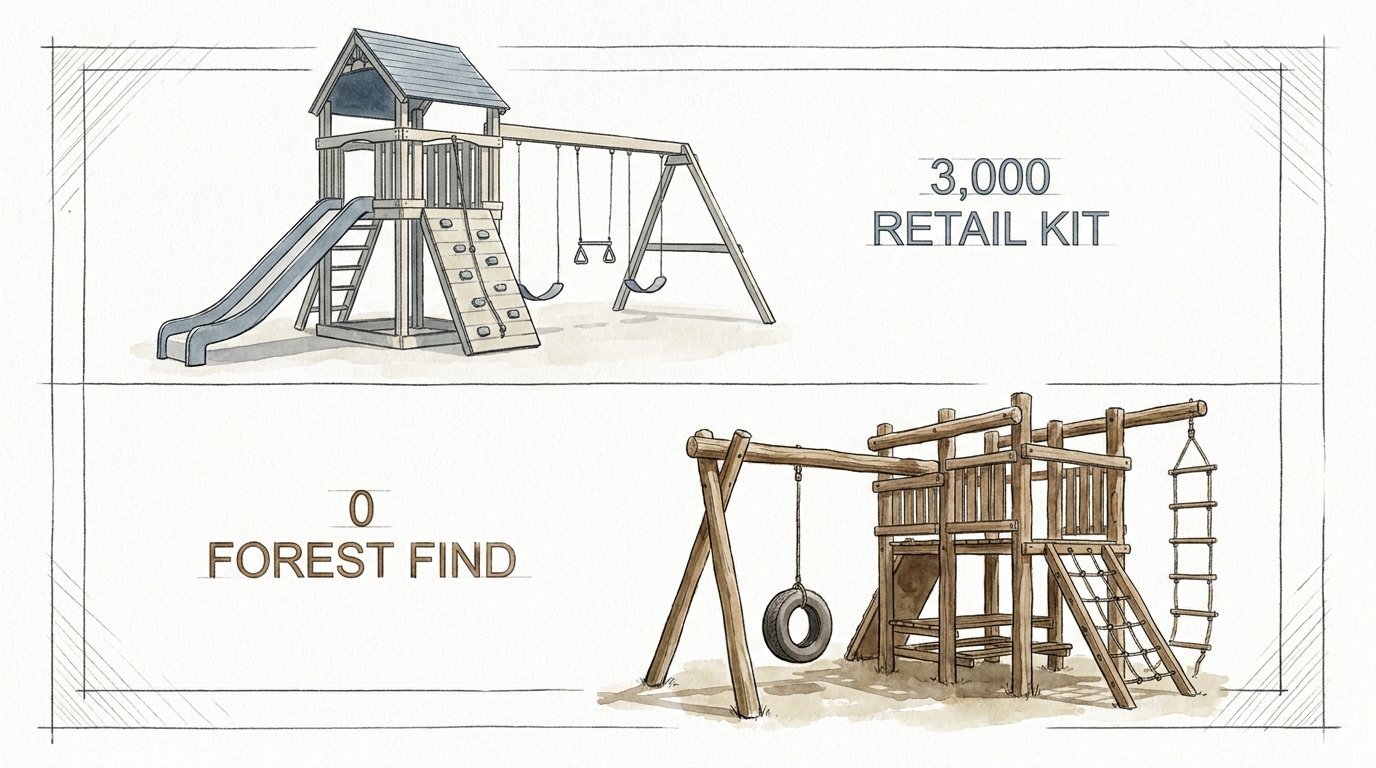
The most obvious benefit is the financial savings. While a high-quality wooden playset from a retailer can easily cost $3,000 or more, a forest-sourced playground can be built for the cost of a few bags of hardware and a weekend of labor.
Physically, natural play structures offer “varying” challenges. Unlike the uniform steps of a plastic ladder, a tree branch or a boulder has unique grips and angles. This forces children to use their core muscles and fine motor skills in ways they never would on a standard set. It builds proprioception—the body’s ability to sense its location, movements, and actions.
Mentally, these spaces reduce “play fatigue.” Because the environment is ever-changing (the mud changes consistency, the leaves fall, the sticks are moved), children stay engaged longer. Studies suggest that access to natural play areas can reduce stress, improve focus, and even boost the immune system through exposure to healthy soil microbes.
Common Mistakes to Avoid
The biggest error is ignoring the “Life of the Wood.” Not all logs are created equal. Using soft, fast-rotting wood like pine or birch for ground-contact posts will result in a structure that fails within two seasons. Always check the density and rot-resistance of your species before you put in the work.
Another frequent pitfall is insufficient fall surfacing. Grass is not a safety surface. It compacts over time and becomes as hard as concrete. If you skip the mulch or sand pit, you are significantly increasing the risk of a bone-fracturing impact. Always maintain the depth of your loose-fill material, as it will naturally compact and decompose over time.
Finally, do not forget the maintenance of the wood. Because natural wood is “alive,” it will check (crack) and weather. While some checking is normal and does not affect structural integrity, you must regularly inspect for splinters. A quick hit with a power sander once a season is often all it takes to keep the area safe for bare hands.
Limitations of DIY Natural Playgrounds
While these structures are incredible, they are not a “set it and forget it” solution. They require more active observation than a steel or plastic set. You are managing a biological material that will eventually return to the earth.
Space can also be a constraint. To accommodate the necessary 6-foot fall zones around large logs, you need a larger footprint than a compact “tower” style commercial set might require. If you have a tiny urban backyard, you may be limited to “loose parts” play (buckets, sticks, and stones) rather than large climbing logs.
There is also the aesthetic trade-off. Some neighborhoods or HOAs may view a pile of logs and a mud pit as “messy” rather than “educational.” You may need to use decorative borders, like cedar planks or woven willow edging, to define the space and signal to the neighbors that the “mess” is a deliberate, designed environment.
$3,000 Retail Kit vs $0 Forest Find
The choice between buying and building often comes down to what you value most: your time or your money.
| Feature | Commercial Retail Kit | DIY Forest Playground |
|---|---|---|
| Initial Cost | $1,500 – $5,000+ | $0 – $200 (for hardware/mulch) |
| Installation Time | 1 – 2 Days (Assembly) | 2 – 4 Weekends (Sourcing/Prep/Build) |
| Durability | High (Plastic/Treated Wood) | Variable (Depends on Wood Species) |
| Creativity Level | Low (Fixed paths) | High (Open-ended play) |
| Maintenance | Minimal | Moderate (Sanding/Checking) |
Practical Tips and Best Practices
If you want to build a space that lasts, focus on elevation and airflow. Whenever possible, keep wood from sitting directly in the dirt. Use “post shoes” or a thick bed of gravel to allow water to drain away from the base of your logs.
Optimize your “loose parts” inventory. A natural playground is only 50% fixed structures. The other 50% should be moveable. Provide a “Stick Library” with various lengths of branches, a “Rock Box” with smooth river stones, and a “Texture Bin” with pinecones, acorns, and dried seed pods. These are the tools of imaginative engineering.
Tools you will actually need:
- A high-quality Chainsaw for bucking logs to size.
- A Drawknife or Spud for removing bark (crucial for preventing rot and pests).
- An Angle Grinder with a sanding flap disc for smoothing out rough surfaces quickly.
- A Post Hole Digger for securing vertical stumps.
- Heavy-duty Structural Screws (like TimberLOK) that don’t require pre-drilling.
Advanced Considerations for Serious Practitioners
For those who want to take their backyard to the “forest school” level, consider integrating living structures. Willow tunnels are a perfect example. By planting willow whips in the spring and weaving them together, you create a living, growing play house that gets stronger every year.
Think about verticality and risk. Research shows that “risky play” (within reason) is essential for developing confidence. Instead of a flat balance beam, try a “log jam” where several logs are piled and secured at different angles. This forces the child to plan their route and assess their own ability.
Don’t ignore the sensory landscape. Use plantings to enhance the play. Plant lamb’s ear for its soft texture, mint for its scent (and durability against trampling), and tall grasses like Miscanthus to create natural “hiding” spots. The goal is to create a multi-sensory immersion, not just a place to climb.
Examples of Budget Play Scenarios
The “Stump-Hopper” Course: If you have limited space, source 10-12 stumps of various diameters. Install them in a zigzag pattern with heights ranging from 6 inches to 18 inches. This creates a challenging path that improves balance and agility. Total cost: Free logs + $40 in gravel.
The “Mud Kitchen” Station: Take two discarded shipping pallets. Sand them down thoroughly. Stack one horizontally as a countertop and attach the other vertically as a tool rack. Cut holes in the countertop to drop in old stainless steel mixing bowls. Add a few cheap wooden spoons and some old pots. Total cost: $0.
The “Hollow Log” Tunnel: If you find a massive, naturally hollowed-out log, you have hit the jackpot. Debark it, sand the interior smooth, and anchor it into a bed of wood chips. It becomes a crawl-through tunnel, a hiding spot, and a sound chamber all in one.
Final Thoughts
Building a budget DIY playground is an act of rebellion against the idea that childhood must be “purchased.” By choosing logs over links and stones over slides, you are giving children a gift that plastic cannot provide: a sense of ownership over their environment. They aren’t just playing on a structure; they are interacting with the earth.
Start small. You do not need to transform the entire yard in one weekend. Start with a single balance beam or a small circle of jumping stumps. Watch how your children use the space, and let their play guide your next addition. You are the engineer, but they are the consultants.
The forest has already done the heavy lifting by growing the materials. All you need is a shovel, a little sweat, and the willingness to let the “perfect” lawn go in favor of a perfect childhood. It is time to stop financing plastic and start building with the tools nature provided for free.
Sources
1 tierneyfamilyfarms.com | 2 mosquitojoe.com | 3 thezoofamily.com | 4 mrcrec.com | 5 bienenstockplaygrounds.com | 6 greenschoolyards.org | 7 penndutchstructures.com | 8 playgroundequipment.com | 9 robertsonsurfaces.com | 10 aaastateofplay.com | 11 woodlit.eu | 12 youtube.com | 13 childhoodbynature.com